The PT Boat Forum
http://www.ptboatforum.com/cgi-bin/MB2/netboard.cgi
ģ Forum Category: PT Boats of WWII
http://www.ptboatforum.com/cgi-bin/MB2/netboard.cgi?cid=101&fct=showf
ģ Forum Name: PT Boats - General
http://www.ptboatforum.com/cgi-bin/MB2/netboard.cgi?fct=gotoforum&cid=101&fid=102
ģ Topic:
RON 5 PT 105
http://www.ptboatforum.com/cgi-bin/MB2/netboardr.cgi?cid=101&fid=102&tid=4888
Recently while doing some research for my PT 105 build I come across an article where Dick Keresey skipper of the 105 stated all the RON 5 boats were painted a shade of grey, possibly gunship grey, I know colour pics are very scarce, so does anyone have any more thought on this ? Also on the engine room companion way 103 class boats was there handles or latches on the lid ? any help ,advise would be great
Posted By: Grady | Posted on: Jan 6, 2020 - 3:39am
Total Posts: 157 | Joined: Oct 2, 2018 - 8:04am
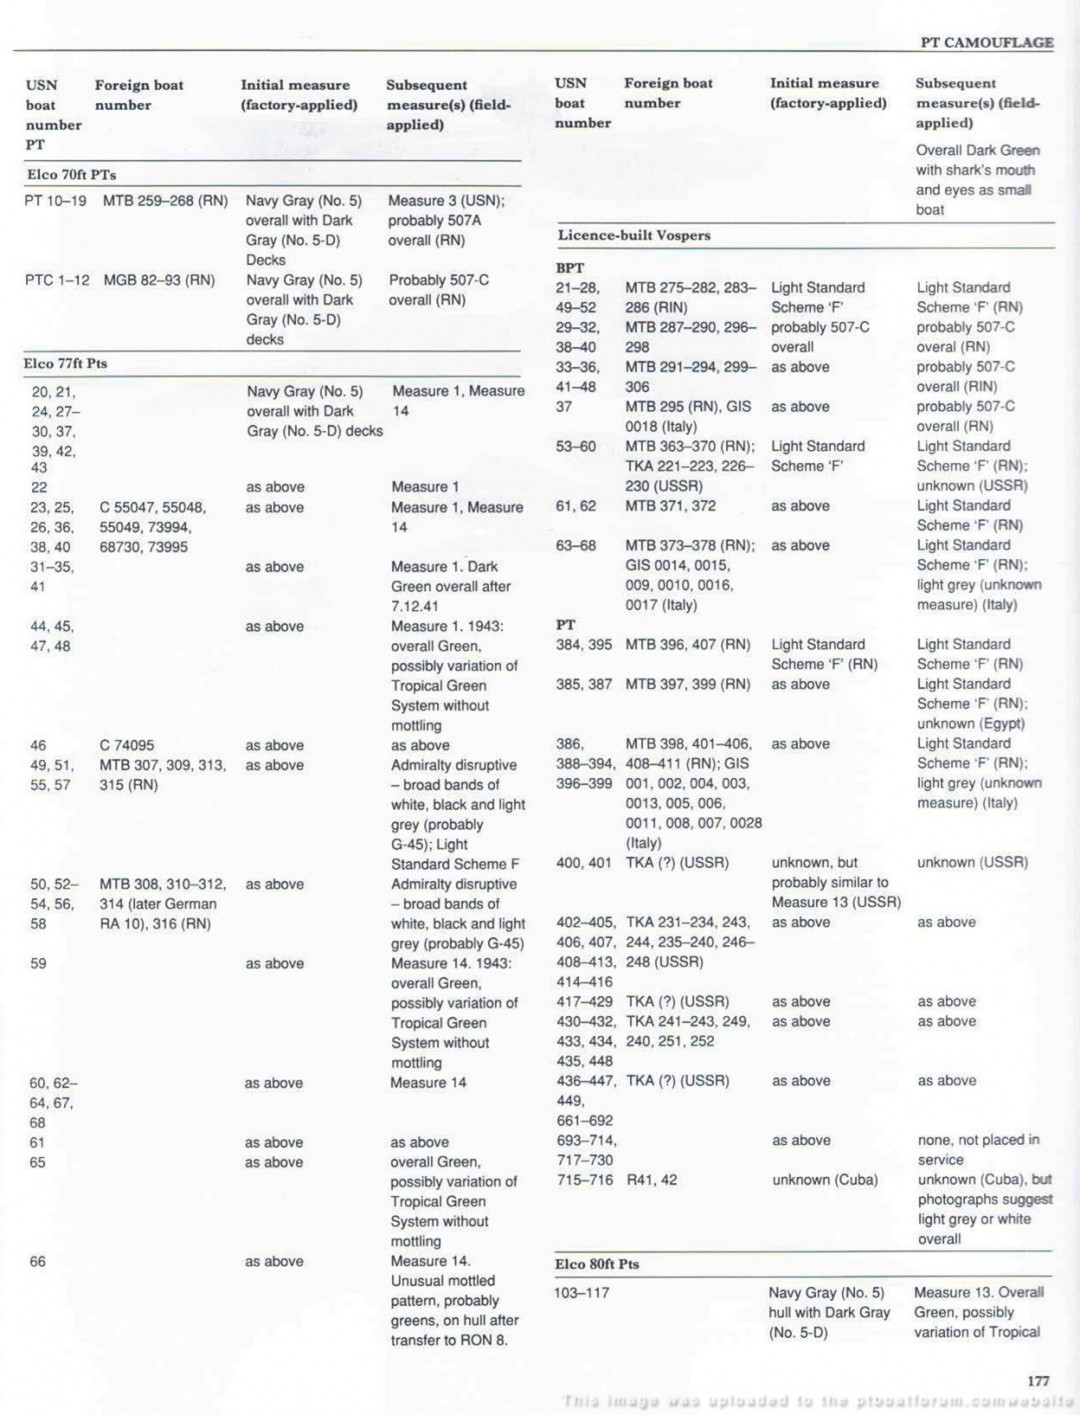
Are you asking about the factory delivery color or in service? The 103 class boats were factory painted in Navy Gray (No. 5) hull with Dark Gray (No. 5-D). Later, Measure 13 paint scheme.
Former crew member of the Big Blue Sightseer ex-PT 486
Posted By: Gerry McGovern | Posted on: Jan 6, 2020 - 6:10am
Total Posts: 78 | Joined: Oct 7, 2016 - 1:47pm

Former crew member of the Big Blue Sightseer ex-PT 486
Posted By: Gerry McGovern | Posted on: Jan 6, 2020 - 6:14am
Total Posts: 78 | Joined: Oct 7, 2016 - 1:47pm
Former crew member of the Big Blue Sightseer ex-PT 486
Posted By: Gerry McGovern | Posted on: Jan 6, 2020 - 6:17am
Total Posts: 78 | Joined: Oct 7, 2016 - 1:47pm
thanks Gerry, looking for in theater paint scheme, I know there were allot of variations as you use what ever you can get your hands on at the time. There's no mention of colour in Dick Kersey's book, so I don't know the time frame he said the boats were Grey. anyway good advise thanks
Posted By: Grady | Posted on: Jan 6, 2020 - 9:03am
Total Posts: 157 | Joined: Oct 2, 2018 - 8:04am
Grady,
Some boats were repainted in overall ocean grey 5-0 which was darker than the factory greys. Below the waterline they retained the copperoyd coating.
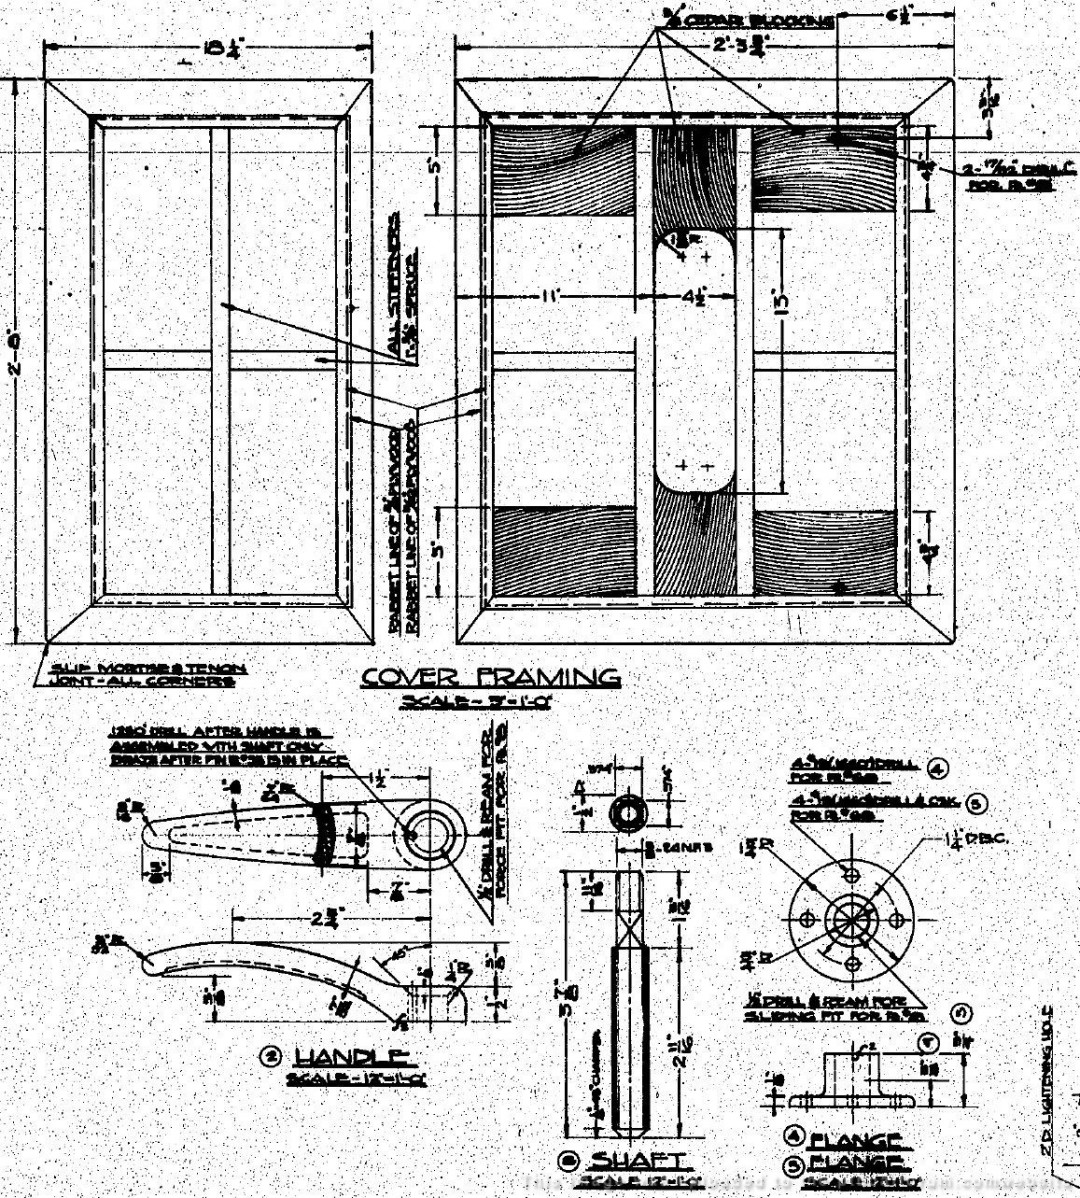
The engine room hatch had two latches which were locked by turning them 90 degrees similar to a door handle.
Try here http://pt103.com
Stu
Posted By: Stuart Hurley | Posted on: Jan 6, 2020 - 1:46pm
Total Posts: 255 | Joined: Mar 19, 2013 - 3:32am
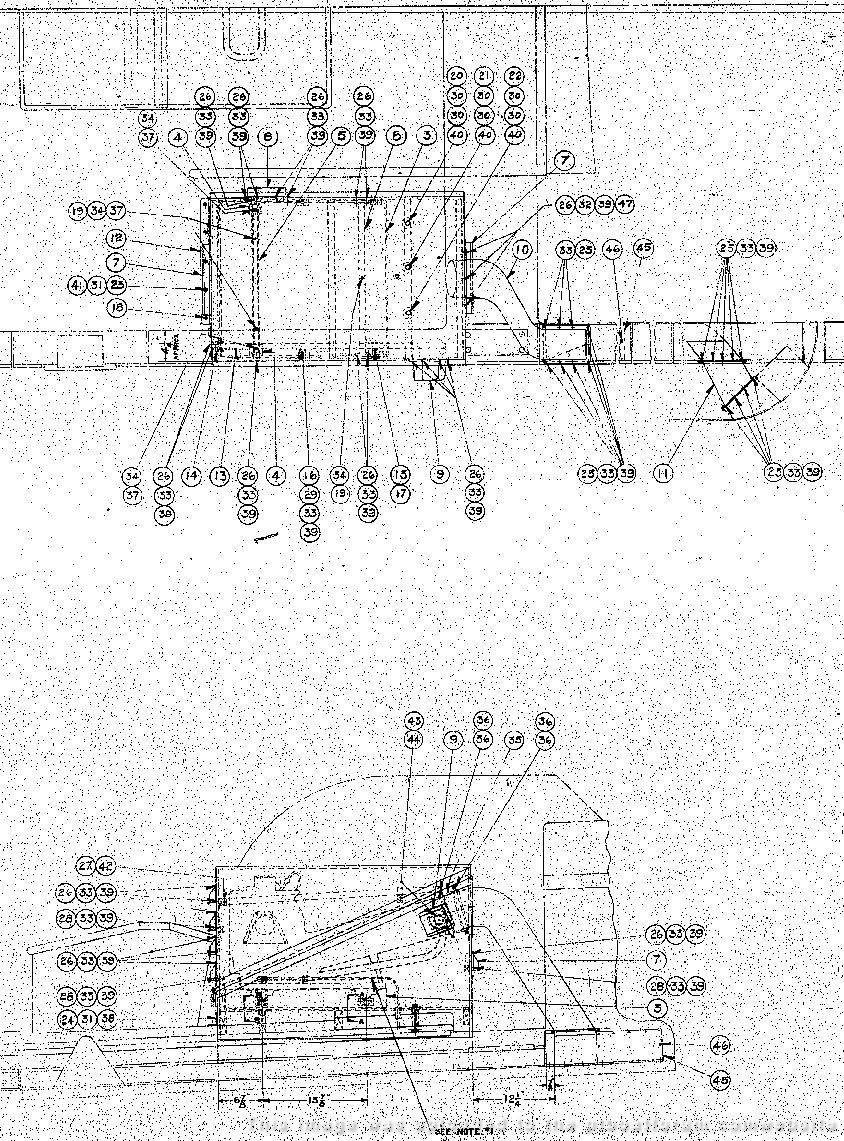
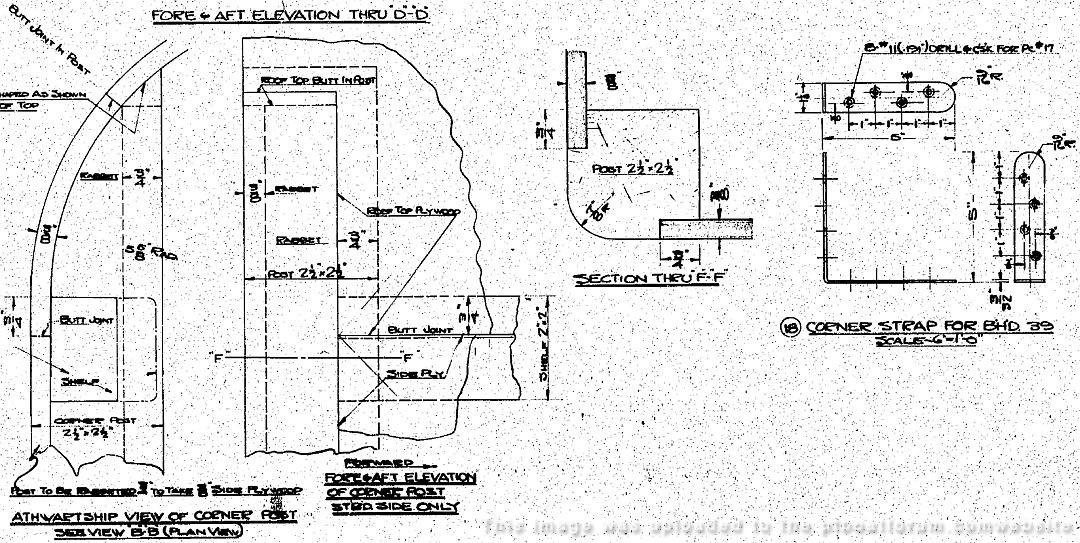
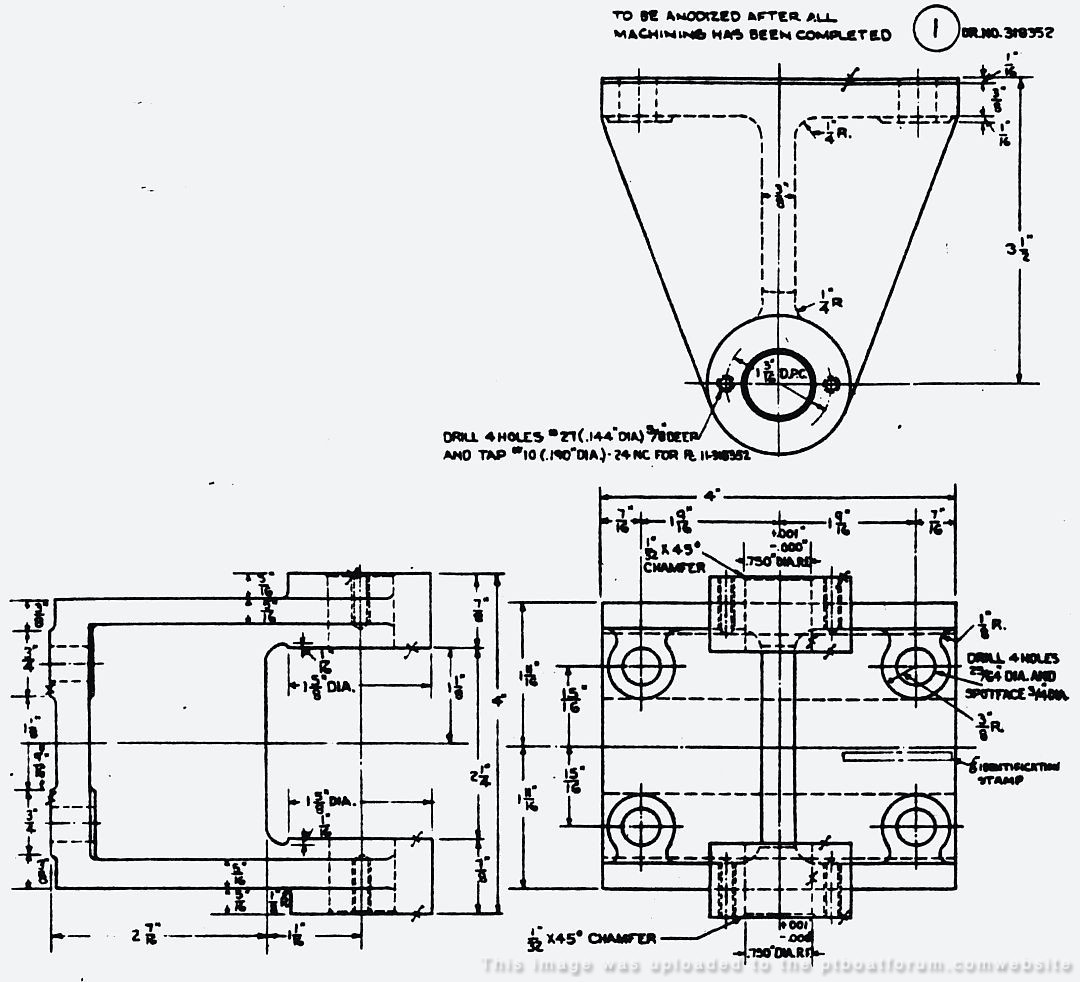
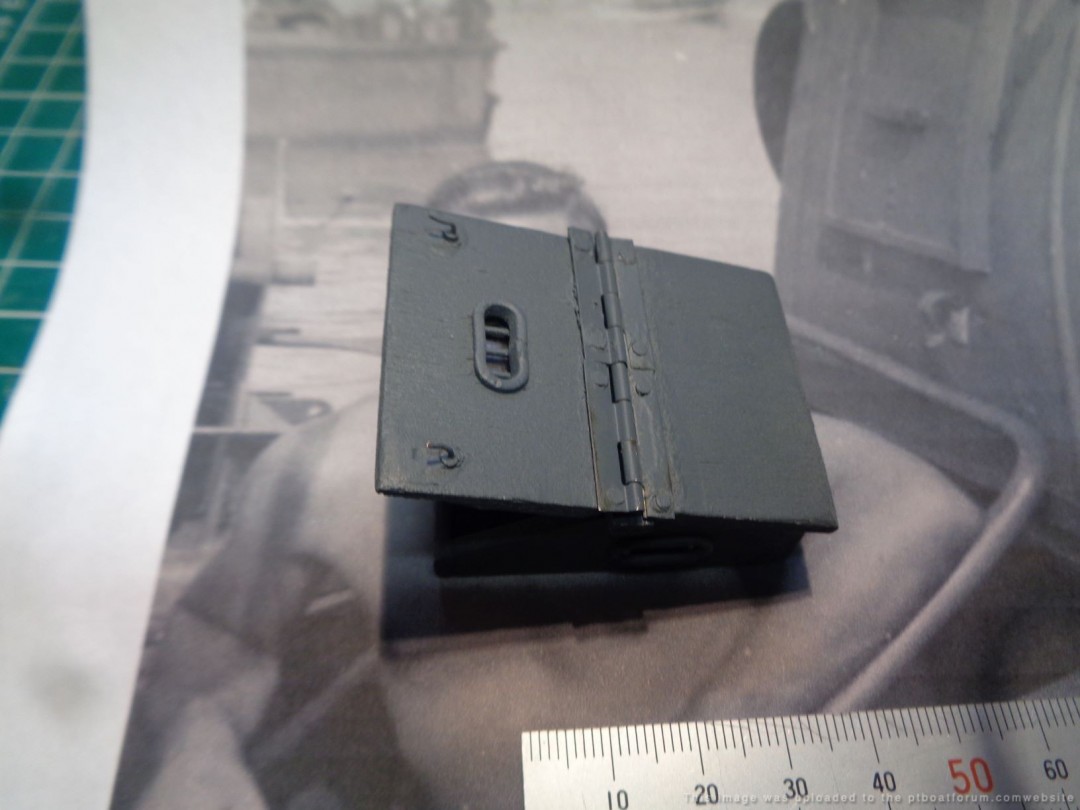
Here are some details of the hatchway showing the handle placement, from Dick Washichek's collection. He has generously decided to put them up for free download, see the "Documents" link. The first shows where the holes should be drilled in the forward cover for the handles:

Posted By: Jeff D | Posted on: Jan 6, 2020 - 3:38pm
Total Posts: 2200 | Joined: Dec 21, 2006 - 1:30am
Thanks Stu, The paint is a real Grey area, no pun intended the hatch hinges and latch's was something I could not find
Jeff D has been a great help during my build, The outstanding information on his site has been the main stay of my work. I kind of feel guilty emailing him all the time with simply questions, however as in his last post he's always there to help Thanks Jeff
Posted By: Grady | Posted on: Jan 7, 2020 - 3:44am
Total Posts: 157 | Joined: Oct 2, 2018 - 8:04am
Grady,
The greys are certainly variable depending on the time frame. The paints issued at the time were not always pre-mixed and utilised a tinting colour which could be added to produce the various shades. Personally i think 5-D is too dark tonally looking at period photos, and i think 5-0 is more likely. 5-D was reckoned to be too contrasty . The use of 5-0 on small craft was known as measure 14 IIRC
Best Regards,
Stu.
Posted By: Stuart Hurley | Posted on: Jan 7, 2020 - 4:50am
Total Posts: 255 | Joined: Mar 19, 2013 - 3:32am
lol thanks Grady it's always nice to be appreciated!
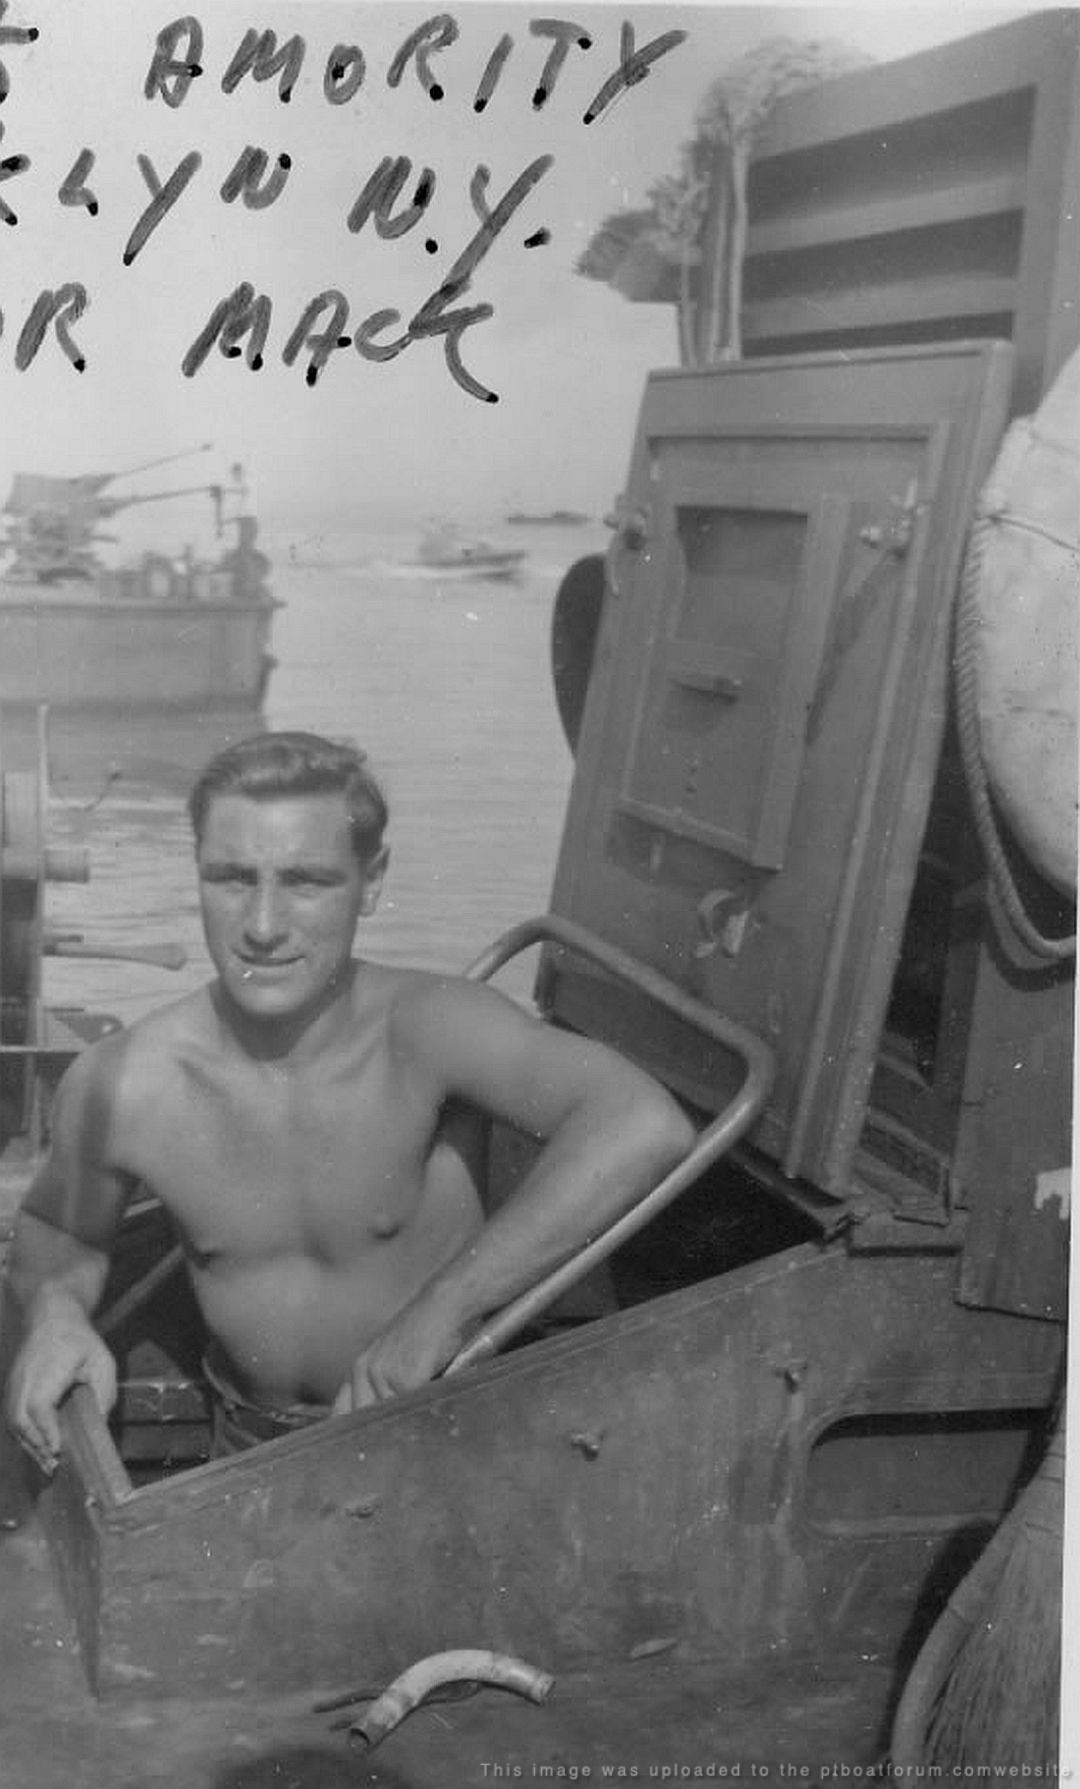
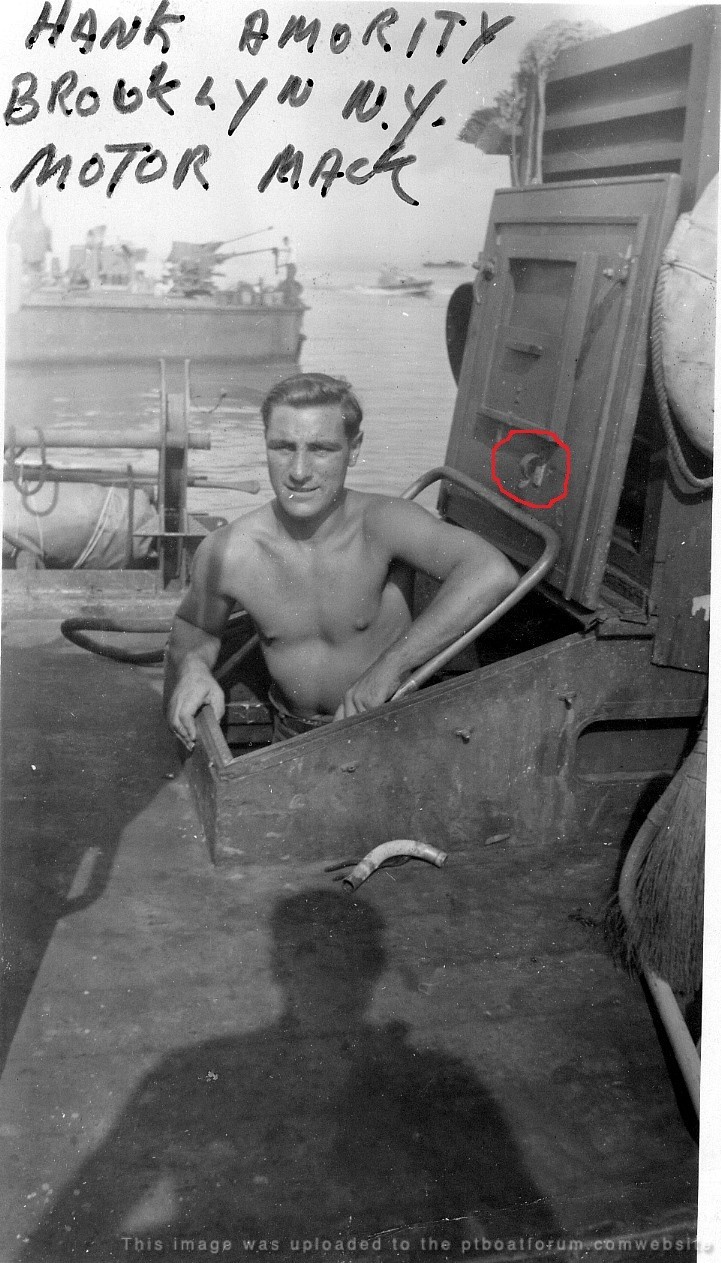
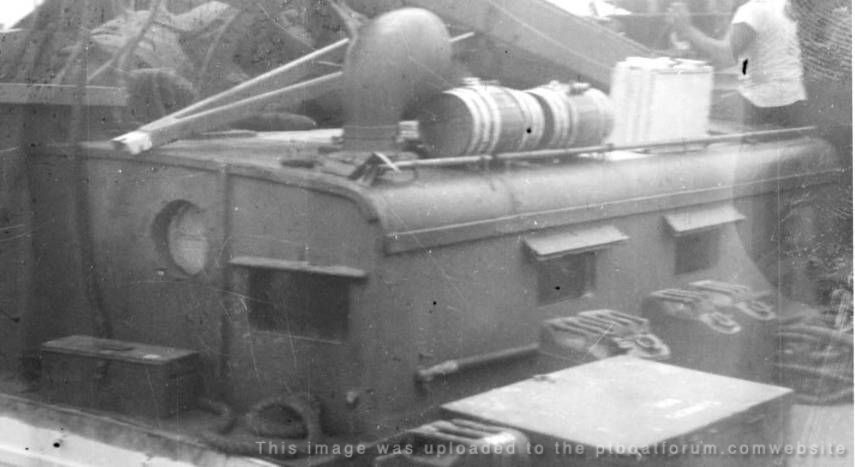
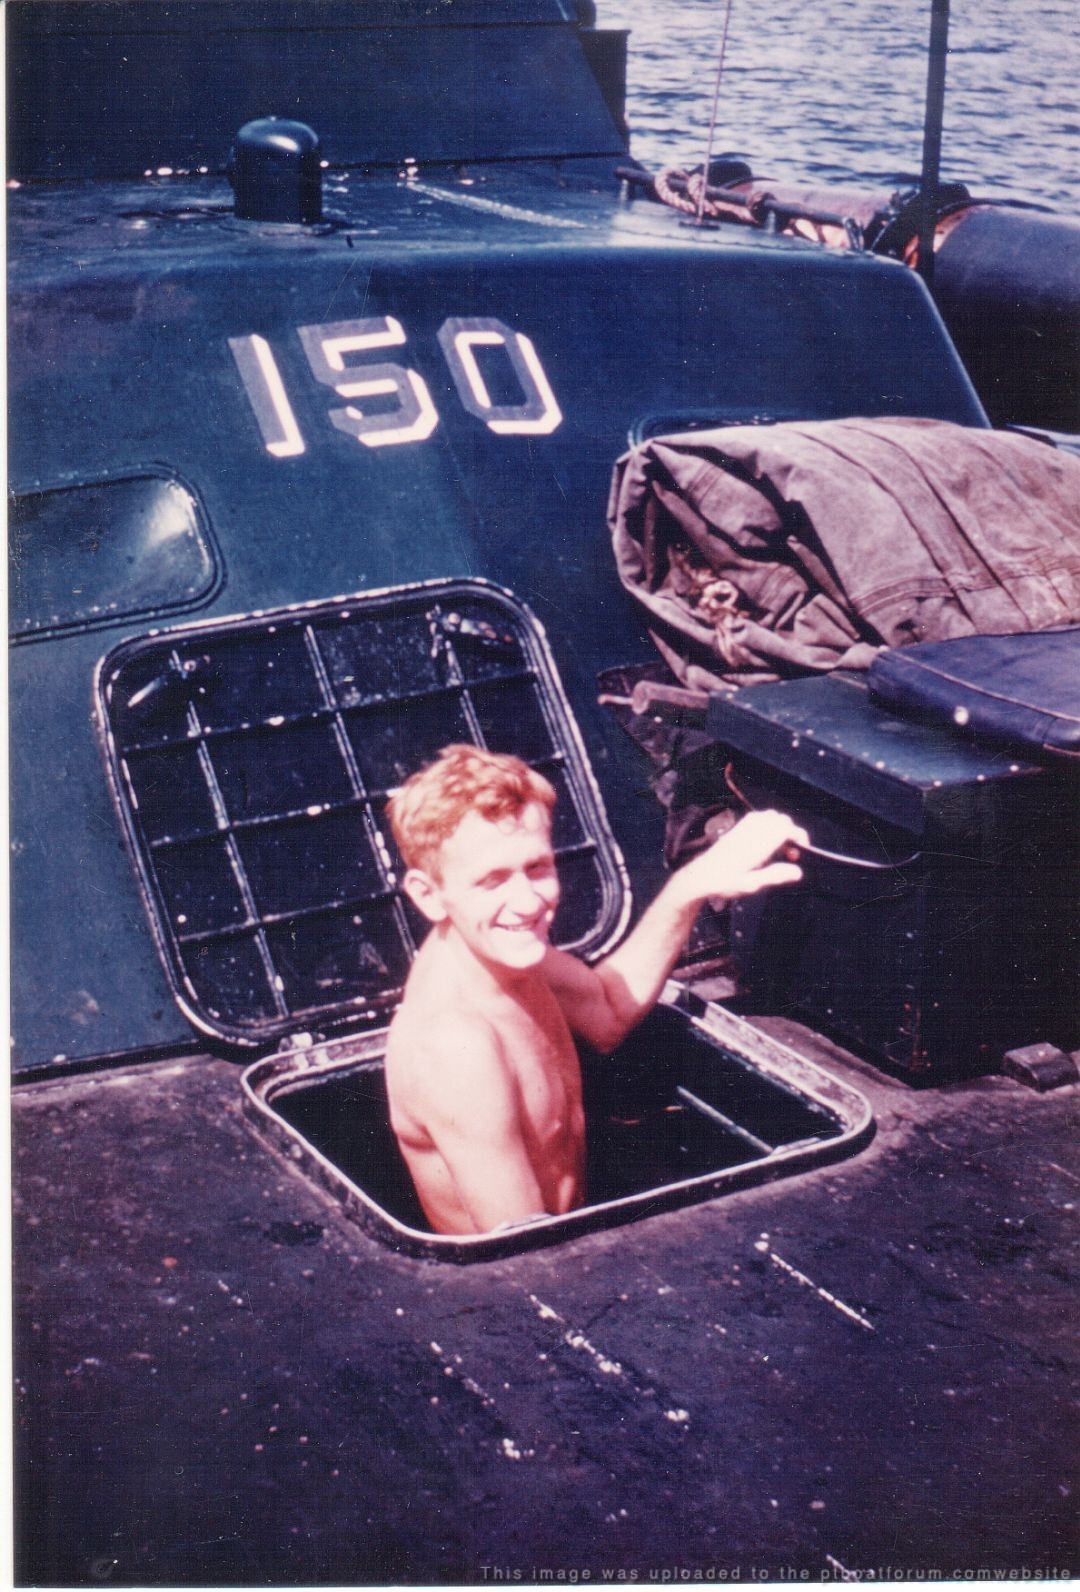
I forgot about the hinges. The covers were attached with a full length 1 1/4 - 1 1/2 piano hinge with a rubber strip inderneath that appears to stick out a little past the ends of the hinge. Photo (cropped) of PT 127's Motor Mac Hank Amority courtesy of [url]http://pt127.org/[/url]. It looks like they added an air scoop to the hatchway's forward cover:
Posted By: Jeff D | Posted on: Jan 7, 2020 - 8:18am
Total Posts: 2200 | Joined: Dec 21, 2006 - 1:30am
Oops, the scoop was added to the rear cover not the front...
Posted By: Jeff D | Posted on: Jan 7, 2020 - 3:02pm
Total Posts: 2200 | Joined: Dec 21, 2006 - 1:30am
I was fortunate enough to have a discussion with Mr. Keresey about the 105 boat. He told me it was "Battleship Gray". I think that's buried somewhere in the forum. According to the reference I have from Dr. Ross the color should be Measure 1, overall 5D. This is how she was painted in Panama and it carried over into theatre. Under his command it was not green. Later photos show her in camouflage. That's the boat I'm going to finish one of these days!
Dave
David Waples
Posted By: David Waples | Posted on: Jan 10, 2020 - 2:41pm
Total Posts: 1679 | Joined: Jan 2, 2007 - 9:55pm
Looks like they had a U-shaped pipe/bar that fit in a clip on the underside of the aft engine room hatch door to hold it open.
Wonder if all the early 80' Elcos with the original small, two-door engine room hatches had this hold-open device?
I've always thought of the 105 under Mr. Keresey as being 5D Gray.
Posted By: Drew Cook | Posted on: Jan 11, 2020 - 8:07am
Total Posts: 1306 | Joined: Oct 19, 2006 - 10:44am
Thanks Dave & Drew
Now I can check off the color search , each step more research, more pictures , more plans to follow. Starting to learn my way around the boat.
Posted By: Grady | Posted on: Jan 11, 2020 - 10:55am
Total Posts: 157 | Joined: Oct 2, 2018 - 8:04am
According to the drawing they all had it Drew. It's actually the forward door, the aft one was traded in for an air scoop. I also see the attachments for the short-lived canvas air scoop on the sides of the base.
Posted By: Jeff D | Posted on: Jan 12, 2020 - 4:21am
Total Posts: 2200 | Joined: Dec 21, 2006 - 1:30am
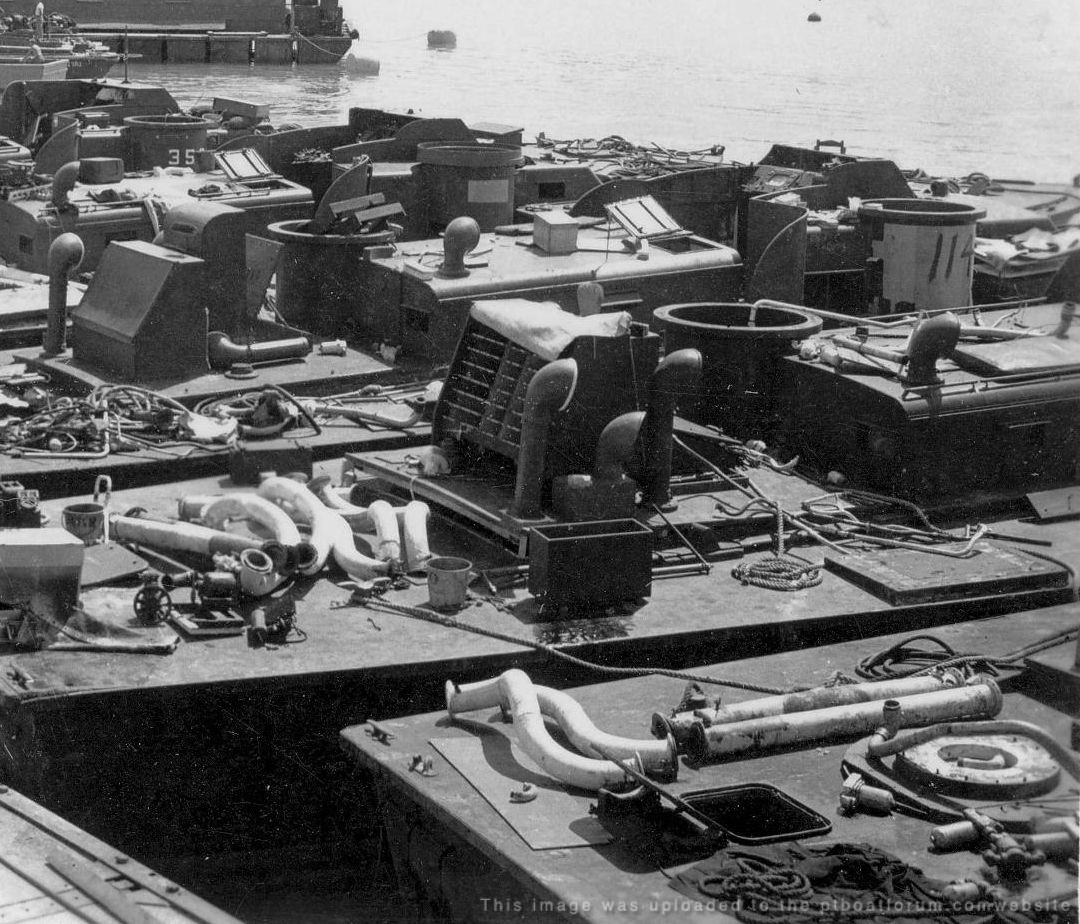
I found this shot of the 114 Drew, you can see the holdopen bar and it looks like the 127 wasn't the only boat to add a scoop to the small early hatchway:
Posted By: Jeff D | Posted on: Jan 12, 2020 - 3:54pm
Total Posts: 2200 | Joined: Dec 21, 2006 - 1:30am
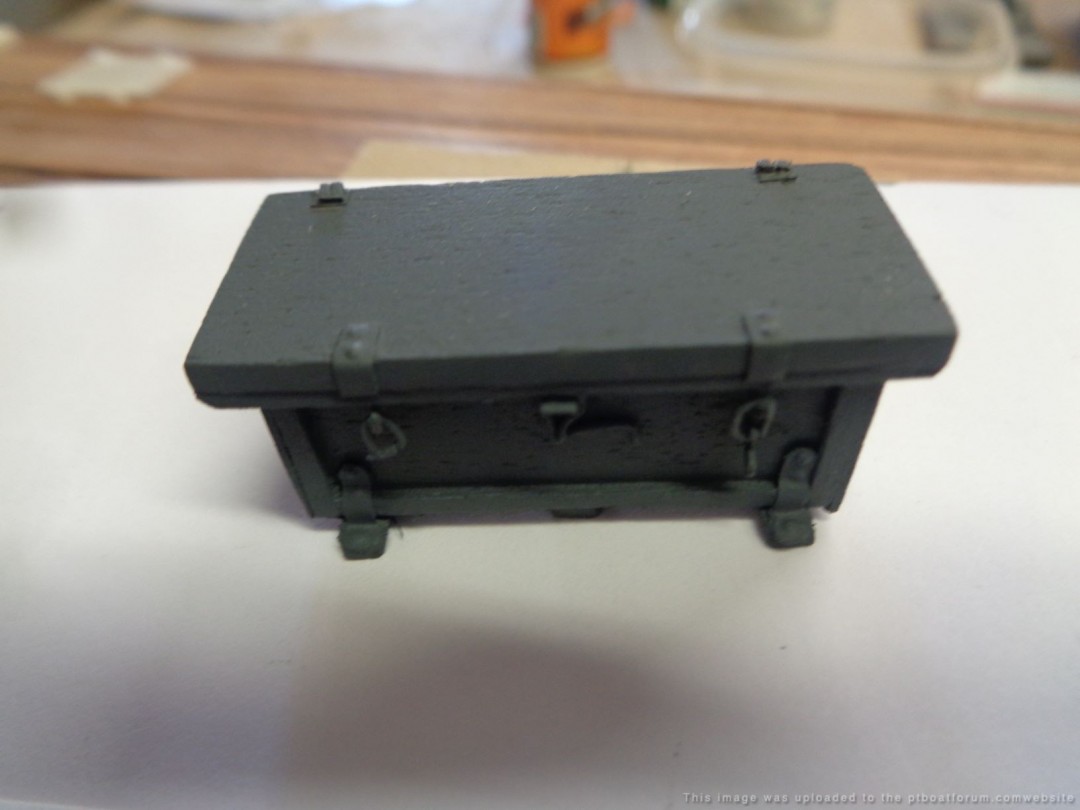
Great Pic Jeff, looks like they are being scrapped , sad So moving on Does anyone have pictures/drawings of 103 class boats 20 mm ammunition boxâs I have a few, but would like have a few more for reference.
Thanks Grady
Posted By: Grady | Posted on: Jan 13, 2020 - 4:02am
Total Posts: 157 | Joined: Oct 2, 2018 - 8:04am
Yep sad indeed. I sent you some partly legible drawings, hope they help.
Posted By: Jeff D | Posted on: Jan 13, 2020 - 12:08pm
Total Posts: 2200 | Joined: Dec 21, 2006 - 1:30am
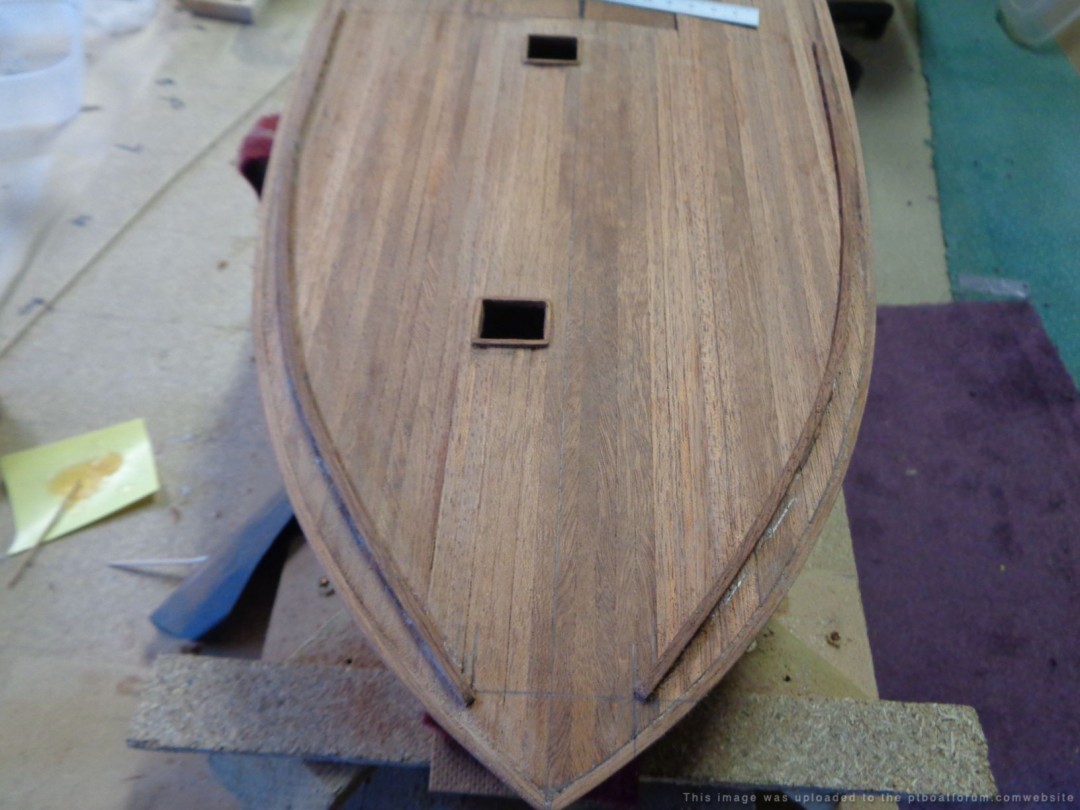
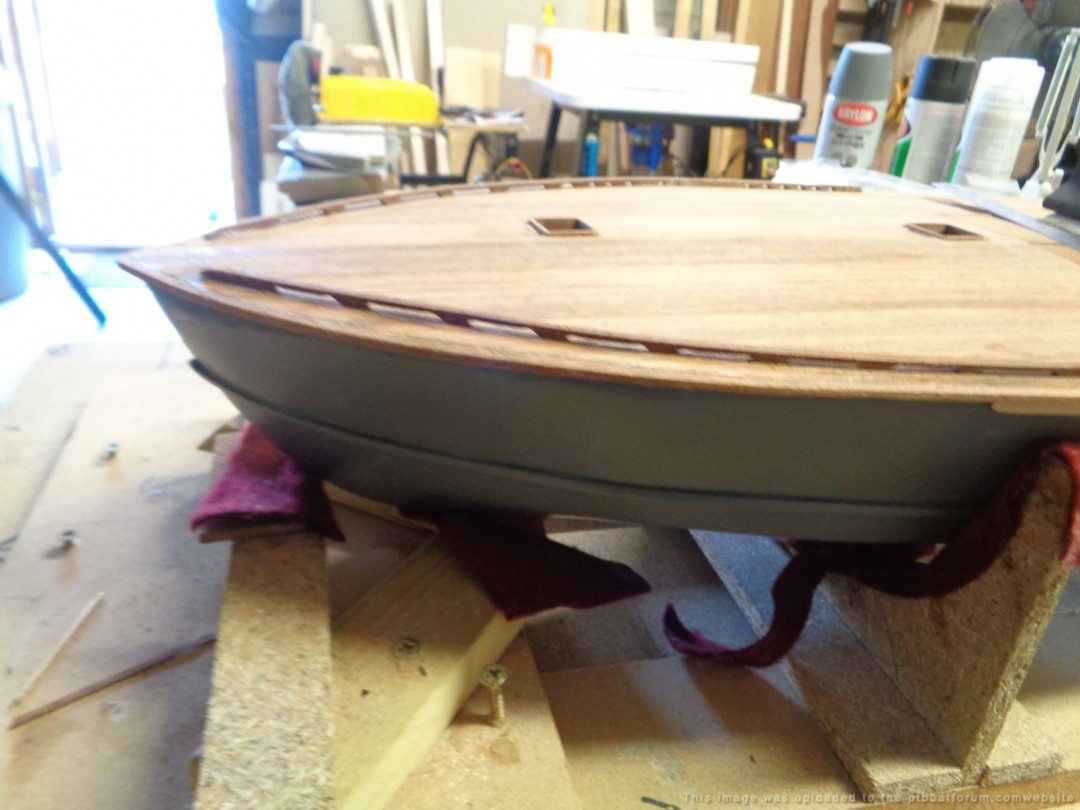
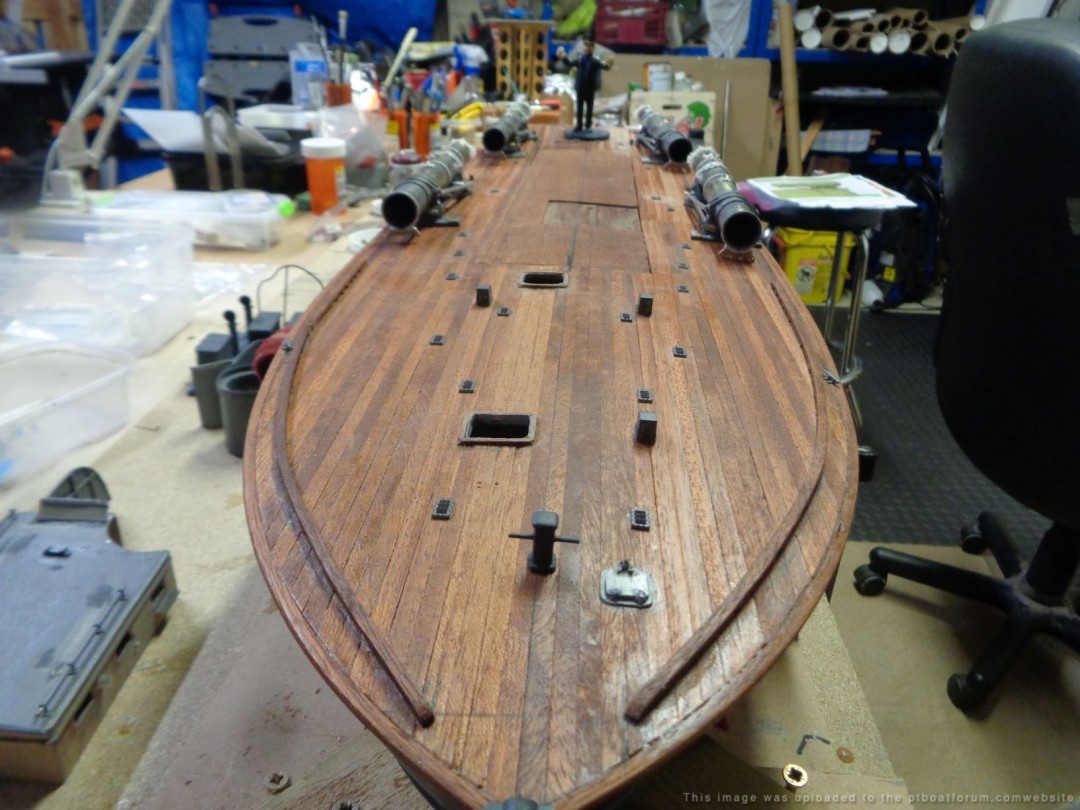
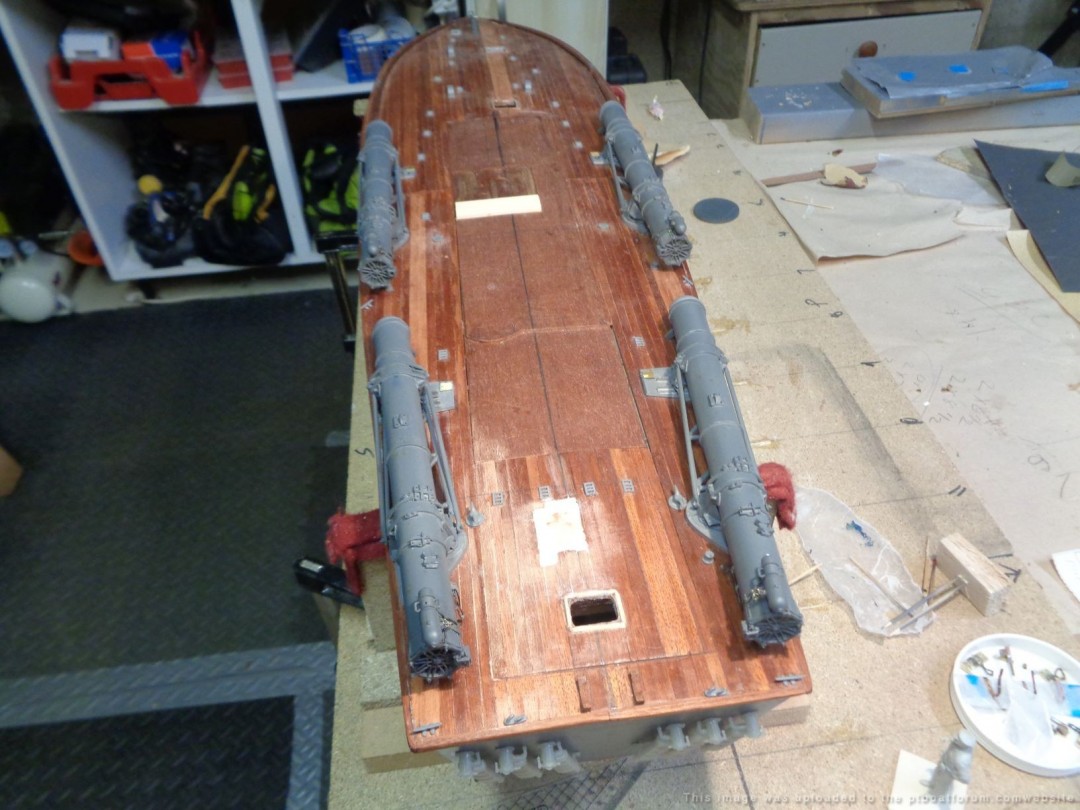
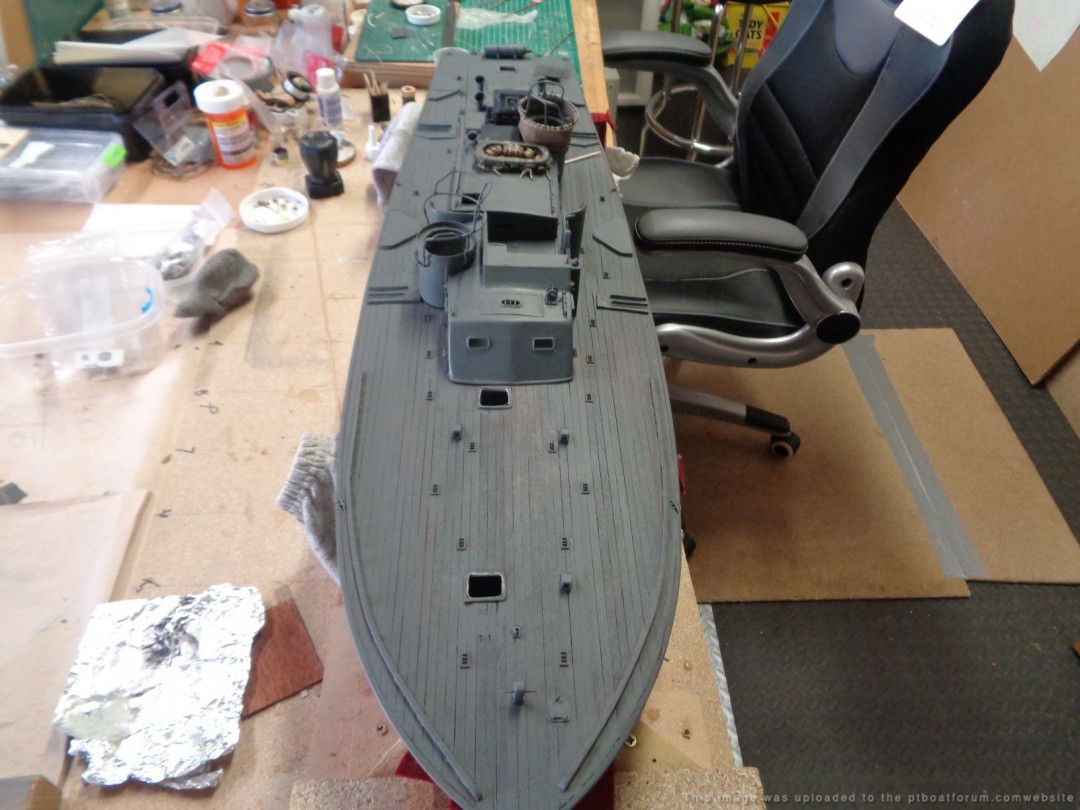
The site has been a godsent for me stepping into the world of the PTs, however with a background in building rigged ships, I limited my posts to asking questions & research for my first PT build, I have been reluctant to post any photos of my build on the site, mainly because thereâs a lot of PT experts here . Iâm learning more about the boats so I guessed it was time I'm further along than this, however to pics of the deck keep in mind Iâm not a professional builder & very little experience with Pts
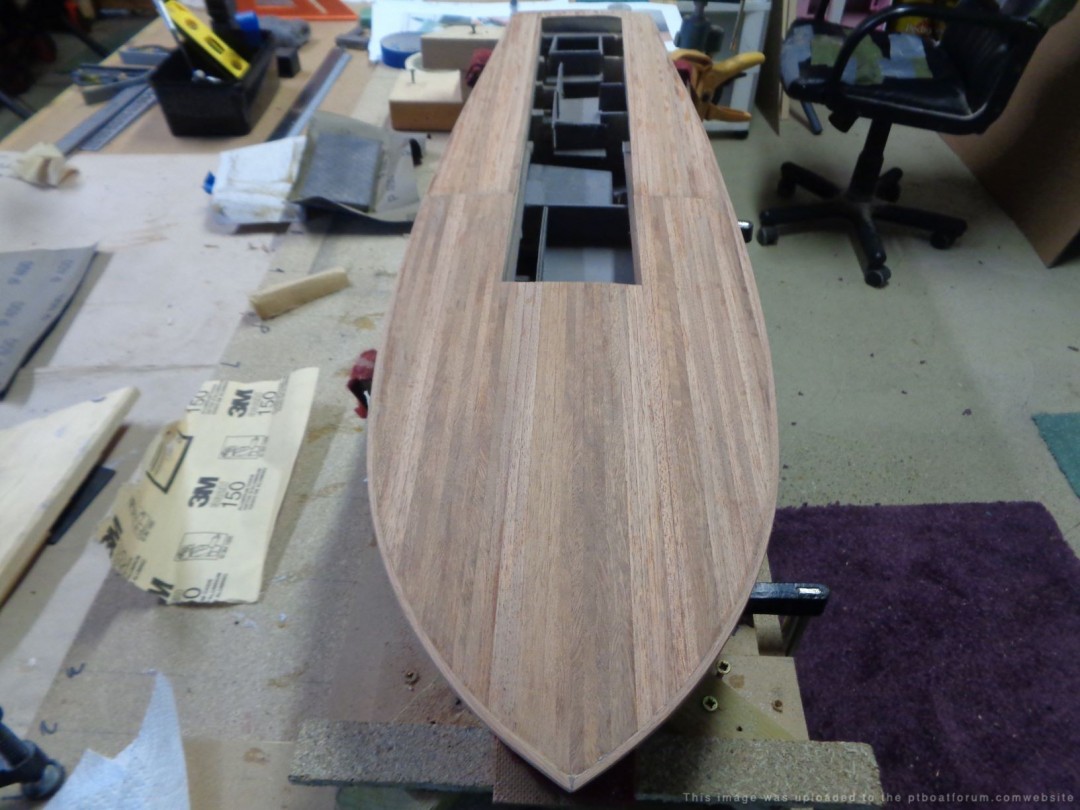
Posted By: Grady | Posted on: Jan 19, 2020 - 11:08am
Total Posts: 157 | Joined: Oct 2, 2018 - 8:04am
Nice Grady, it's going be a shame to paint that deck! What kind of wood is that?
Posted By: Jeff D | Posted on: Jan 20, 2020 - 2:40am
Total Posts: 2200 | Joined: Dec 21, 2006 - 1:30am
Thanks Jeff, its mahogany, same as the hull, except the hull has about 6 coats of primer on it. I have been working on an outside the box plan for the deck. This is the outcome of the plans you sent

Posted By: Grady | Posted on: Jan 20, 2020 - 3:08am
Total Posts: 157 | Joined: Oct 2, 2018 - 8:04am
Hey cool, the same wood the real ones were planked with! [:-cheers-:]
Posted By: Jeff D | Posted on: Jan 20, 2020 - 11:38am
Total Posts: 2200 | Joined: Dec 21, 2006 - 1:30am
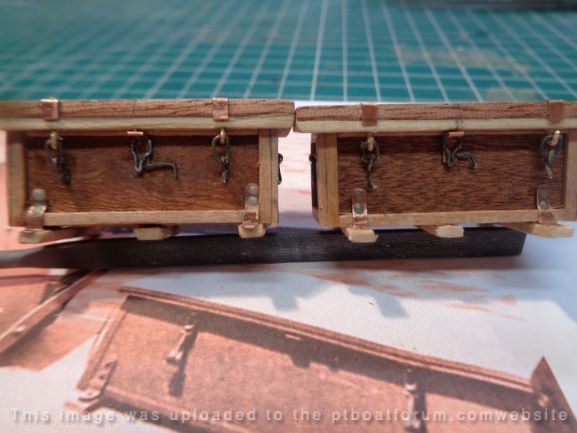
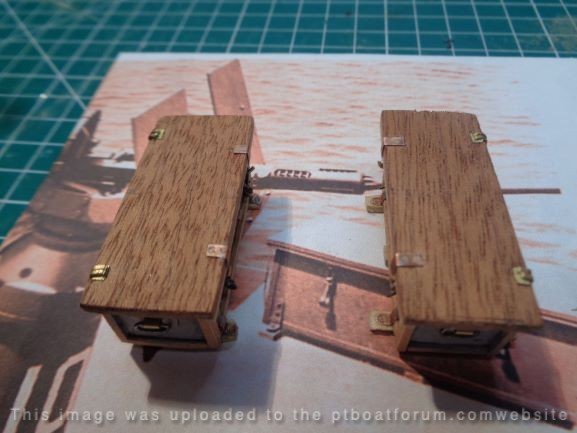
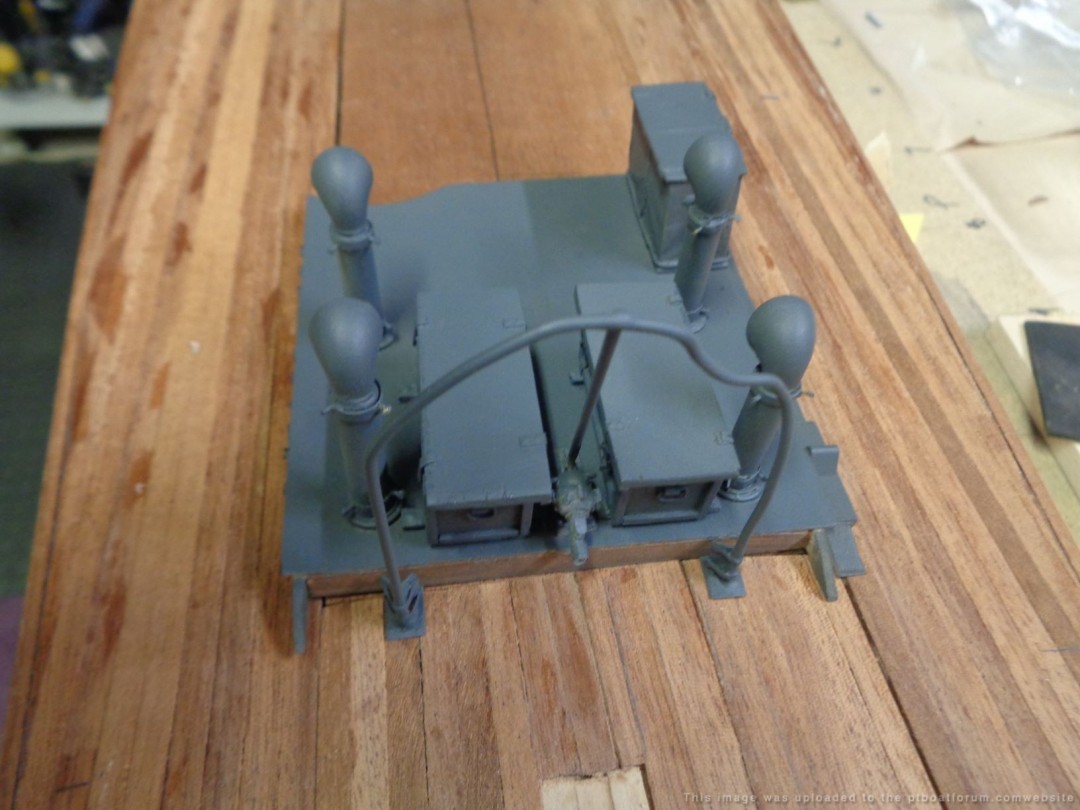
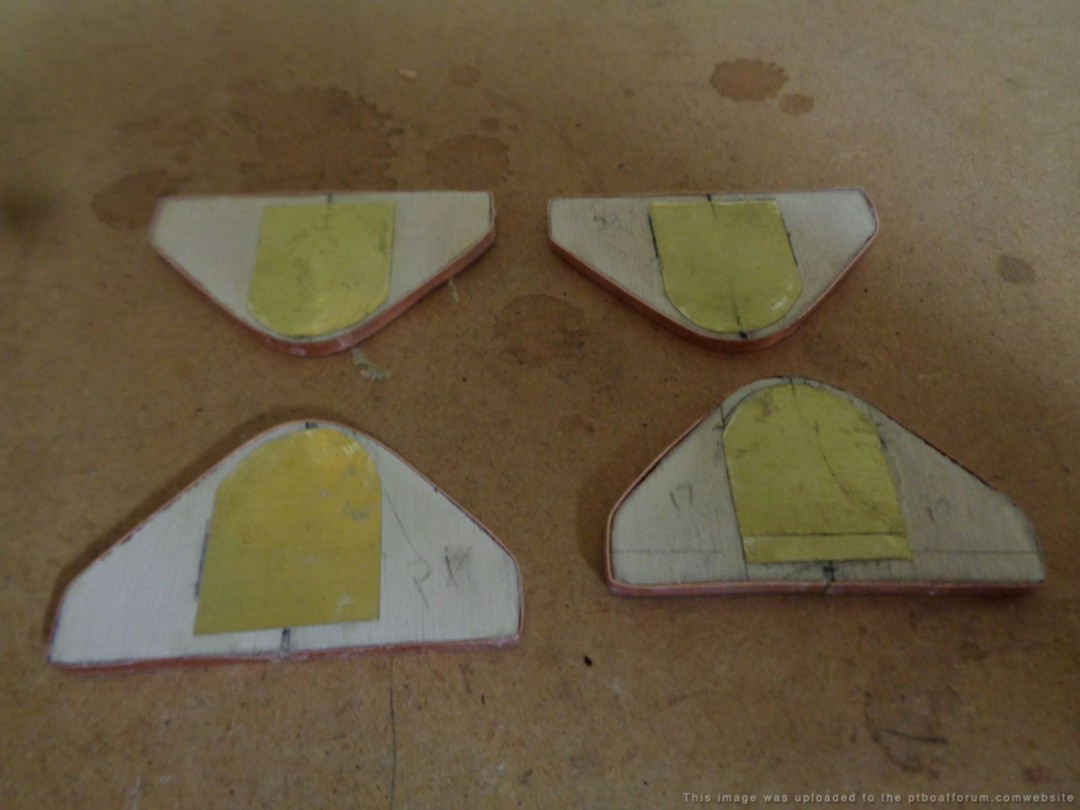
I know the old saying âthere are no stupid questionsâ so I will ask a simple one Does the 20 mm ready ammo lockers open inboard or out board on the early 103 class boats ?
Posted By: Grady | Posted on: Jan 29, 2020 - 4:37am
Total Posts: 157 | Joined: Oct 2, 2018 - 8:04am
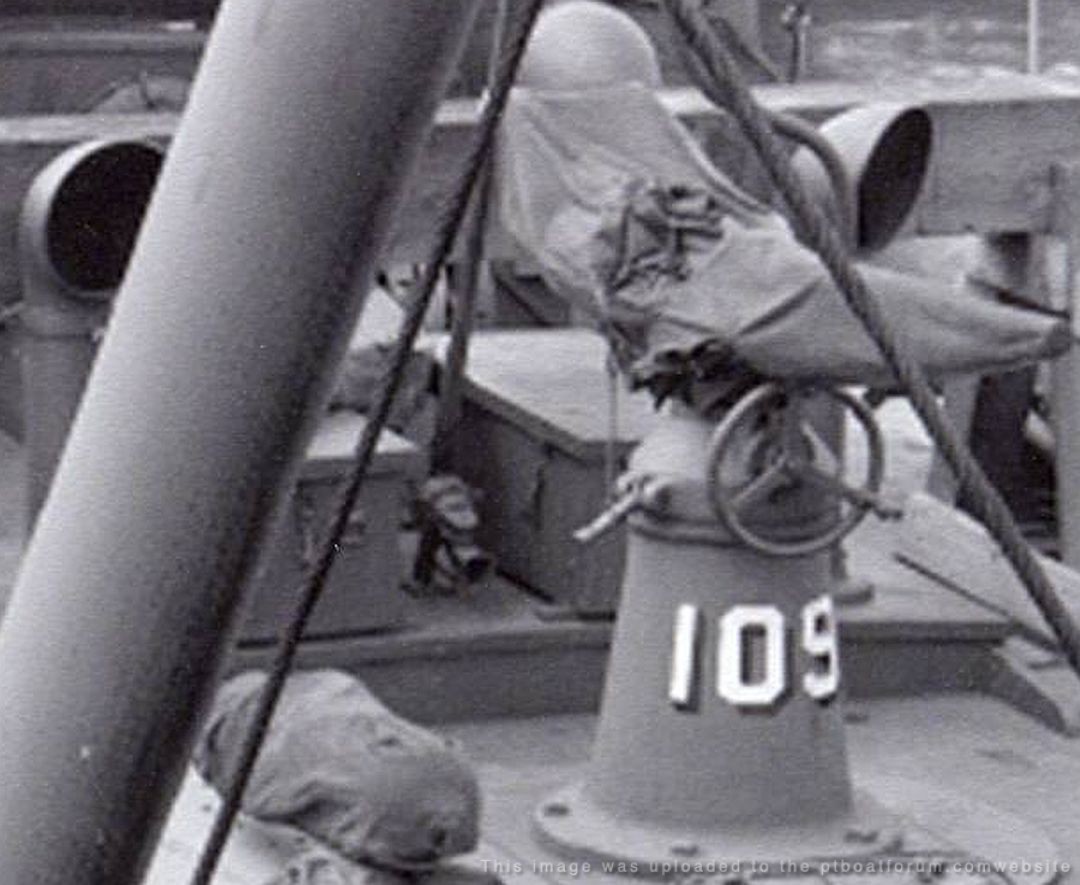
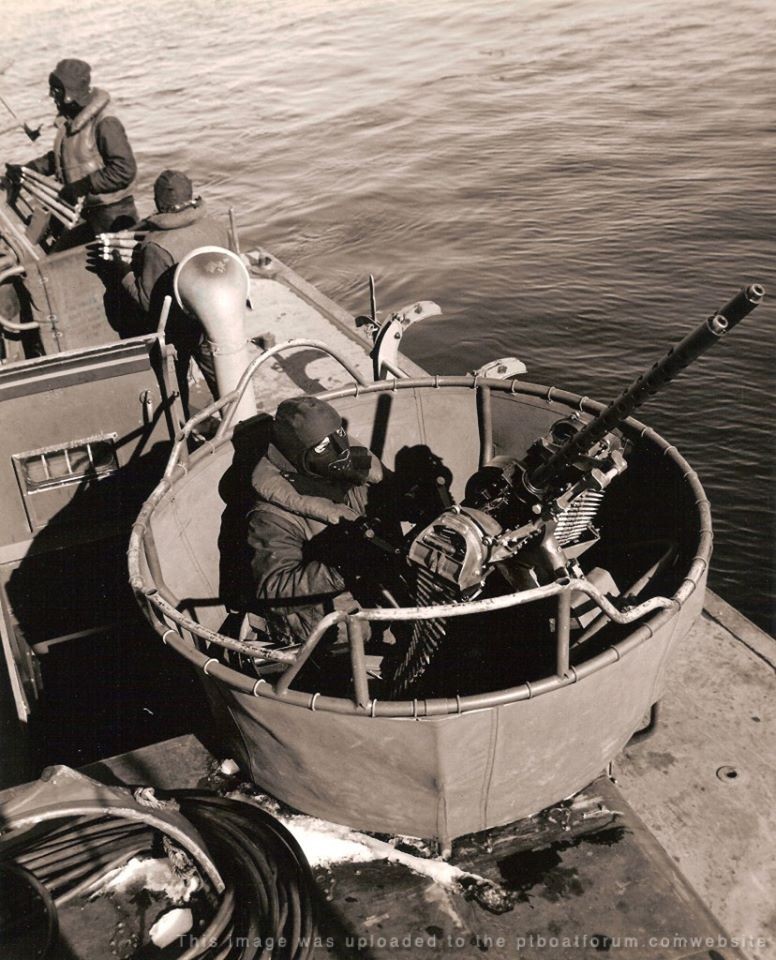
The latches were inboard, hinges outboard on the 109. Note the 20mm signal horn hiding between the boxes:
Posted By: Jeff D | Posted on: Jan 29, 2020 - 10:36am
Total Posts: 2200 | Joined: Dec 21, 2006 - 1:30am
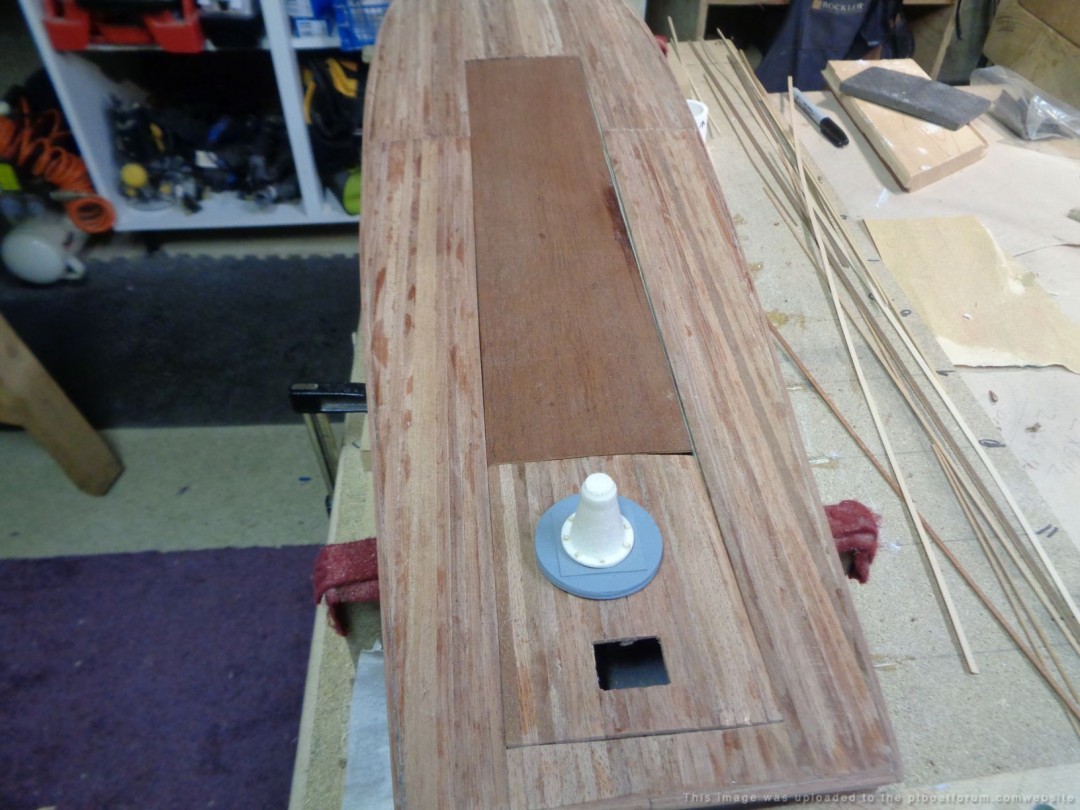
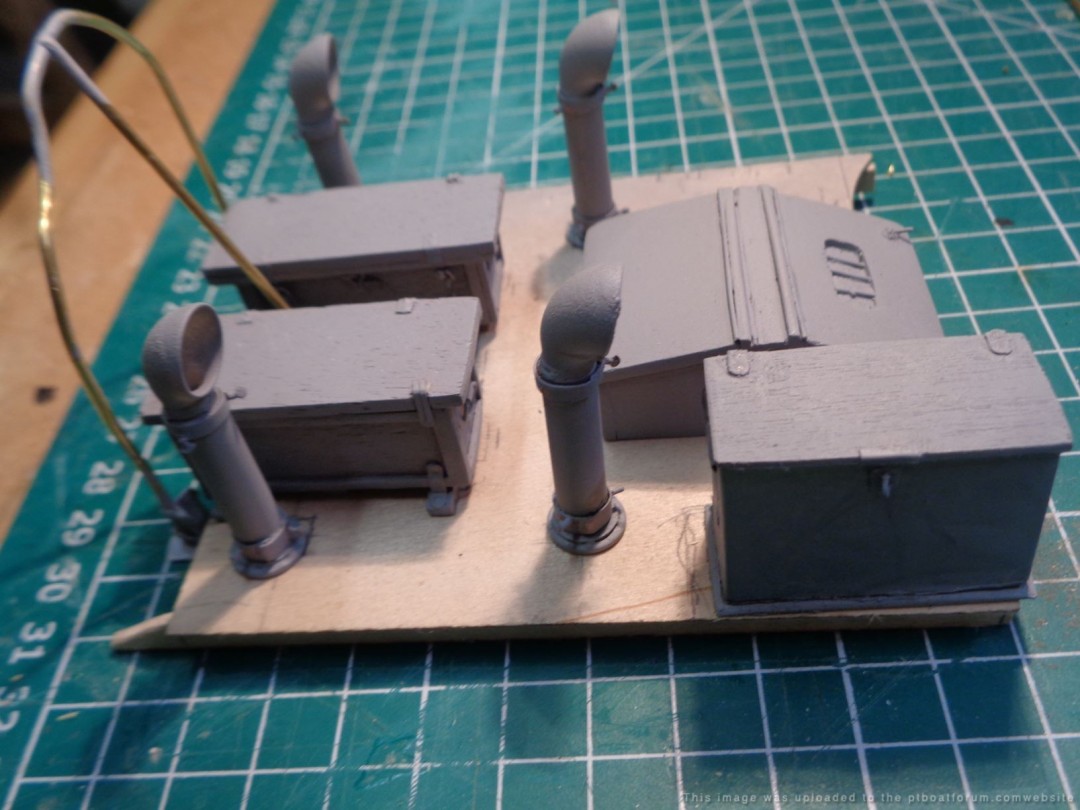
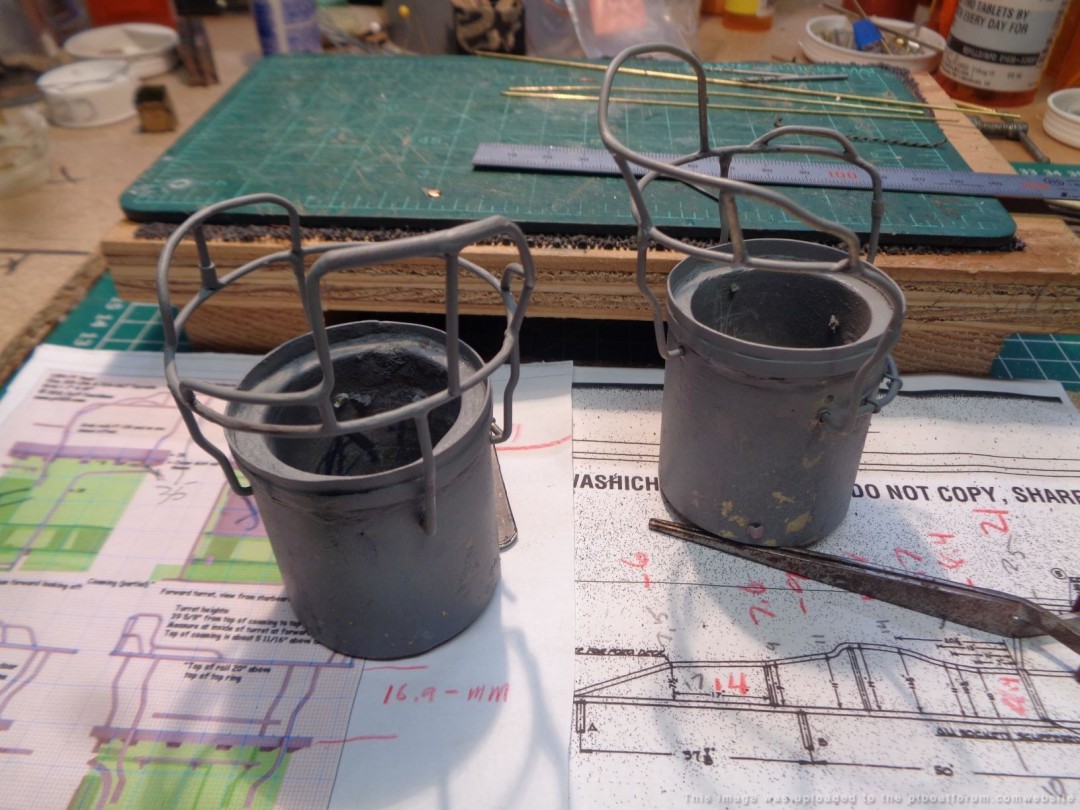
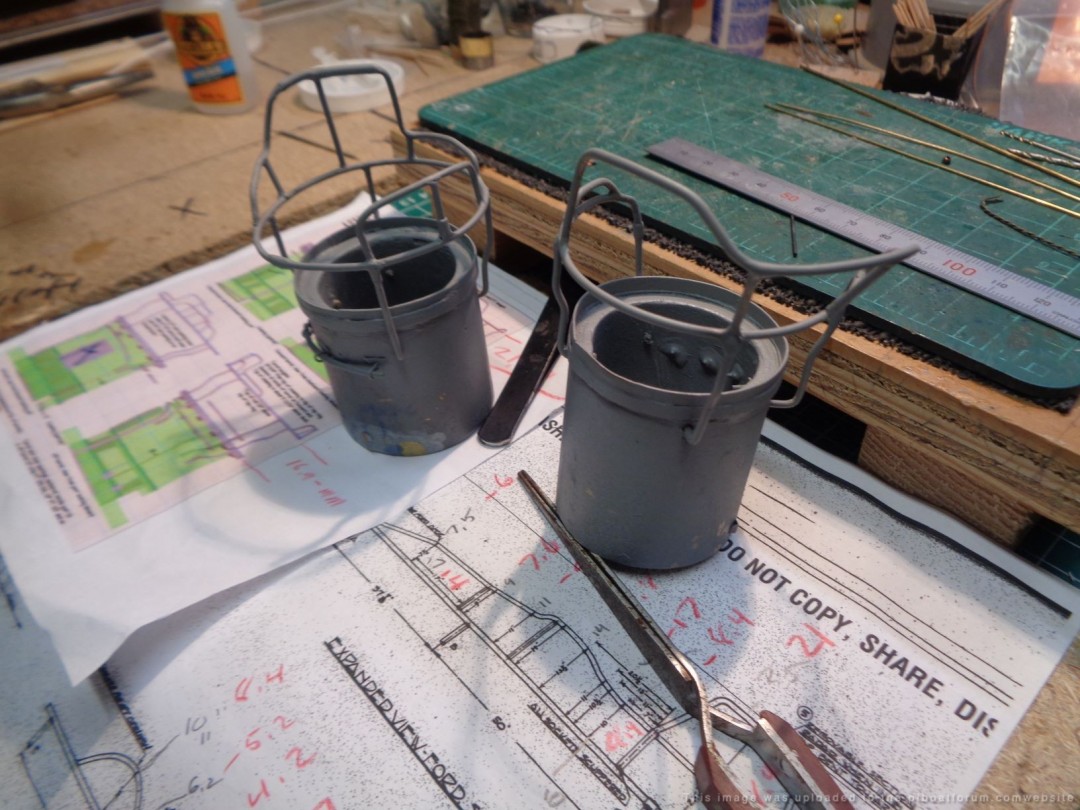
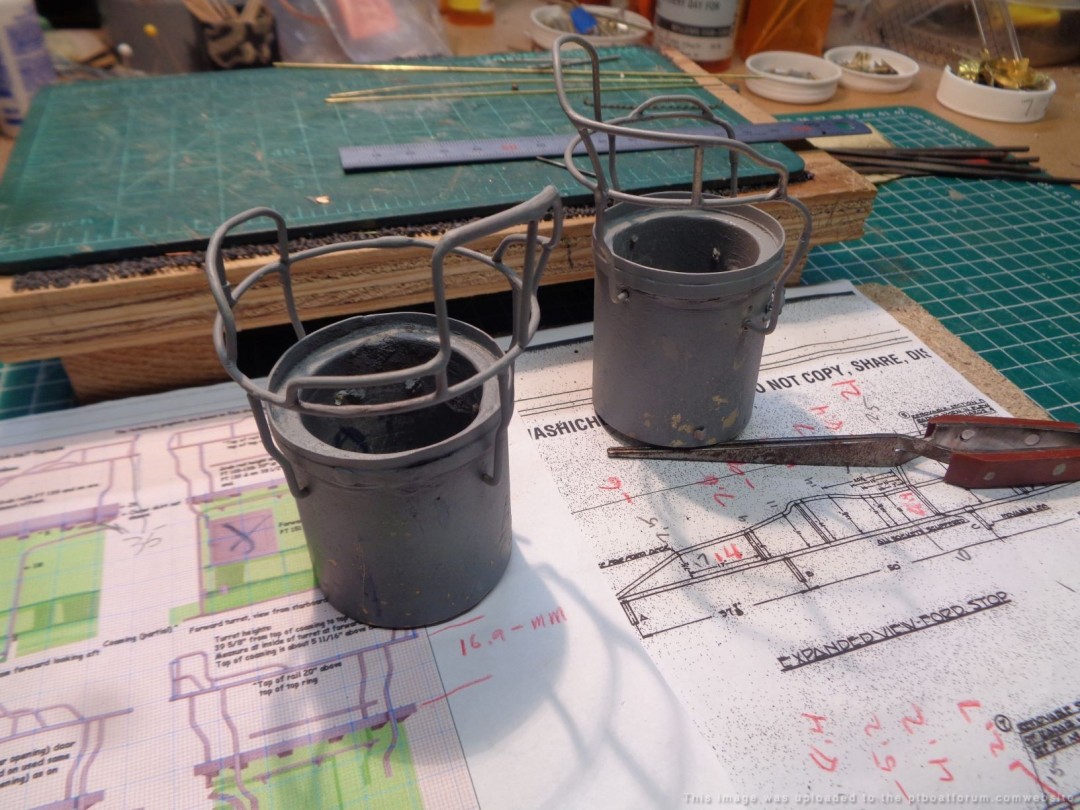
Are the heater units on the Elco 80âs all the same type? And does anyone if some of the boats removed them once in the Pacific theatre ?.
Posted By: Grady | Posted on: Feb 1, 2020 - 5:25am
Total Posts: 157 | Joined: Oct 2, 2018 - 8:04am
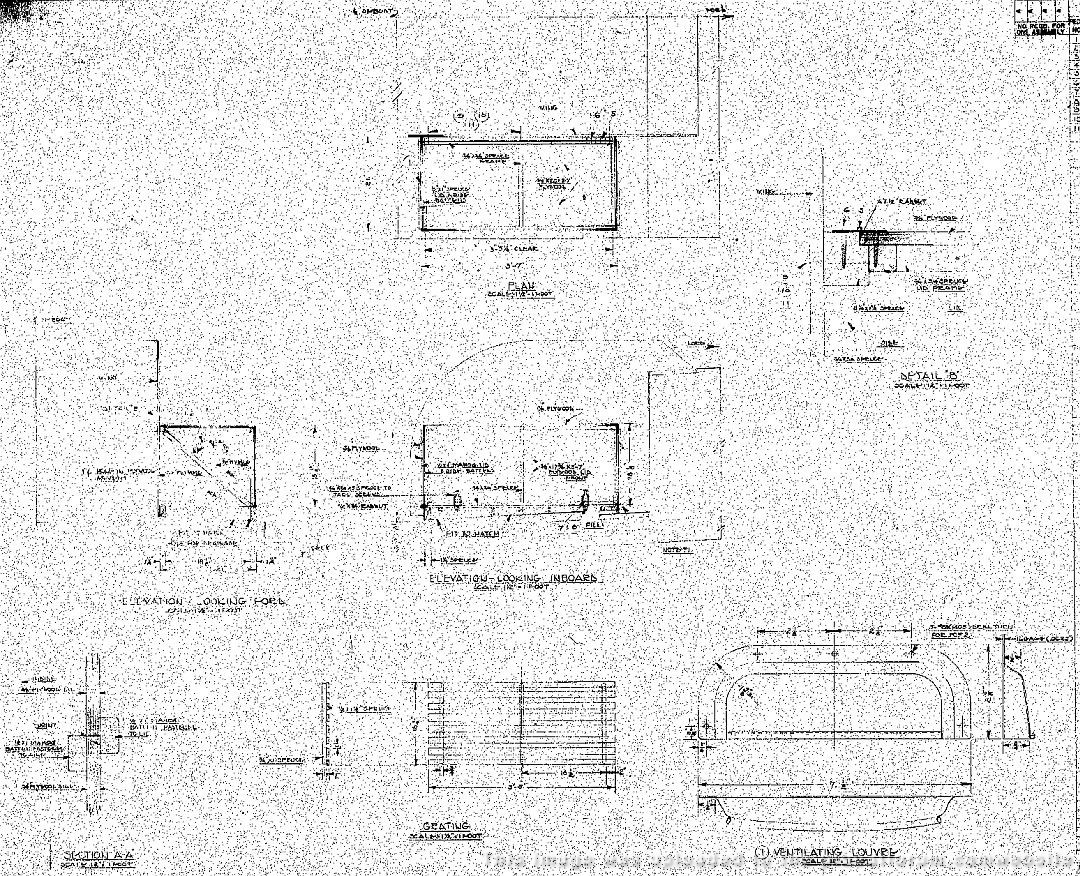
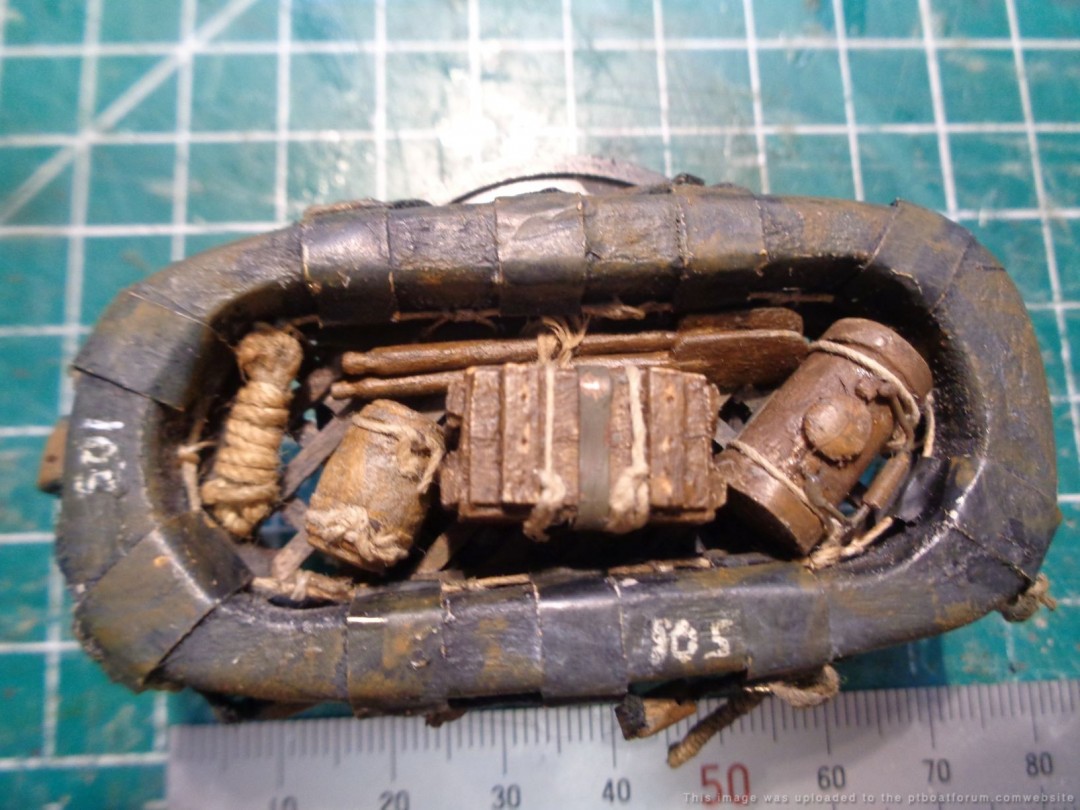
Unless destined for a cold climate, most likely the boat carried a very similar looking rubber boat stowage locker which was usually removed early on. It was located in the same place as the heater. See these 2 threads:
[url]http://www.ptboatforum.com/cgi-bin/MB2/netboardr.cgi?fid=102&cid=101&tid=3993&pg=23&sc=20&x=0[/url]
[url]http://www.ptboatforum.com/cgi-bin/MB2/netboardr.cgi?fid=102&cid=101&tid=3110&st=20&nd=30&pg=36&sc=20[/url]
Here's the drawing for it:
Posted By: Jeff D | Posted on: Feb 1, 2020 - 11:57am
Total Posts: 2200 | Joined: Dec 21, 2006 - 1:30am
Thanks Jeff
I went back and looked at the links, about same size and shape as a heater unit, but no visible heating duct. Also I go along with if we donât need it lose it theory, weight & space are critical. So if not a heater or raft locker, did anything go there??
Posted By: Grady | Posted on: Feb 2, 2020 - 2:31am
Total Posts: 157 | Joined: Oct 2, 2018 - 8:04am
Exactly, one thing PT crews weren't was pack rats! You'd have to check photos of specific boats but I've noticed nothing there for the most part except for the occasional ammo locker.
One thing that I found interesting on the early boats with heaters, the 103 - 162, was that they used the throttle rod housing that ran along the starboard coaming as a duct for heated air:
Posted By: Jeff D | Posted on: Feb 2, 2020 - 3:12am
Total Posts: 2200 | Joined: Dec 21, 2006 - 1:30am
Thanks Jeff I think I will go without the heater unit on the 105, Ok I see what your talking about thatâs the duct flange cover on the throttle rod housing Aft end of the day room right. Would you listen to me Iâm becoming one of you?
Posted By: Grady | Posted on: Feb 2, 2020 - 4:07am
Total Posts: 157 | Joined: Oct 2, 2018 - 8:04am
lol you have fallen into the whirlpool and are being sucked down. Welcome!
Posted By: Jeff D | Posted on: Feb 2, 2020 - 7:23am
Total Posts: 2200 | Joined: Dec 21, 2006 - 1:30am
Grady,
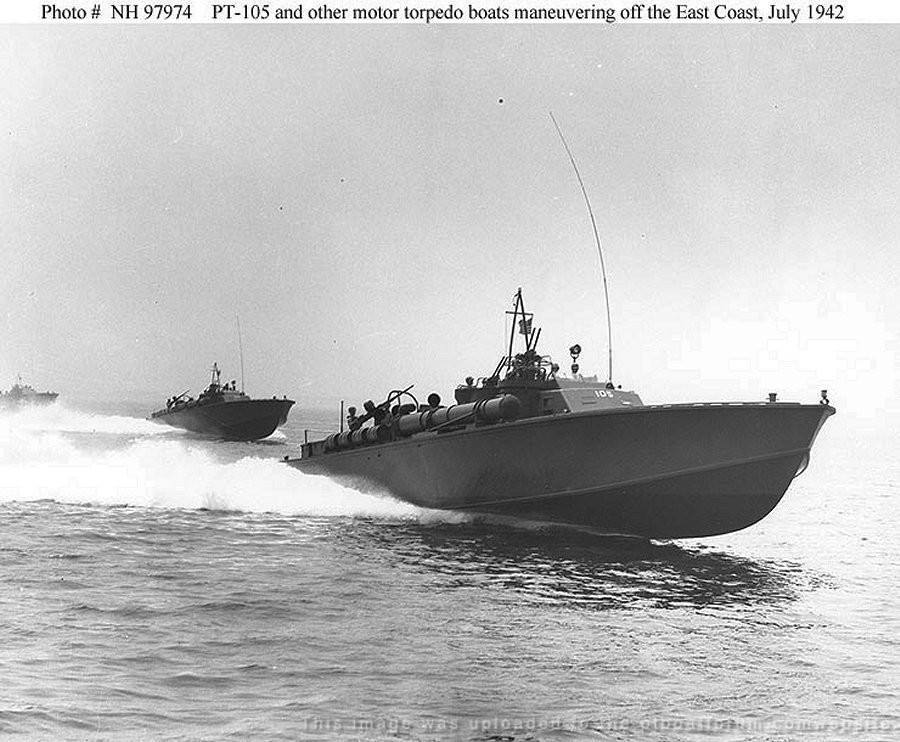
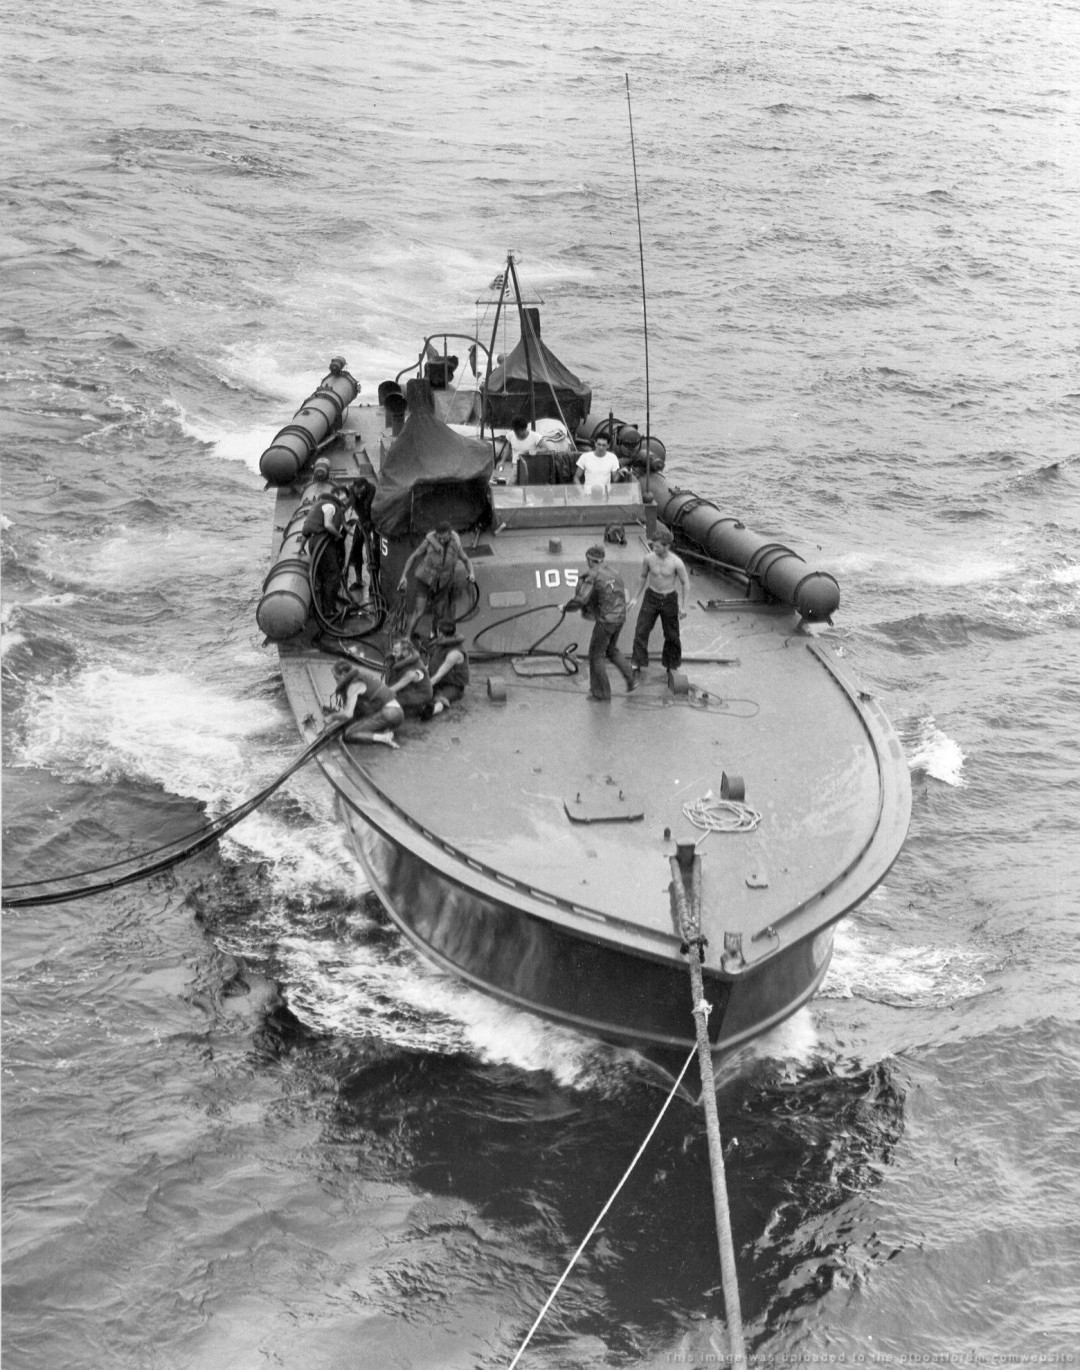
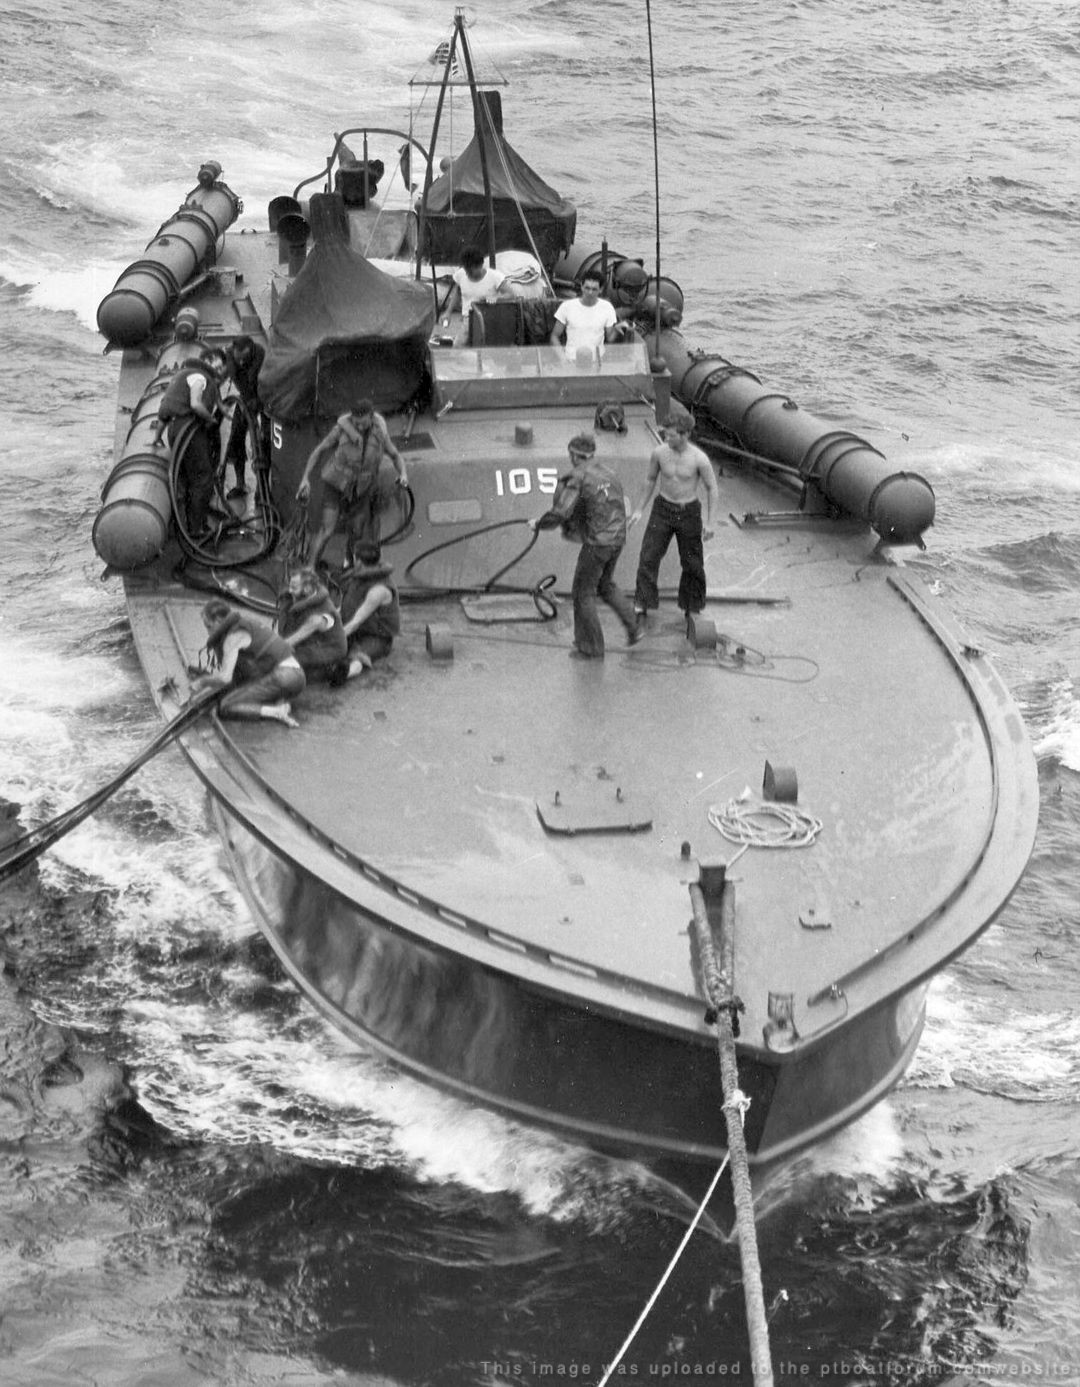
105 certainly had the raft box in photos of her refueling en-route to the Galapagos Is. from Panama.
Best Regards,
Stu.
Posted By: Stuart Hurley | Posted on: Feb 4, 2020 - 12:37am
Total Posts: 255 | Joined: Mar 19, 2013 - 3:32am
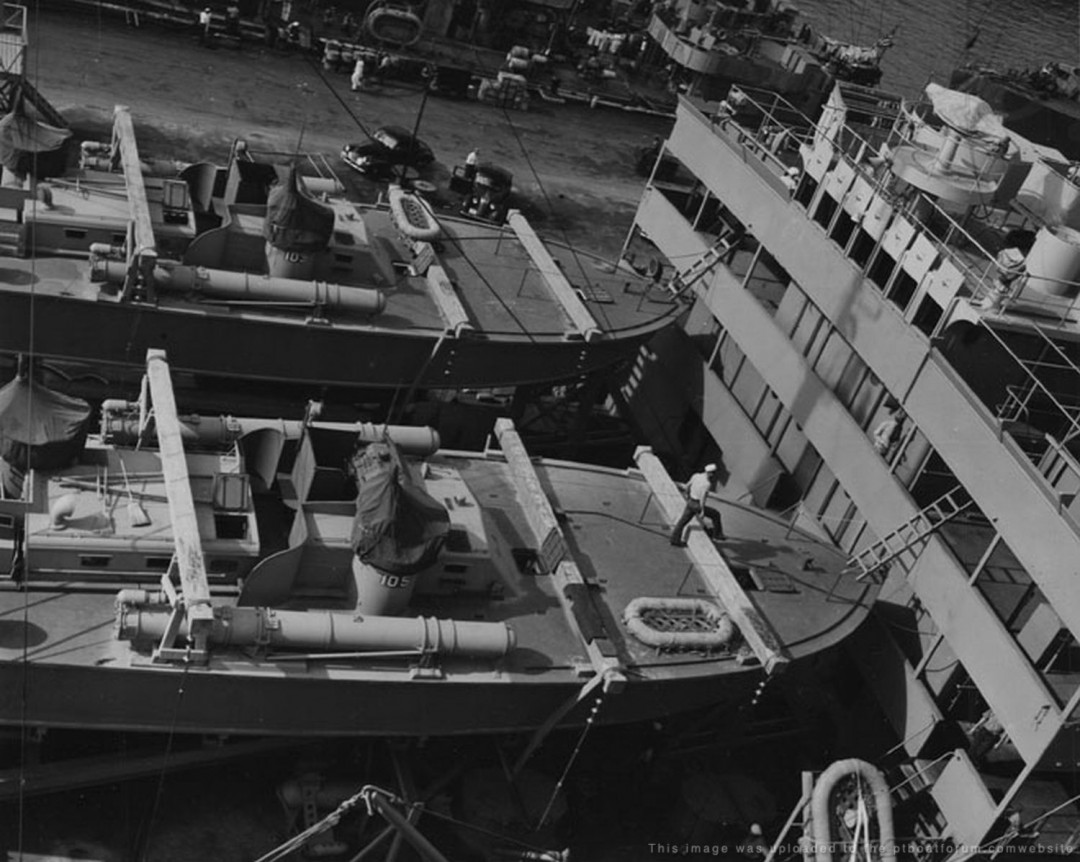
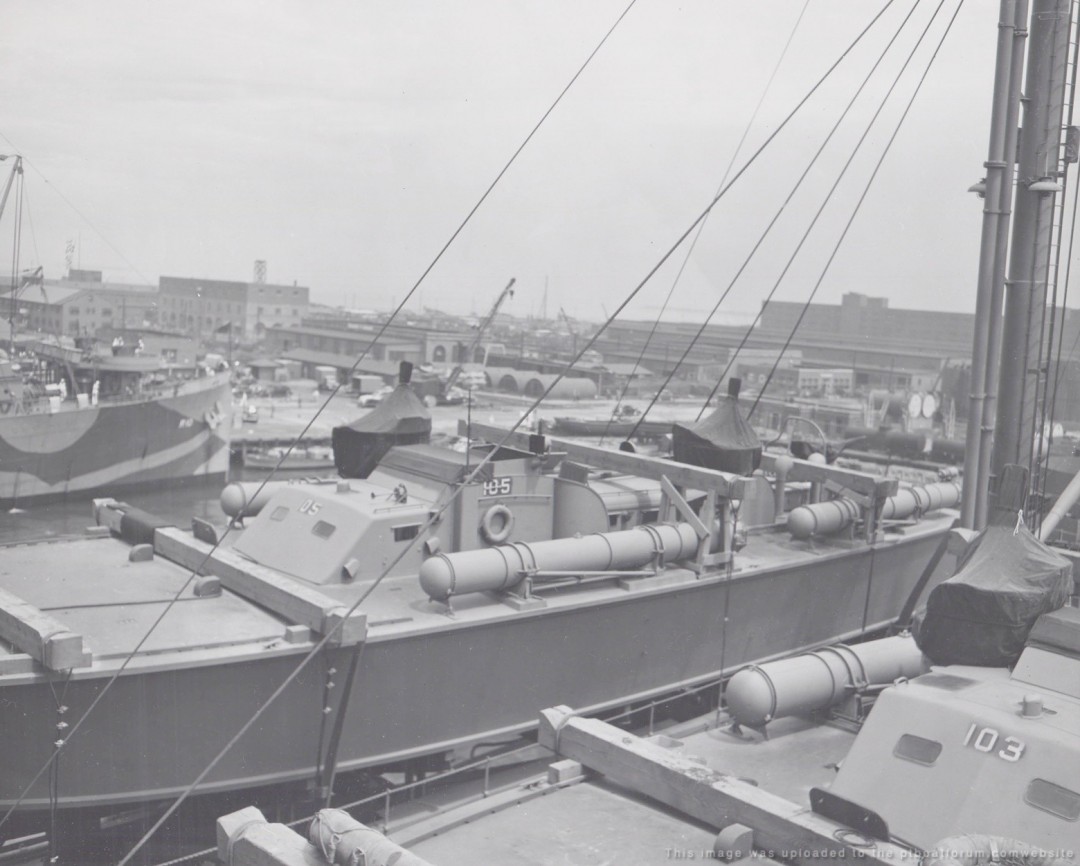
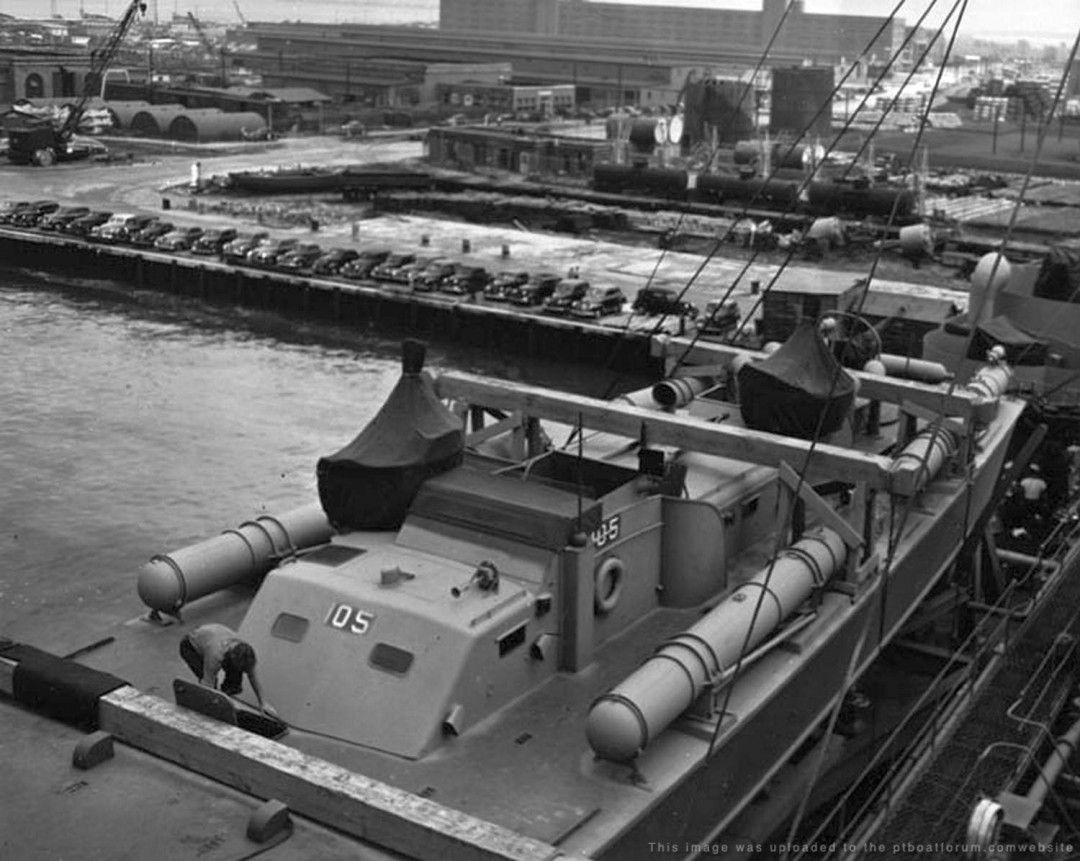
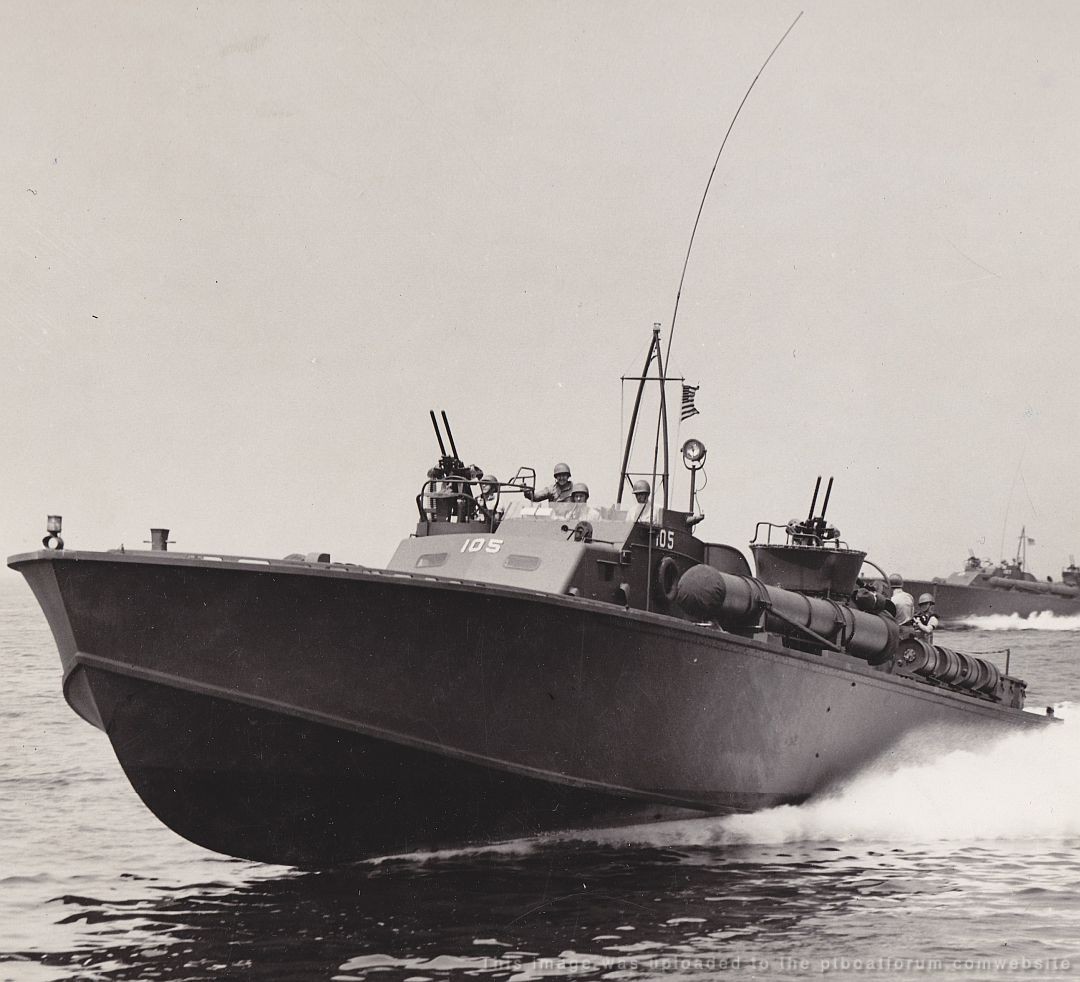
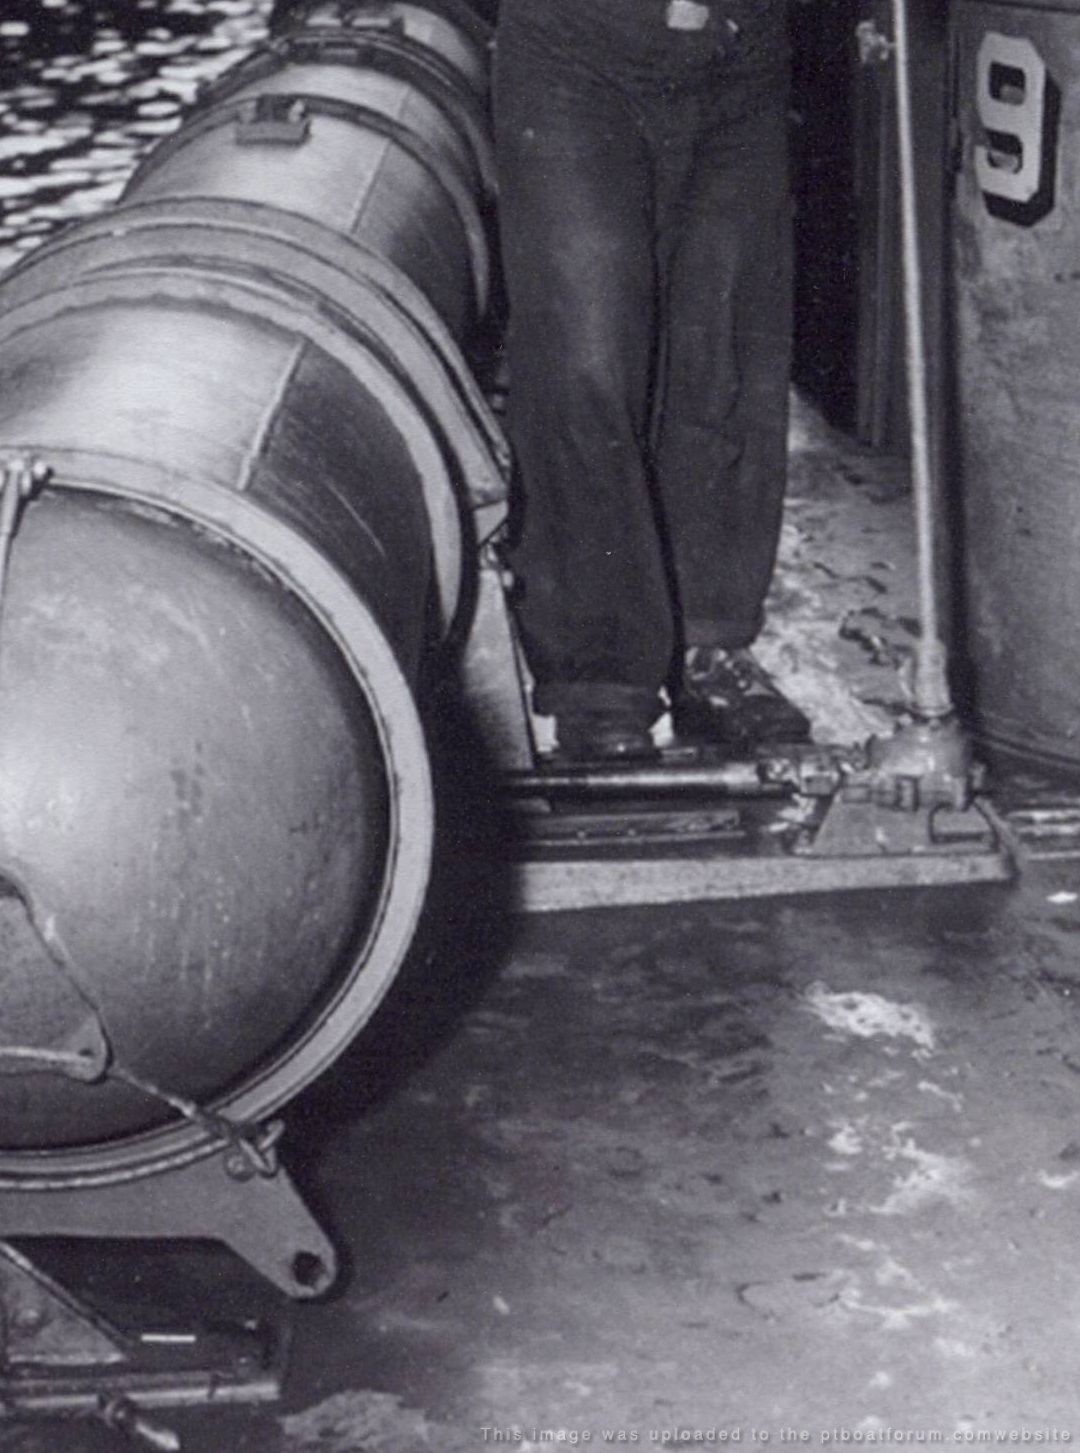
Here is the photo Stu mentioned along with a few others. The series of photos taken July 1942, probably at Melville, shows her with depth charges in place of the aft torpedo tubes:
Posted By: Jeff D | Posted on: Feb 4, 2020 - 6:59am
Total Posts: 2200 | Joined: Dec 21, 2006 - 1:30am
Thanks Jeff & Stu.
A couple of the pics I did not have. Ok Iâm looking at the box right behind the day cabin aft side correct ?
Posted By: Grady | Posted on: Feb 4, 2020 - 7:35am
Total Posts: 157 | Joined: Oct 2, 2018 - 8:04am
The first couple of pictures of being loaded on a ship are not at Melville. Melville didn't look like that. I believe it's the Brooklyn Navy Yard (technically the New York Navy Yard in Brooklyn). That's what Dirk Keresey says in his book PT 105 as they shipped out to Panama.
Charlie
Posted By: 29navy | Posted on: Feb 4, 2020 - 7:43am
Total Posts: 600 | Joined: Dec 28, 2006 - 3:02pm
Grady,
Right behind the day cabin starboard side, in place of the heater unit. In thr refuelling photo the rear corner is visible.
Best Regards,
Stu.
Posted By: Stuart Hurley | Posted on: Feb 4, 2020 - 2:23pm
Total Posts: 255 | Joined: Mar 19, 2013 - 3:32am
Thanks Charlie.
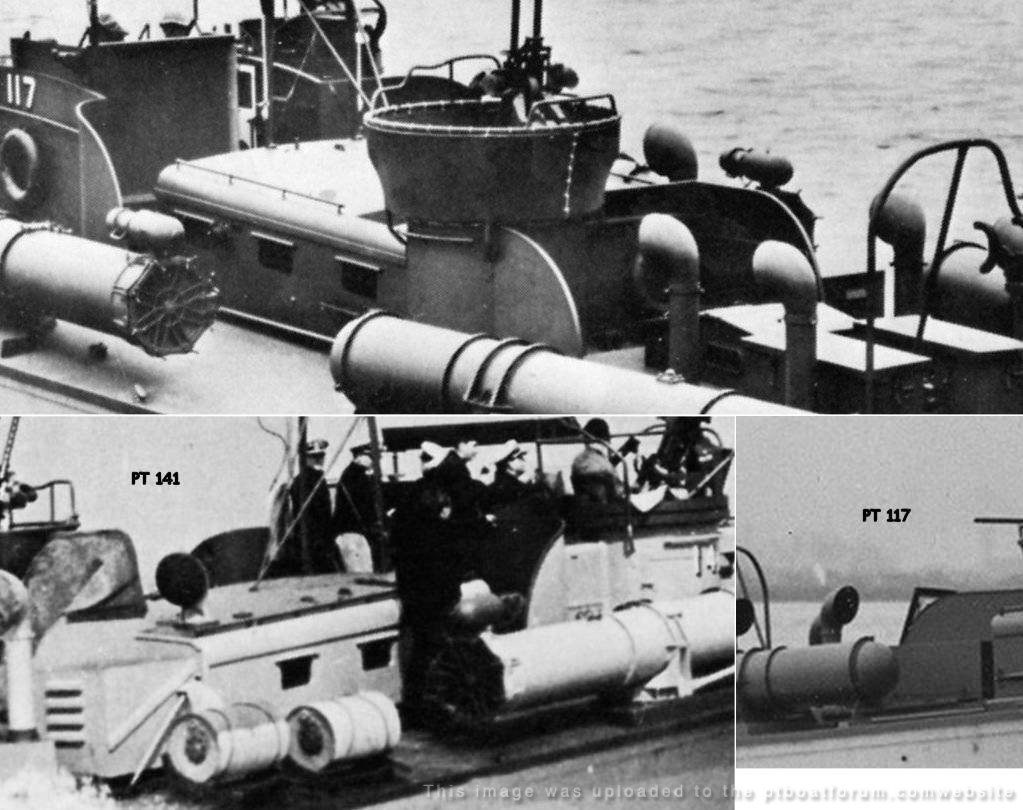
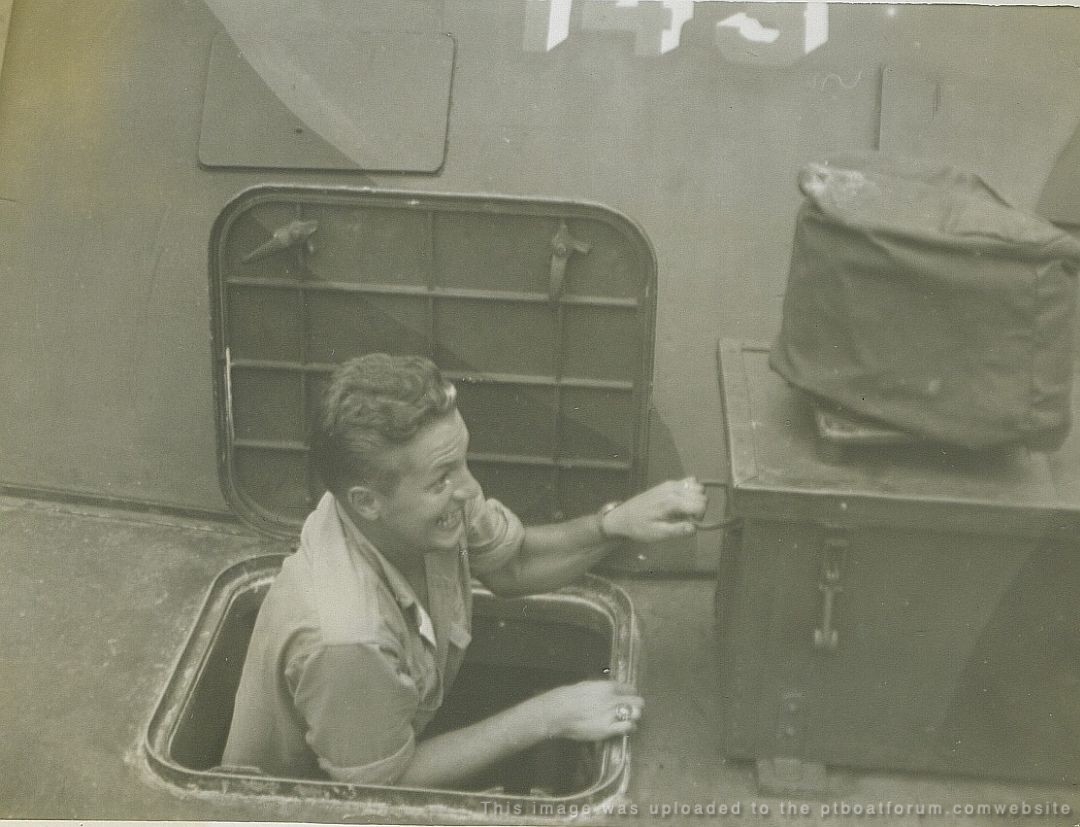
I believe it is Mike, don't know what the odds and ends are around the lockers of both boats are though. Here's a closeup:
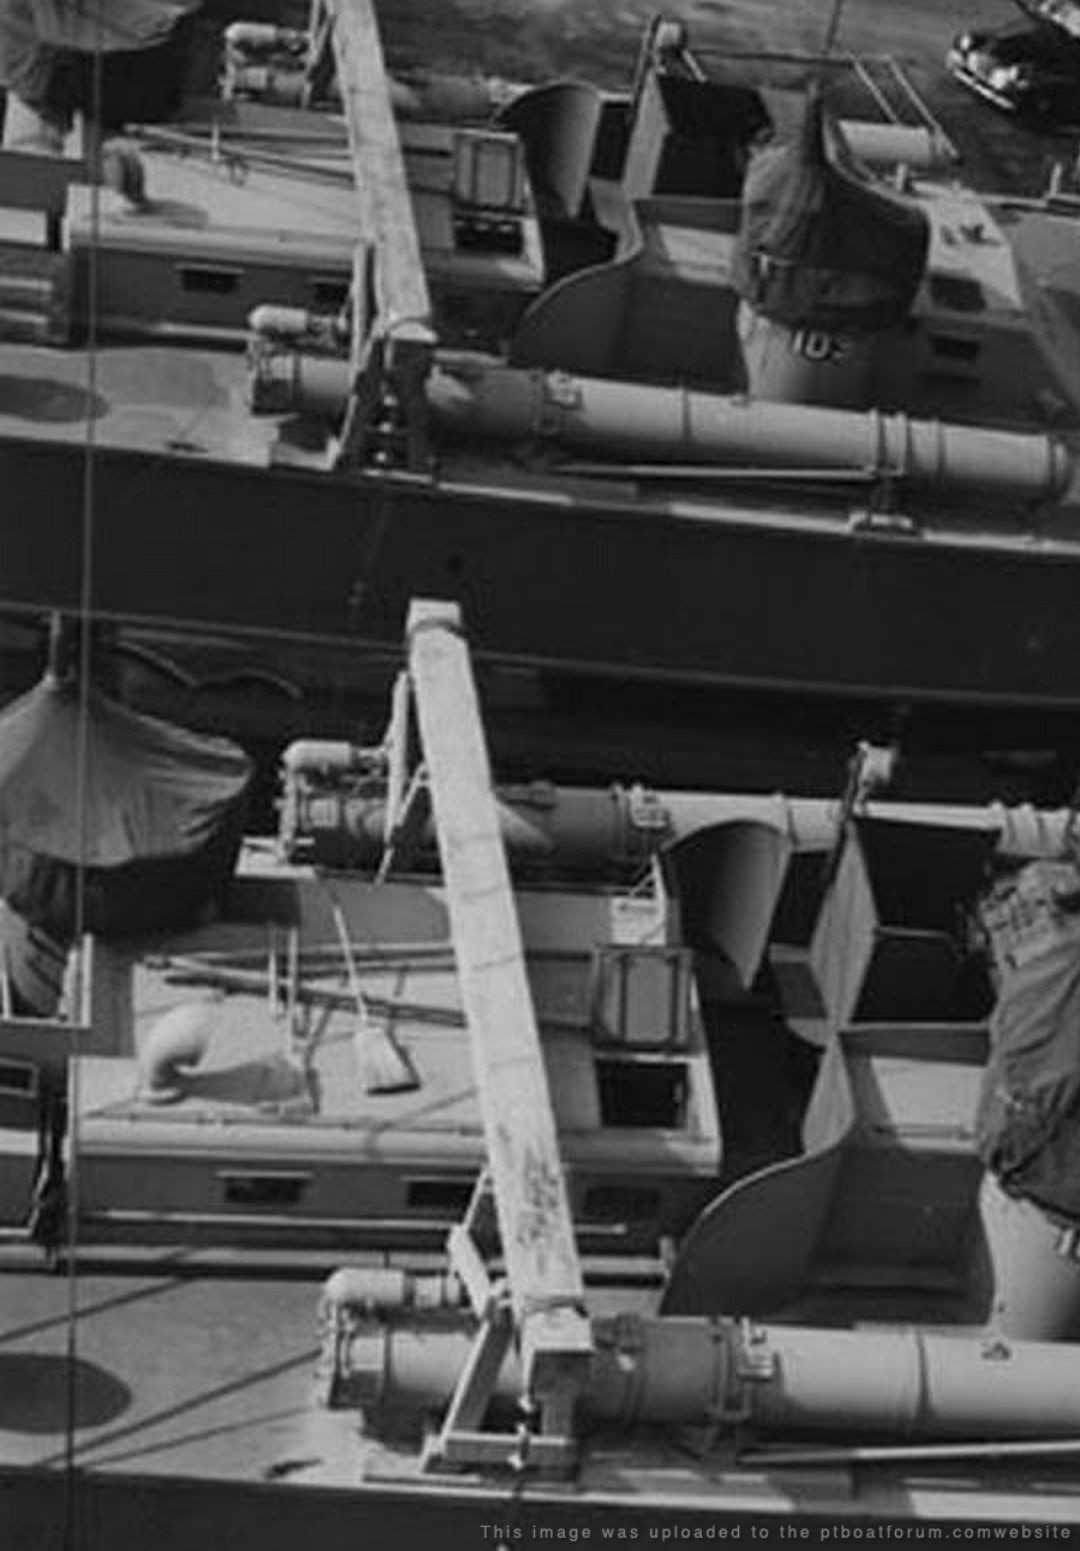
Here's the locker (PT 117) compared to the heater (PT 141):
Posted By: Jeff D | Posted on: Feb 4, 2020 - 2:37pm
Total Posts: 2200 | Joined: Dec 21, 2006 - 1:30am
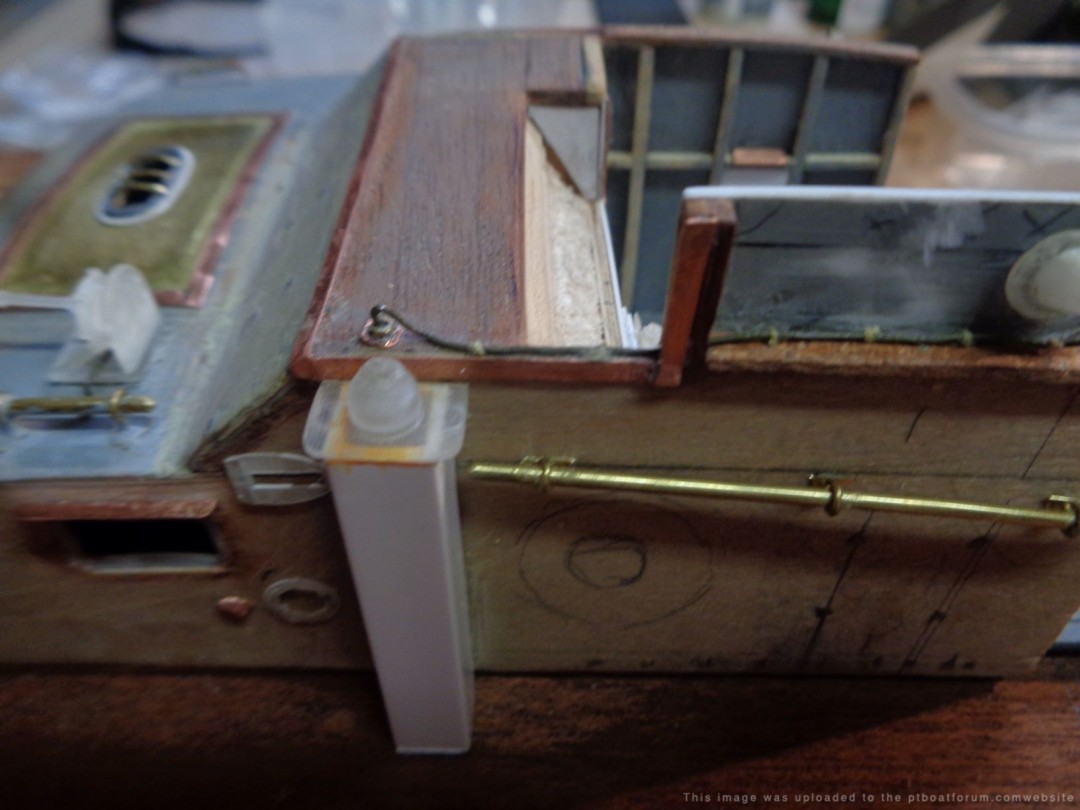
Here's a detail that's often overlooked. The forward most starboard side window on the Day Cabin is the same frame as that on the forward side of the Chart House. This window is the non opening type because it is located behind the ladder and hatch. I've yet to see a modeling company get that right.
When I spoke with Mr. Keresey about his boat he told me that the life raft was often on top of the Chart House or they threw it on the Day Cabin. They wanted it out of the way.
Dave
David Waples
Posted By: David Waples | Posted on: Feb 4, 2020 - 2:45pm
Total Posts: 1679 | Joined: Jan 2, 2007 - 9:55pm
Thanks guys , this is really good info. Dave dead light frame with no rain guards on the forward starboard window of the day cabin,. totally missed it. Looks like I will be going back and correcting.
also same type on forward window correct ?
Posted By: Grady | Posted on: Feb 5, 2020 - 3:02am
Total Posts: 157 | Joined: Oct 2, 2018 - 8:04am
Grady,
No, there was a rain strip on the forward window and drain to port. Aft window, rain strip and drain to stbd. Welcome to the can of worms.
Best Regards,
Stu.
Posted By: Stuart Hurley | Posted on: Feb 5, 2020 - 3:12am
Total Posts: 255 | Joined: Mar 19, 2013 - 3:32am
Thanks guys , this is really good info. Dave dead light frame with no rain guards on the forward starboard window of the day cabin,. totally missed it. Looks like I will be going back and correcting.
also same type on forward window correct ?
No. The forward and aft windows on the Day Cabin are the same as all the others. The only exception is the one behind the ladder which you can see in the attached photo. Note that the black out panel behind the ladder slides up and down instead of hinging in.
[image]https://live.staticflickr.com/65535/49491761338_39bee2646f_o.jpg[/image]
David Waples
Posted By: David Waples | Posted on: Feb 5, 2020 - 5:56am
Total Posts: 1679 | Joined: Jan 2, 2007 - 9:55pm
Thanks all, The new guy is a little slow at picking up the finer points, however you don't get it right if you don't ask
Grady
Posted By: Grady | Posted on: Feb 5, 2020 - 8:31am
Total Posts: 157 | Joined: Oct 2, 2018 - 8:04am
One other detail about the day cabin windows, the stbd fwd fixed window was mounted against the outside while the others were inset quite a bit:

Posted By: Jeff D | Posted on: Feb 6, 2020 - 8:31am
Total Posts: 2200 | Joined: Dec 21, 2006 - 1:30am
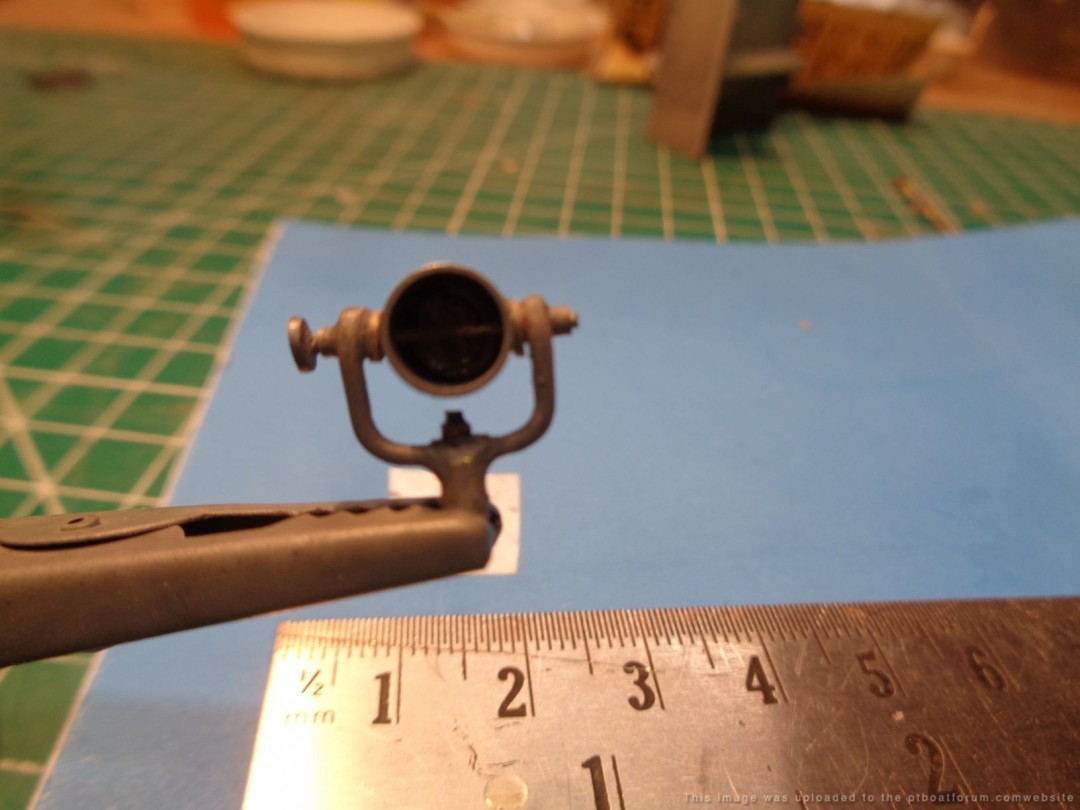
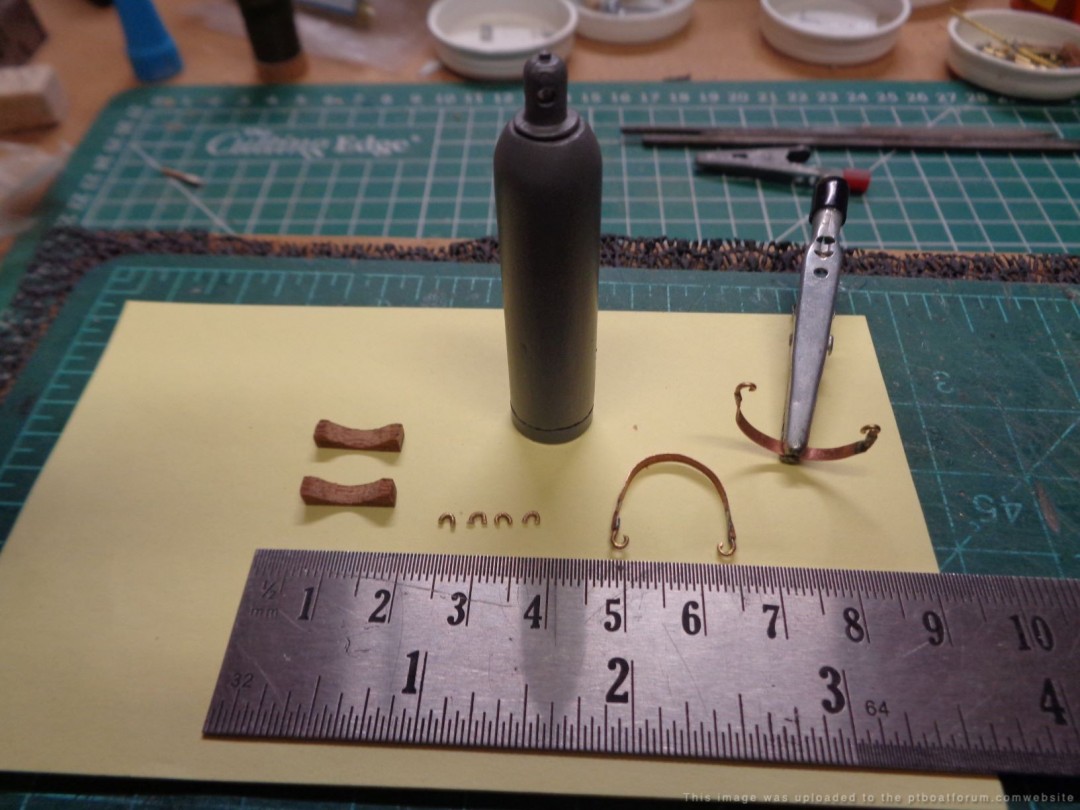
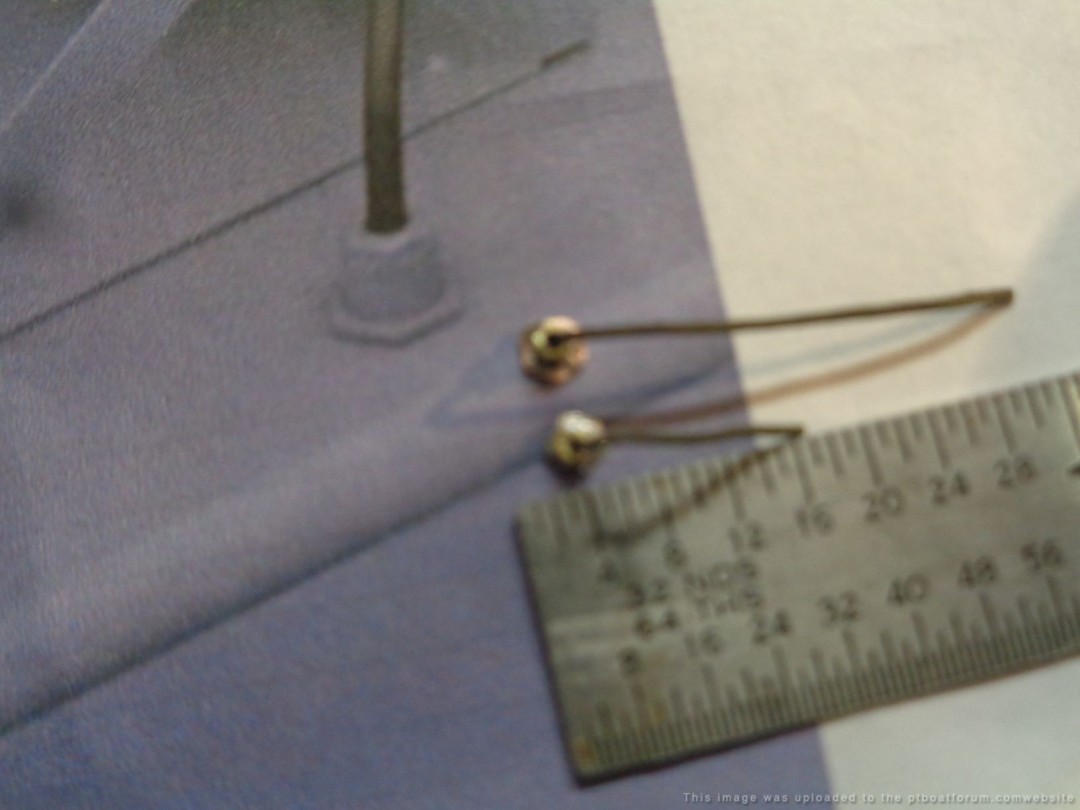
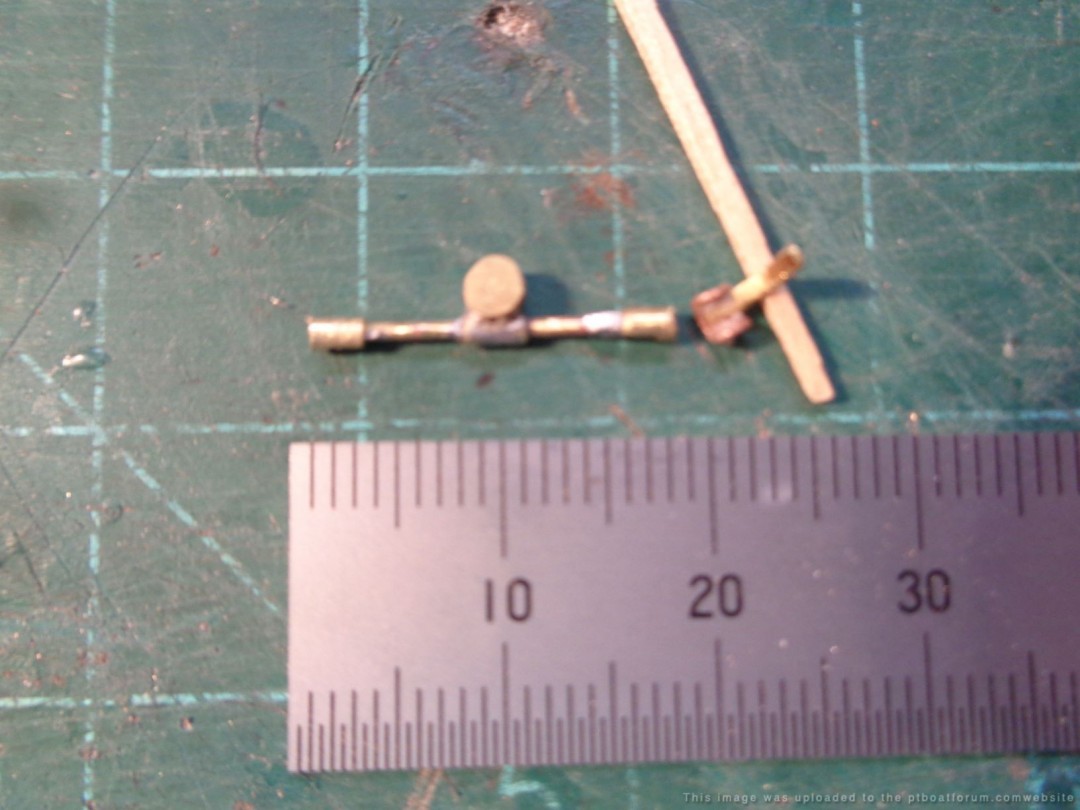
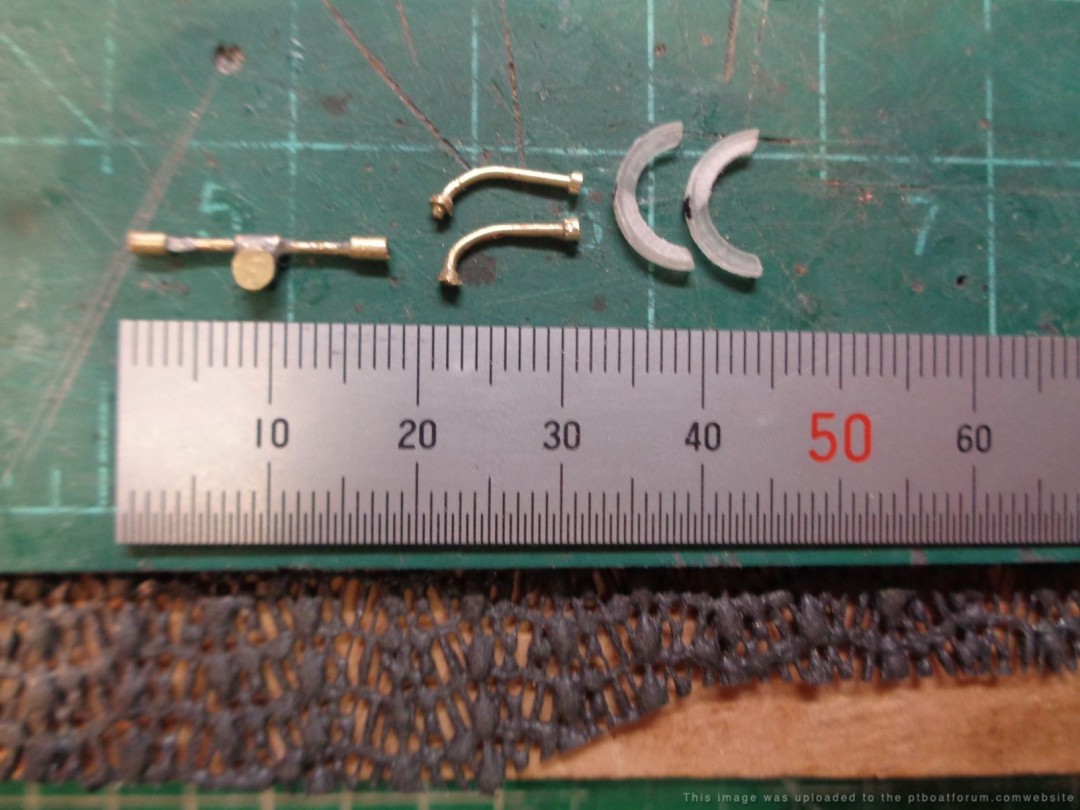
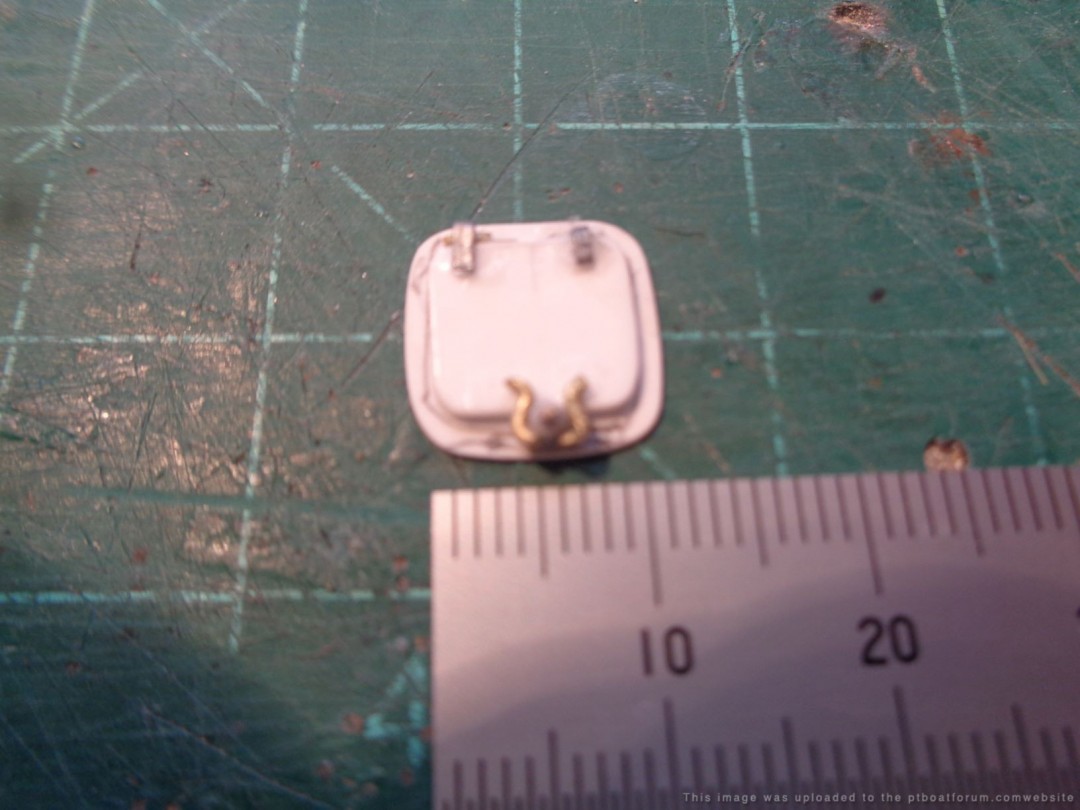
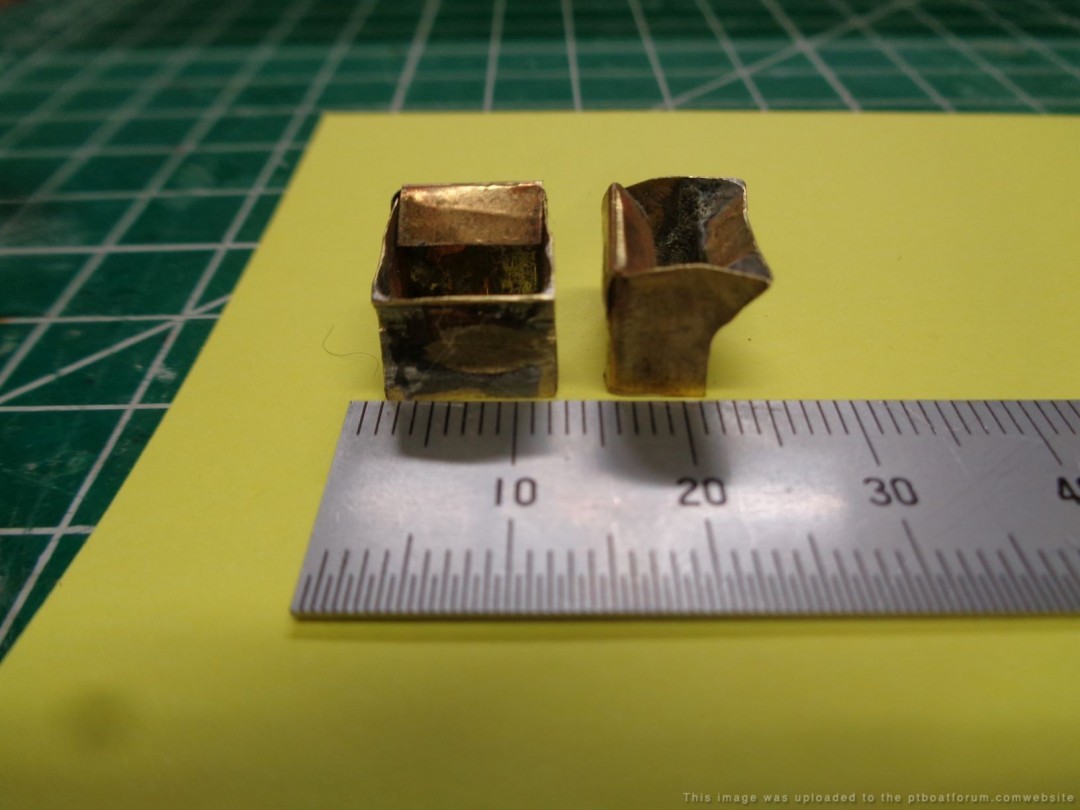
Jeff, my first try at making the 20mm horn, using the pics you sent, close I think, maybe a little short on the support post, still at this scale the simple is patience test thoughts if I should rework ?
Grady
Posted By: Grady | Posted on: Feb 13, 2020 - 2:38am
Total Posts: 157 | Joined: Oct 2, 2018 - 8:04am
Sheesh that thing is tiny! Looks good to me Mike.
Posted By: Jeff D | Posted on: Feb 13, 2020 - 3:55am
Total Posts: 2200 | Joined: Dec 21, 2006 - 1:30am
Thanks Jeff, passing muster is important, you once told me what AMS was, know I got it thanks for adding to the "Fun " of details matter
Posted By: Grady | Posted on: Feb 13, 2020 - 4:15am
Total Posts: 157 | Joined: Oct 2, 2018 - 8:04am
Grady;
Charlie posted:
"The first couple of pictures of being loaded on a ship are not at Melville. Melville didn't look like that. I believe it's the Brooklyn Navy Yard (technically the New York Navy Yard in Brooklyn). That's what Dirk Keresey says in his book PT 105 as they shipped out to Panama.
Charlie"
PT 105 and the rest of RON 5 ran down from the Brooklyn Navy Yard to Norfolk Virginia. They are being loaded at what is called Norfolk Naval Shipyard in Portsmounth Virginia. The ship is at pier 5. I worked there for 3 years.
Take care,
TED
Posted By: TED WALTHER | Posted on: Feb 13, 2020 - 5:30pm
Total Posts: 3059 | Joined: Oct 16, 2006 - 7:42am
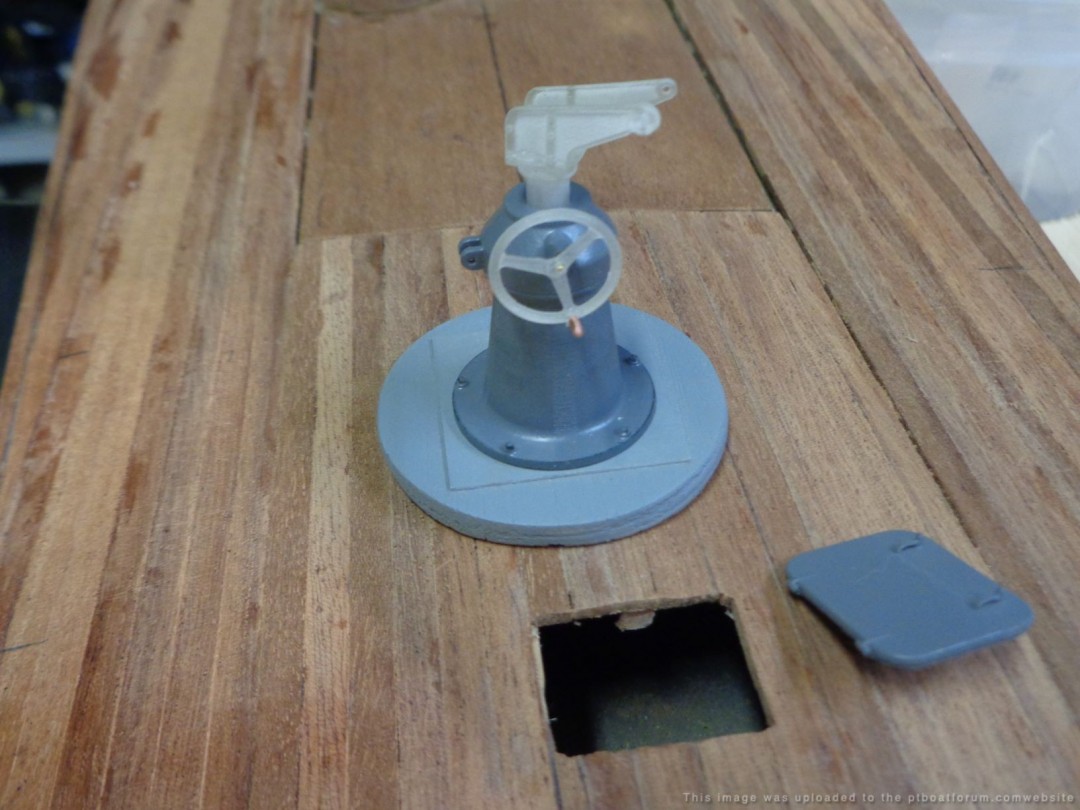
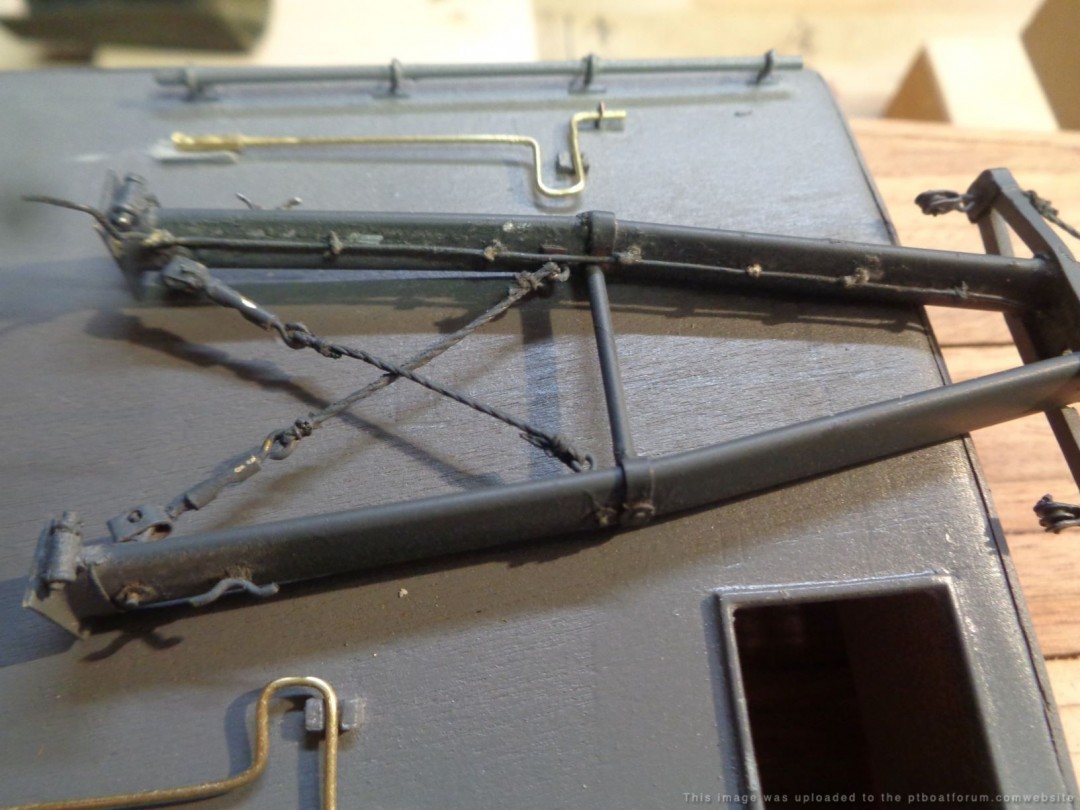
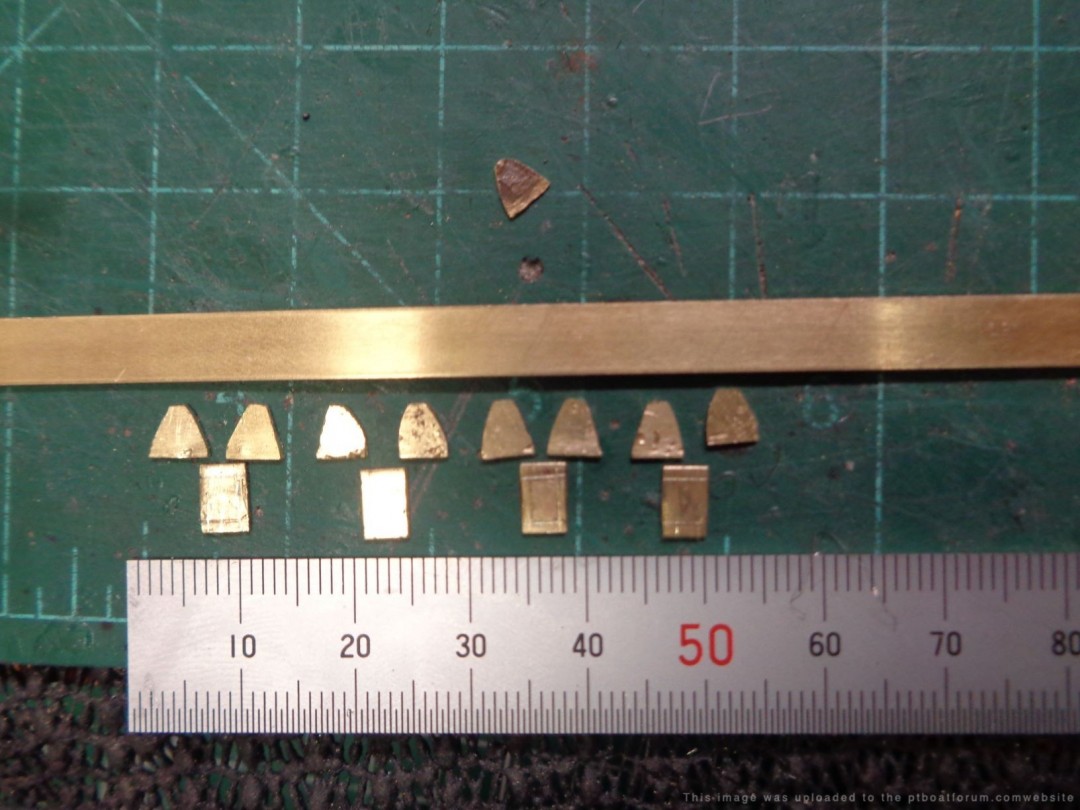
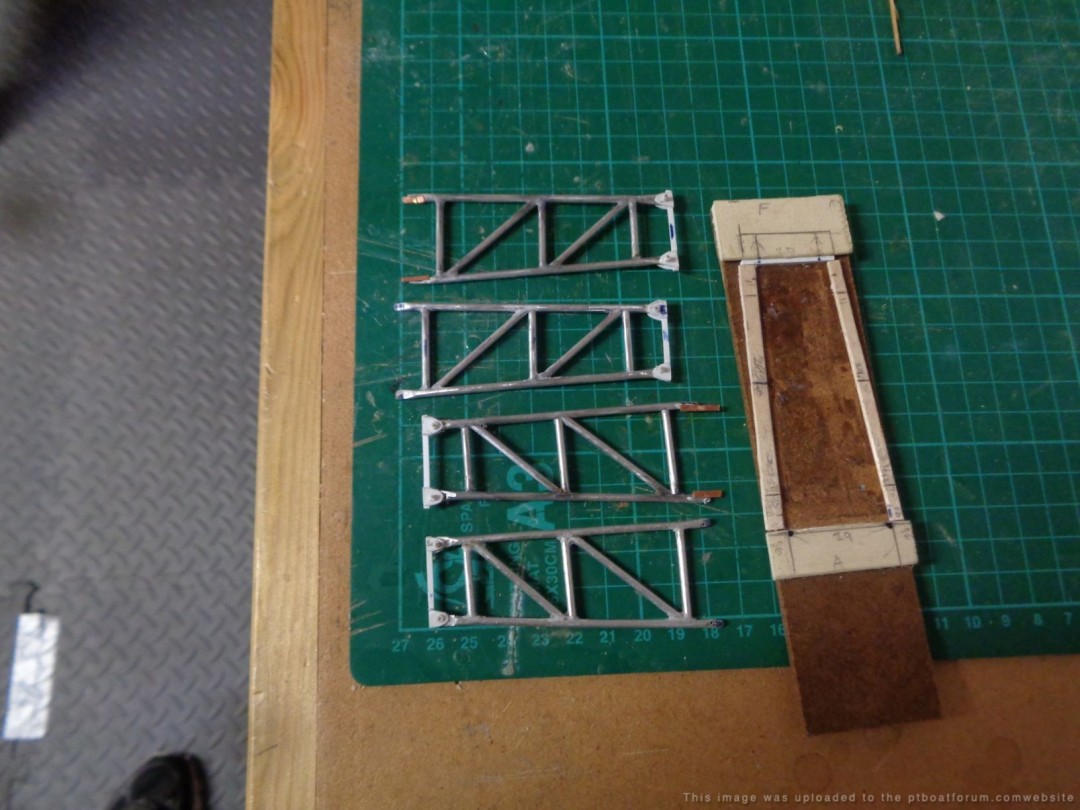
The mast frame for the 103 class boat, looking for a good way to put, this from the pics and drawing for Jeff Dâs site itâs not round, yet itâs not square looking either , if that makes sense. Can anyone help the shape of the frame parts. ?
Posted By: Grady | Posted on: Feb 15, 2020 - 8:35am
Total Posts: 157 | Joined: Oct 2, 2018 - 8:04am
I have the cross sections on the mast drawing, they're hard to notice but they are to the left of the side view. The legs are an airfoil shape and they taper towards the top. Here's one to the left of the base socket:

Posted By: Jeff D | Posted on: Feb 15, 2020 - 8:53am
Total Posts: 2200 | Joined: Dec 21, 2006 - 1:30am
Thanks Jeff, When you look hard at it, I see what you mean. My best guess for getting the material would be Aero or streamline tubing .
Great , once I get the close size so I can order the tube, Let the mast building began. .
Posted By: Grady | Posted on: Feb 15, 2020 - 9:46am
Total Posts: 157 | Joined: Oct 2, 2018 - 8:04am
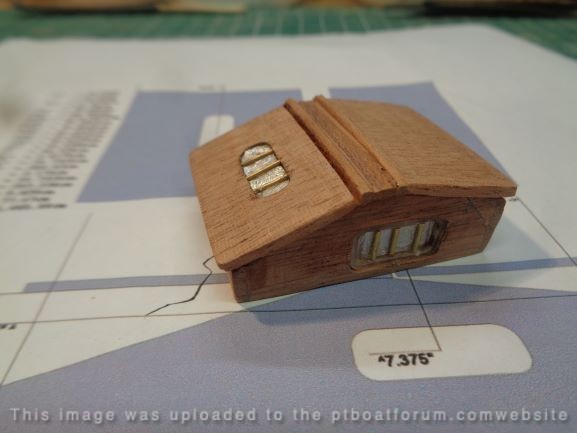
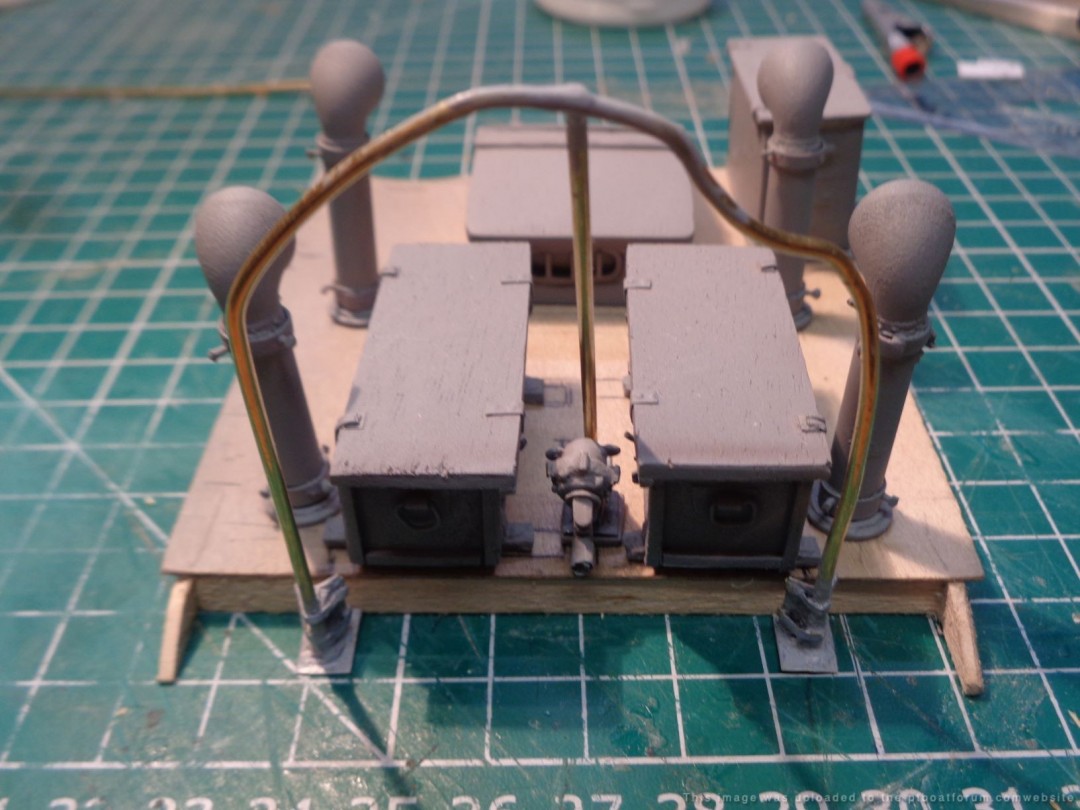
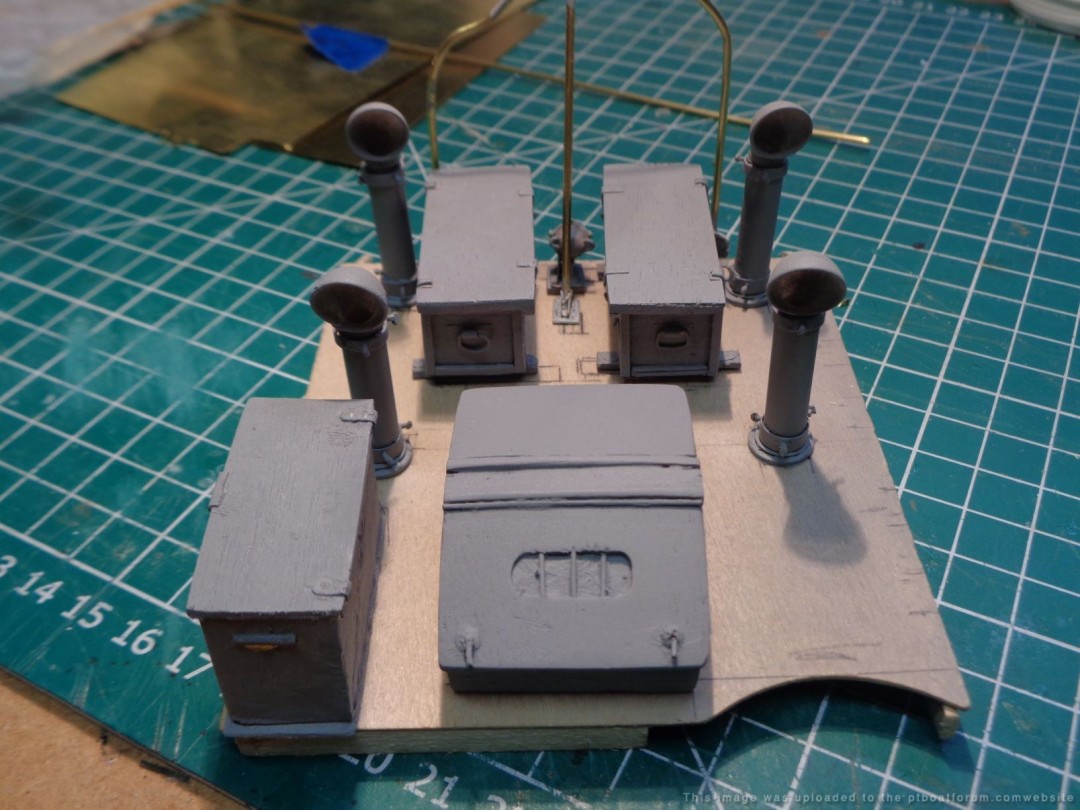
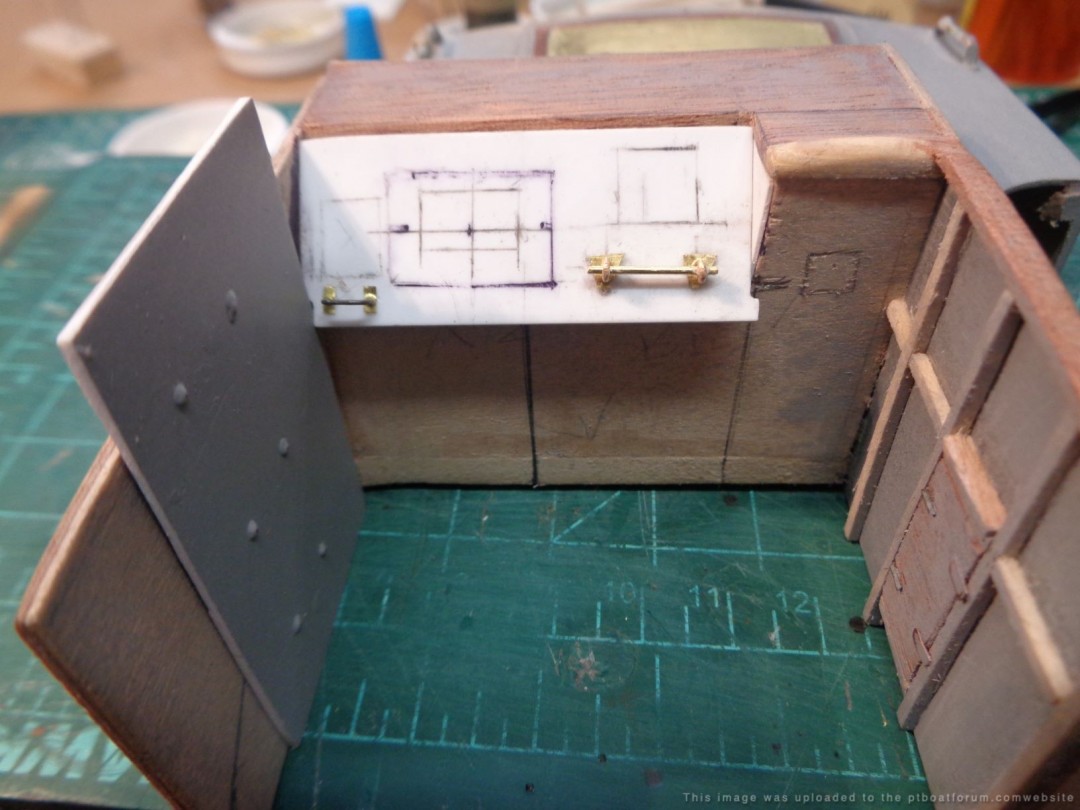
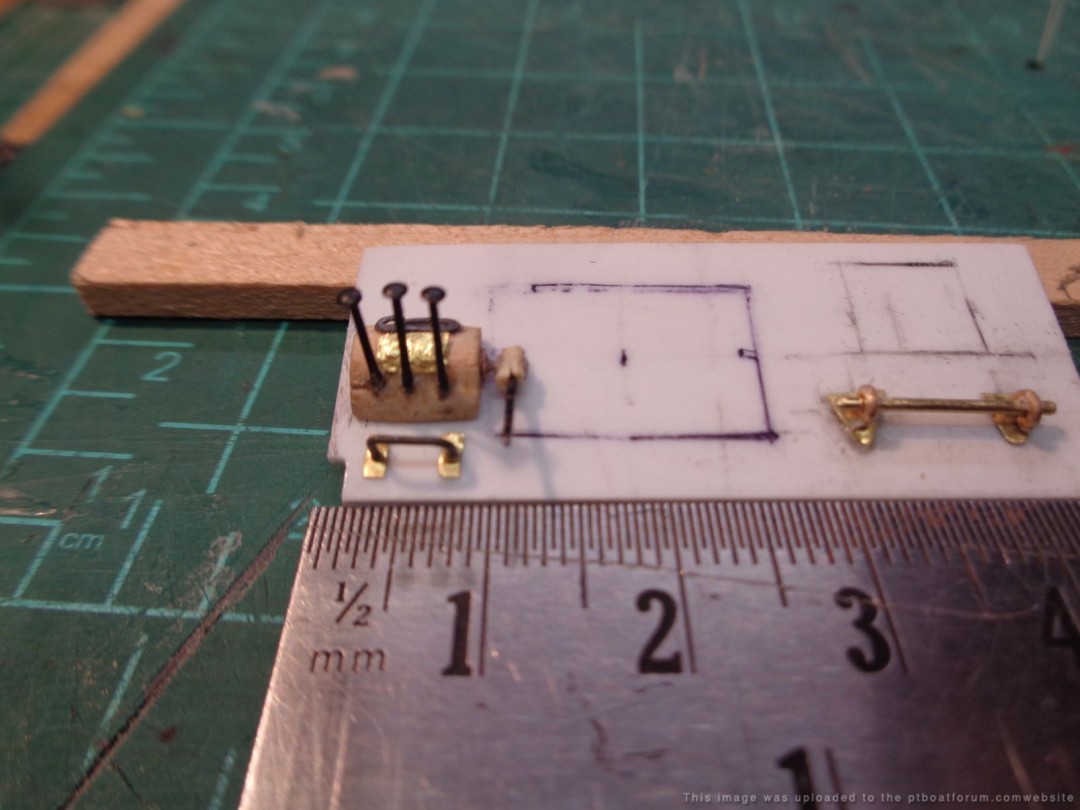
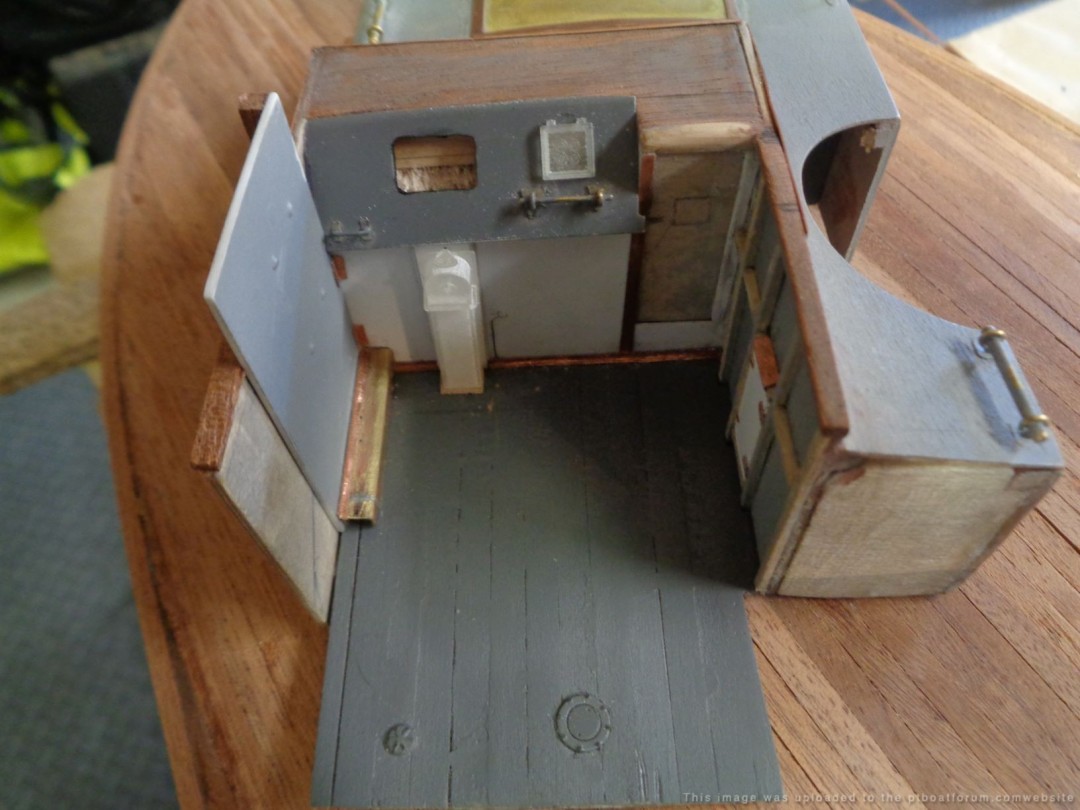
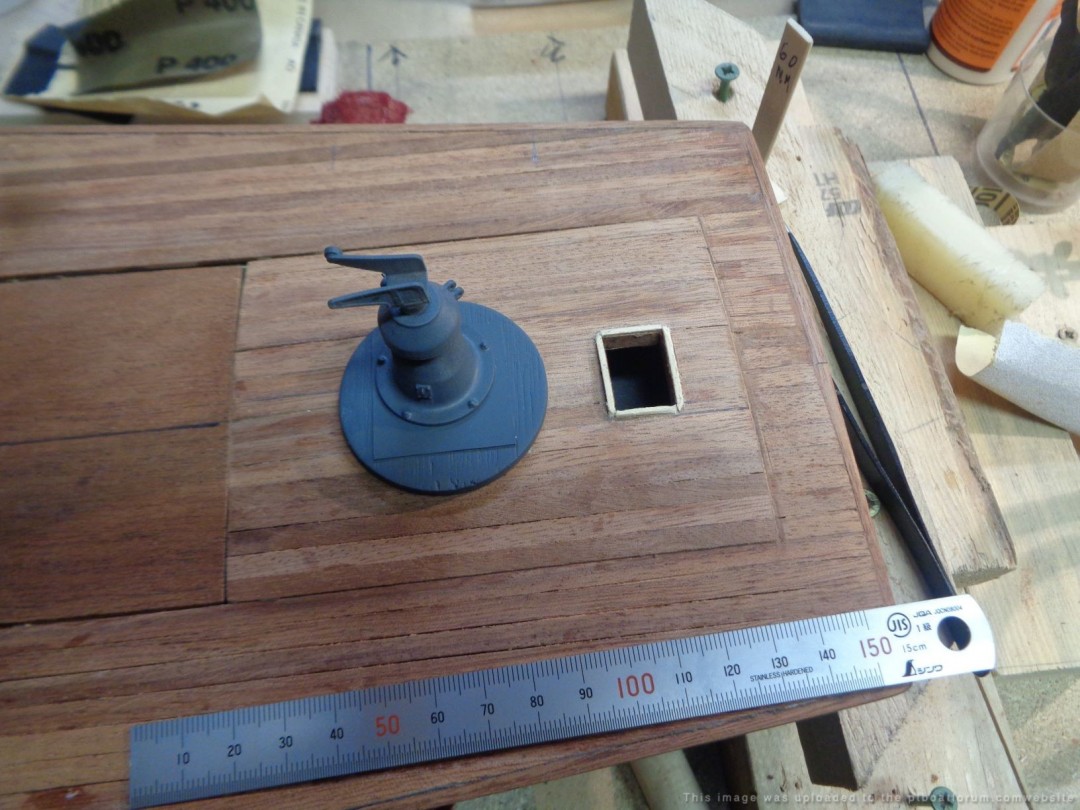
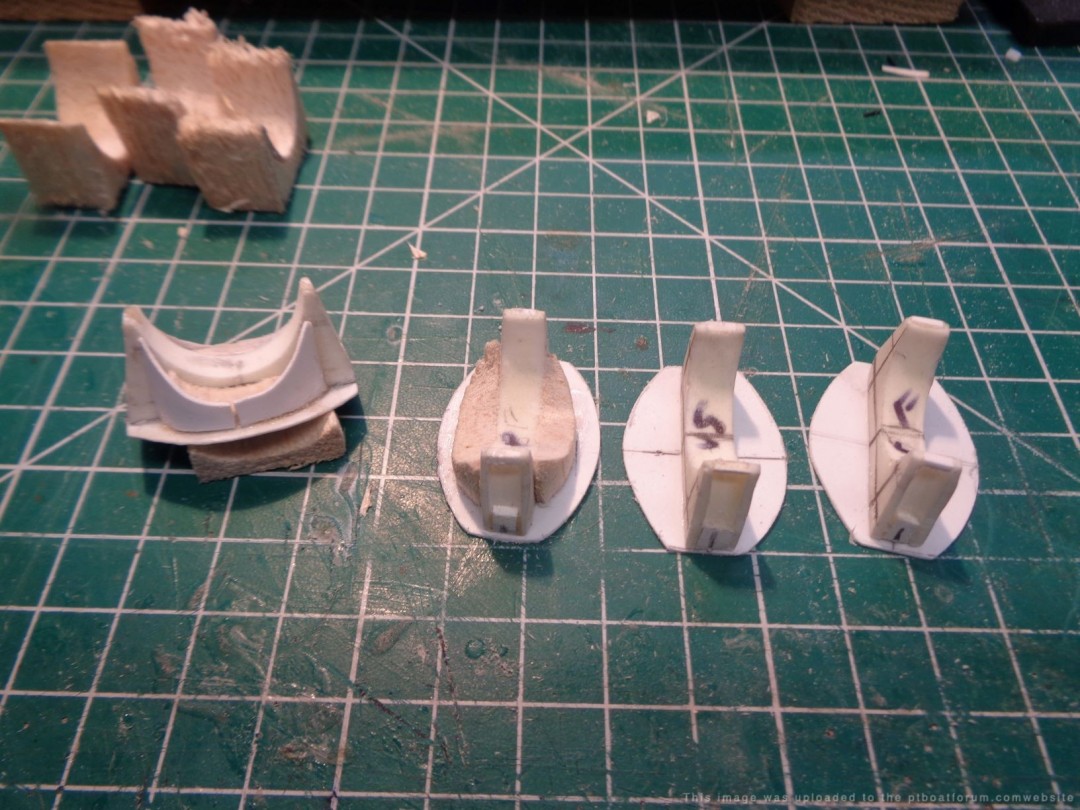
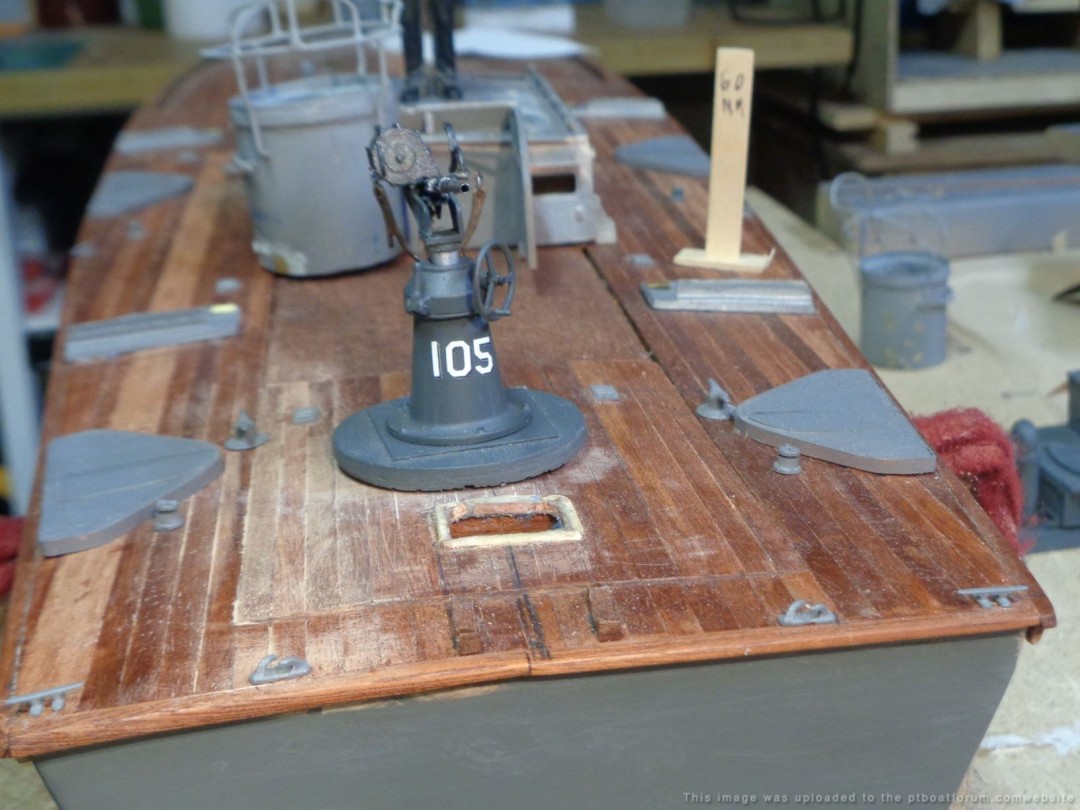
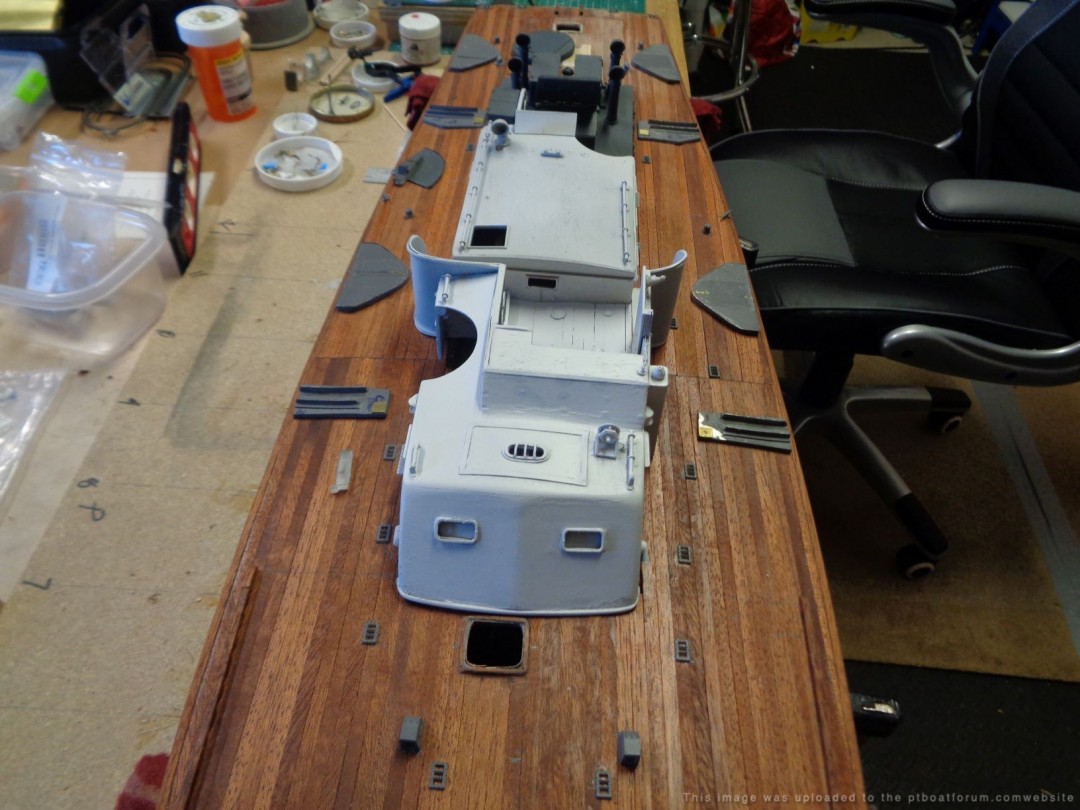
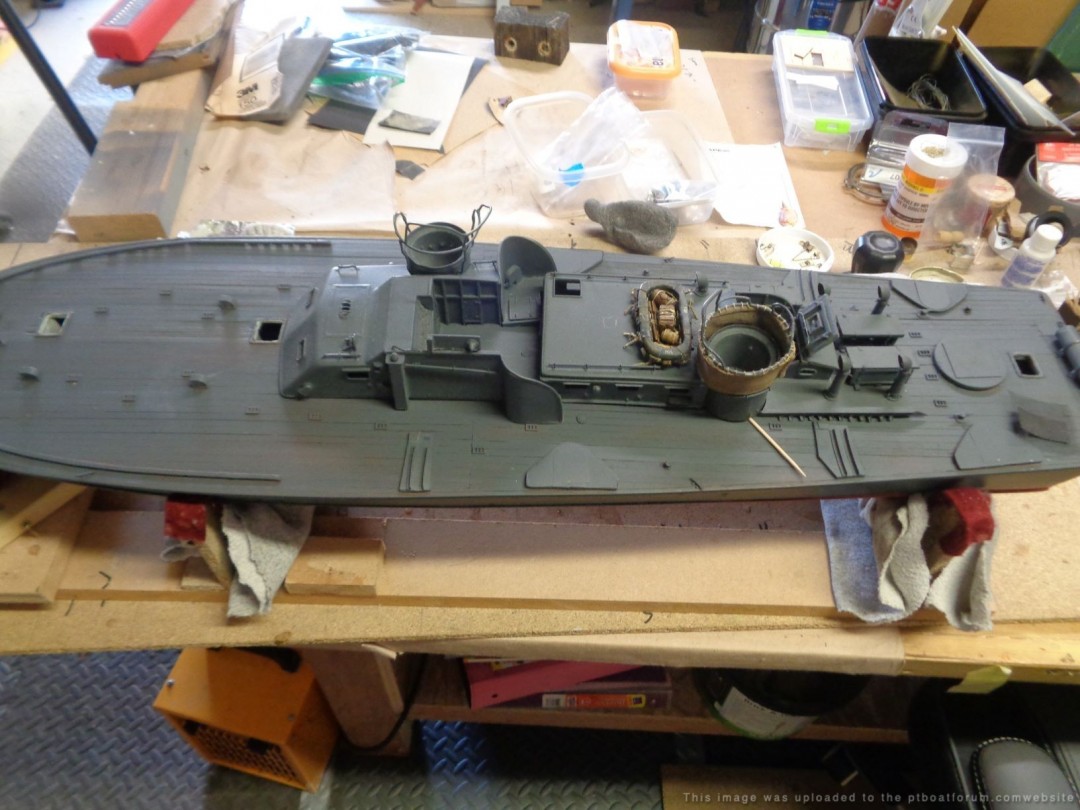
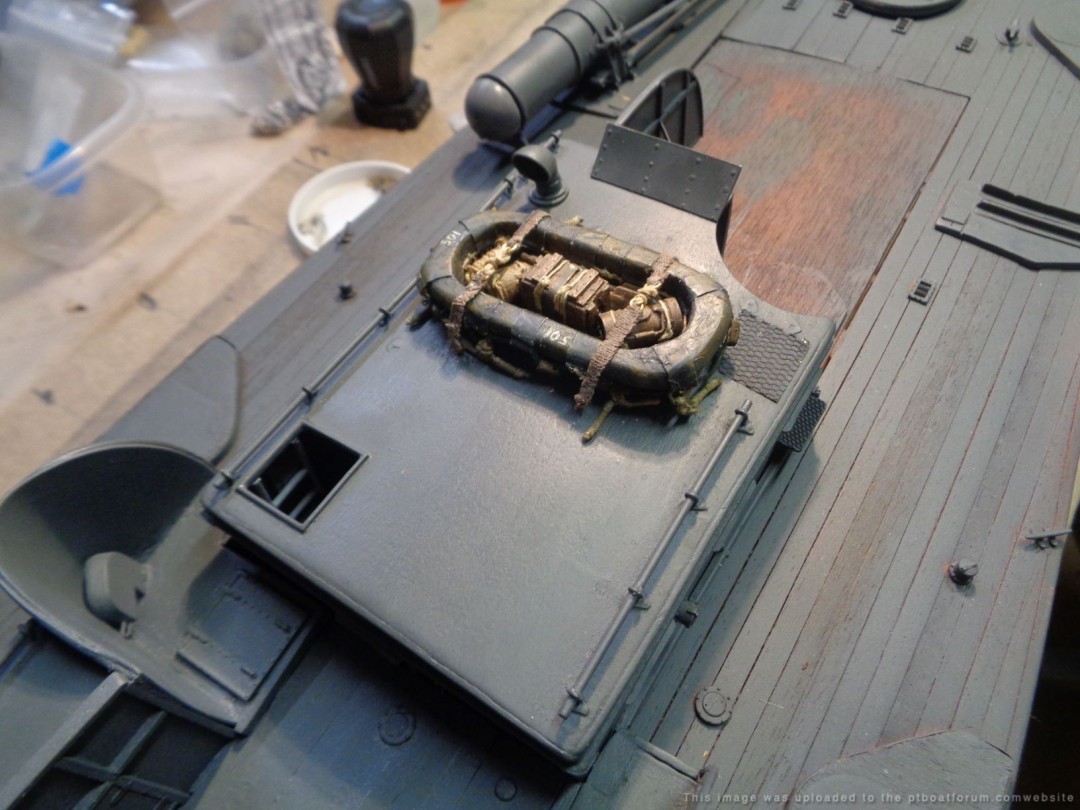
Fit checking parts on the engine house cover, still some clean up to do, smooth out some of the wood, more primer, but getting there. Did I miss anything in the detail?
Posted By: Grady | Posted on: Feb 16, 2020 - 6:38am
Total Posts: 157 | Joined: Oct 2, 2018 - 8:04am
I guess this part would help, age is great
Posted By: Grady | Posted on: Feb 16, 2020 - 6:41am
Total Posts: 157 | Joined: Oct 2, 2018 - 8:04am
Grady;
Why did you paint the dead light on the engine room hatch? The amount of detail you are adding, why take this short cut? I donât really remember a photo where they painted over these, because, as Jeff has shown on his factory blueprint based 3D schematics, these all had âinside shutters â , so light would not be seen on the outside. They had a strict no paint direction in one of the guidebooks or blueprints I read. Otherwise you are doing great.
Take care,
TED
Posted By: TED WALTHER | Posted on: Feb 16, 2020 - 8:49am
Total Posts: 3059 | Joined: Oct 16, 2006 - 7:42am
*****FFM Duplicate message*****
Posted By: TED WALTHER | Posted on: Feb 16, 2020 - 9:39am
Total Posts: 3059 | Joined: Oct 16, 2006 - 7:42am
Thanks Ted, what's the reason I put it out there, because I will miss or misinterpret things like this. I simply don't have the depth of knowledge about the boats. As long as things keep getting pointed out , I will do my best (skill level ) to fix them and get them right
Mike
Posted By: Grady | Posted on: Feb 16, 2020 - 10:06am
Total Posts: 157 | Joined: Oct 2, 2018 - 8:04am
đđģ
Posted By: TED WALTHER | Posted on: Feb 16, 2020 - 12:01pm
Total Posts: 3059 | Joined: Oct 16, 2006 - 7:42am
Ted,
Once I get the frame removed, what is the background? a frosted plastic, or a blackout shade?
& are they all this way on the engine cover Also some pictures show the side frames without bars, the Elco blueprints are hard to read, but it looks like they say only the #7 frames have bars which looks to be the hatch & the Aft frame? I just want to clarify this.
As always, your input is valued.
Mike
Posted By: Grady | Posted on: Feb 17, 2020 - 4:18am
Total Posts: 157 | Joined: Oct 2, 2018 - 8:04am
Clear plastic. here are some photos on even showing the back side of the hatch with shutter.
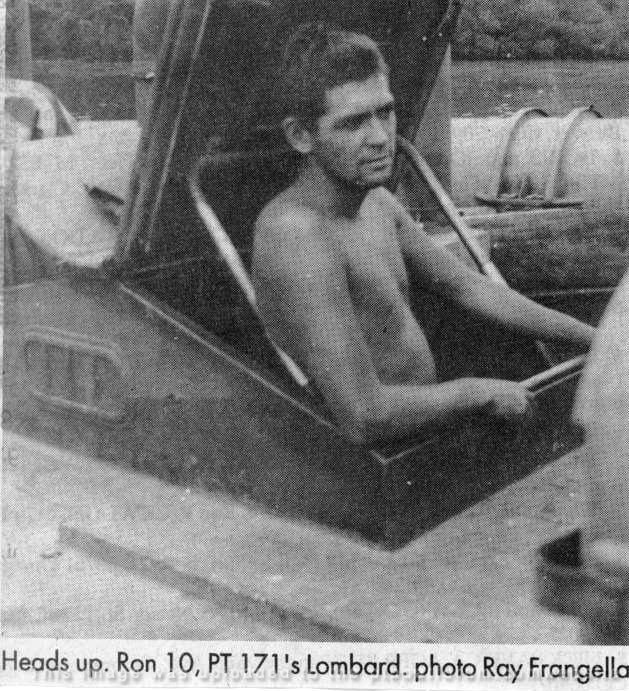
PT171 RON 10
PT127 RON 7 and RON 12. Early engineroom hatch with later style vent added on top.

Early series ELCO 80 at Melville. Engineroom hatch open.
Posted By: TED WALTHER | Posted on: Feb 17, 2020 - 8:52am
Total Posts: 3059 | Joined: Oct 16, 2006 - 7:42am
Ted, Jeff D or who ever can help
Was the lights on the fair head & stern mast removed in theater??
Did the boats post the jack staff when dock side in theater?
Being a Ret Vet from one of those "other" services I really don't know
Mike
Posted By: Grady | Posted on: Feb 28, 2020 - 10:24am
Total Posts: 157 | Joined: Oct 2, 2018 - 8:04am
Grady;
For the most part, those items disappeared(ie: removed, stored below, etc), they were really not used in the Pacific.
Take care,
TED
Posted By: TED WALTHER | Posted on: Feb 28, 2020 - 3:36pm
Total Posts: 3059 | Joined: Oct 16, 2006 - 7:42am
In addition to the the port and starboard lights, there is one on the stern flagstaff. It's just a slit for projecting white light. Here's a photo I borrowed from a post here showing the hardware.
[image]https://live.staticflickr.com/65535/49632761372_b58dba72ac_o.jpg[/image]
David Waples
Posted By: David Waples | Posted on: Mar 7, 2020 - 4:23pm
Total Posts: 1679 | Joined: Jan 2, 2007 - 9:55pm
Thanks Dave,
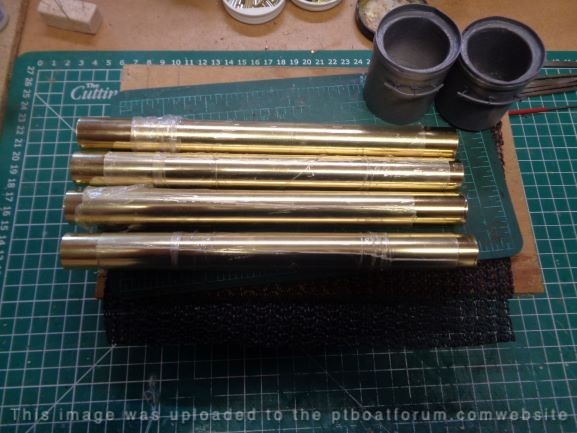
I will add the light cover to the stern mast, Also about done with the engine hatch, did a compete restart. Have started to build the throttle control box , Jeff D sent the plans. again given the scale its a challenge, working on getting the right length of the 3 throttles in 1/30 is allot of trial & error. Again thanks for all the advise
Posted By: Grady | Posted on: Mar 14, 2020 - 4:05am
Total Posts: 157 | Joined: Oct 2, 2018 - 8:04am
Let's see, an 8'' wide x 6 5/8'' x 2 7/8'' tall throttle works out to about 0.267 x 0.221 x 0.096. Sheesh you'd better get some microsurgery equipment!
Posted By: Jeff D | Posted on: Mar 14, 2020 - 6:11am
Total Posts: 2200 | Joined: Dec 21, 2006 - 1:30am
First my hopes & prayers go out to everyone during theses unsure times. The craft new all love seems rather secondary. One of my suppliers is from Spain which is closed for shipping, Iâm still able is get deliveries from Cornwall boats for now, will stock up from them and work from back stock for the rest.
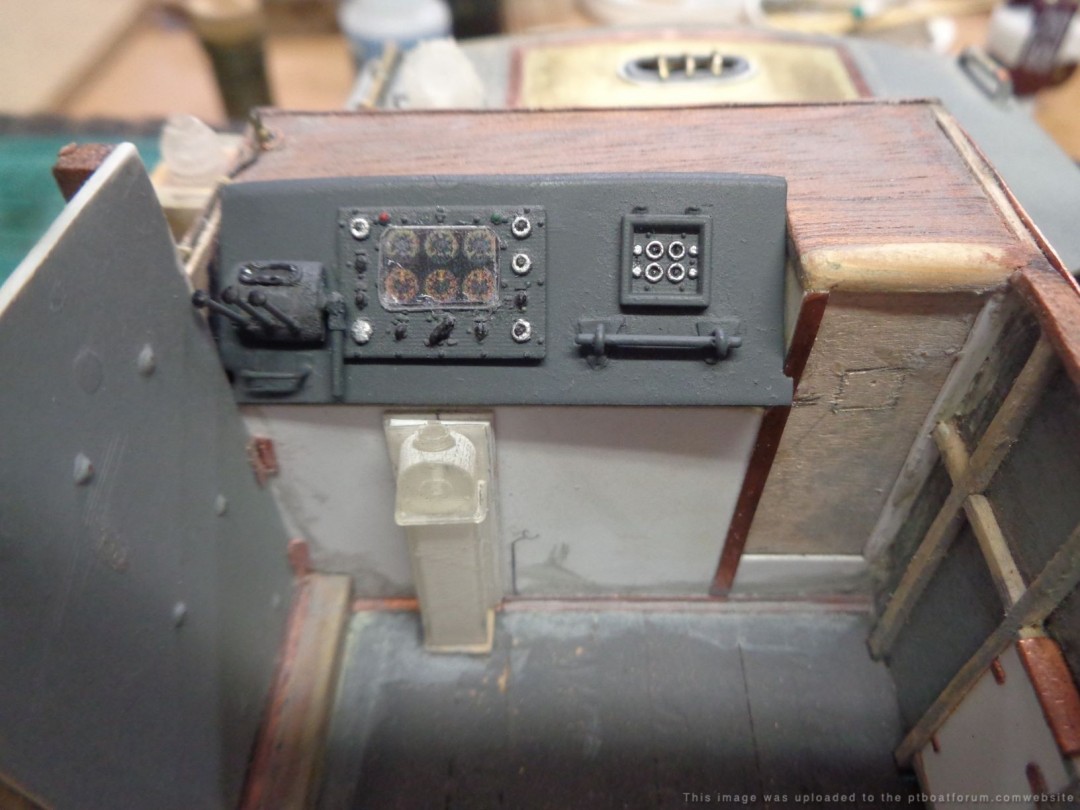
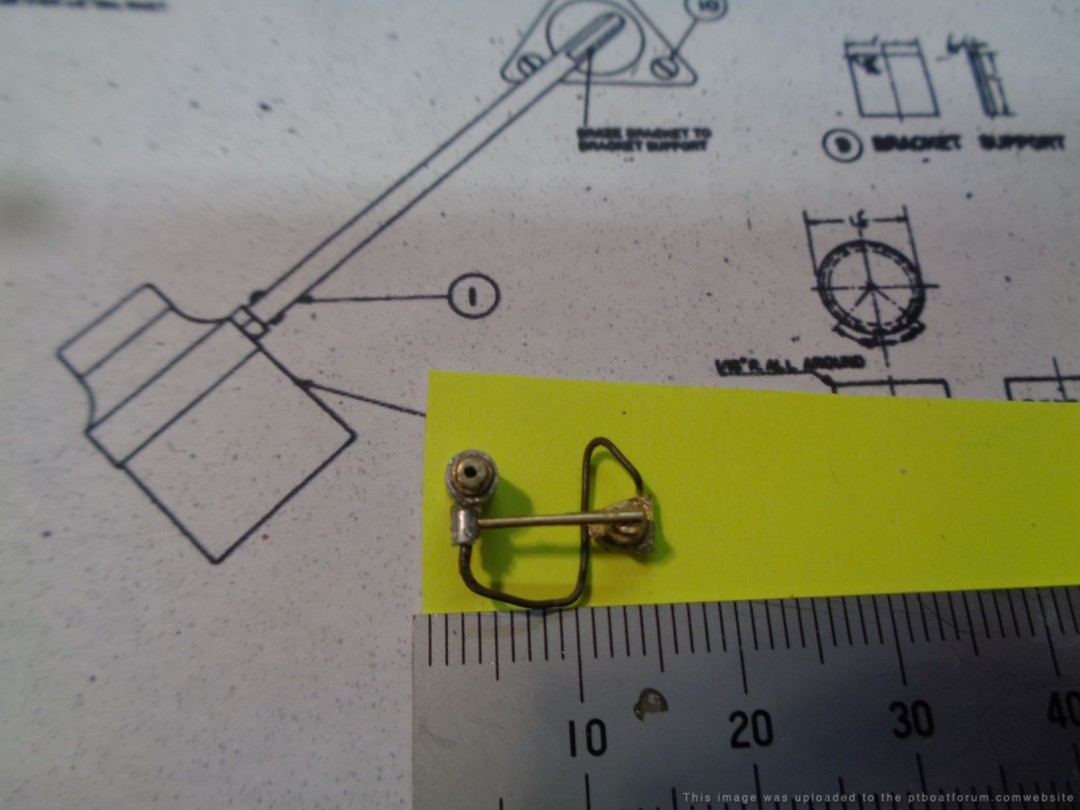
Started laying out the control panel area, the test fit went well, Made the throttle control box, Ok following the plans from Jeff D I took my shot, again being so small scale is tough to get exact overall
itâs still rough, needs some smoothing but its close, with a little rework It should fit in.
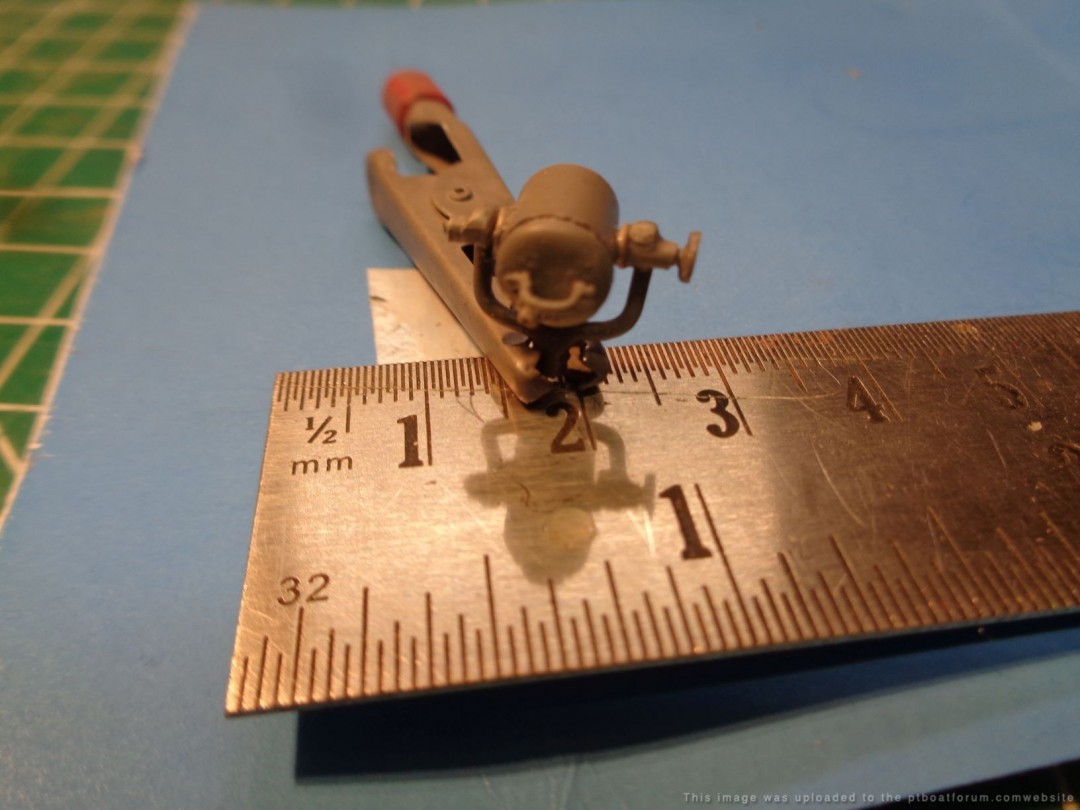
Search light, I think it came out ok, possibly the knob on the bracket needs to sized down, but I happy so far, the lens & background will go in after final paint.
Question does anyone know where I can get a Ron 5 patch??
Posted By: Grady | Posted on: Mar 16, 2020 - 12:13pm
Total Posts: 157 | Joined: Oct 2, 2018 - 8:04am
The only word I can think of is, WOW!
Posted By: Stearman | Posted on: Mar 17, 2020 - 2:01am
Total Posts: 150 | Joined: Nov 1, 2017 - 9:38pm
Question does anyone know where I can get a Ron 5 b2322 WW2 US Navy PT patch Patrol Motor Torpedo Boat Squadron 5
[url]https://www.ebay.com/itm/b2322-WW2-US-Navy-PT-patch-Patrol-Motor-Torpedo-Boat-Squadron-Ron-5-MTB-PB11/380661634416?hash=item58a1339570:g:rbYAAOSw3Sla1Nro:sc:USPSFirstClass!23462!US!-1[/url]
Posted By: TED WALTHER | Posted on: Mar 22, 2020 - 12:34pm
Total Posts: 3059 | Joined: Oct 16, 2006 - 7:42am
contact PTboats inc. for a patch and help support the org. that preserves PT boat history. P.O box 38070 Germantown tn. 38183-0070 901-755-8440. all be safe and stay well. scott
Scott Campbell 2nd gen,PT 248
Ron 20
Posted By: Scott C | Posted on: Mar 22, 2020 - 1:14pm
Total Posts: 108 | Joined: Nov 20, 2019 - 4:34pm
only part of post was posted ?? patch can be had at PT boats Inc P.O. box 38070, Germantown, TN 38183-0070 901-755-8440. they help to preserve PT history. stay safe and well. scott.
Scott Campbell 2nd gen,PT 248
Ron 20
Posted By: Scott C | Posted on: Mar 22, 2020 - 1:21pm
Total Posts: 108 | Joined: Nov 20, 2019 - 4:34pm
Good point Scottđđģđđēđ¸
Posted By: TED WALTHER | Posted on: Mar 22, 2020 - 7:11pm
Total Posts: 3059 | Joined: Oct 16, 2006 - 7:42am
thank you all for the info, the build is keeping me busy during these troubled times. Like many Vets of this site we have seen hard times before, and know how to count to the folks on either side of you. Thanks to you all this fascination turned obsession is becoming a great journey.
Posted By: Grady | Posted on: Mar 23, 2020 - 3:27am
Total Posts: 157 | Joined: Oct 2, 2018 - 8:04am
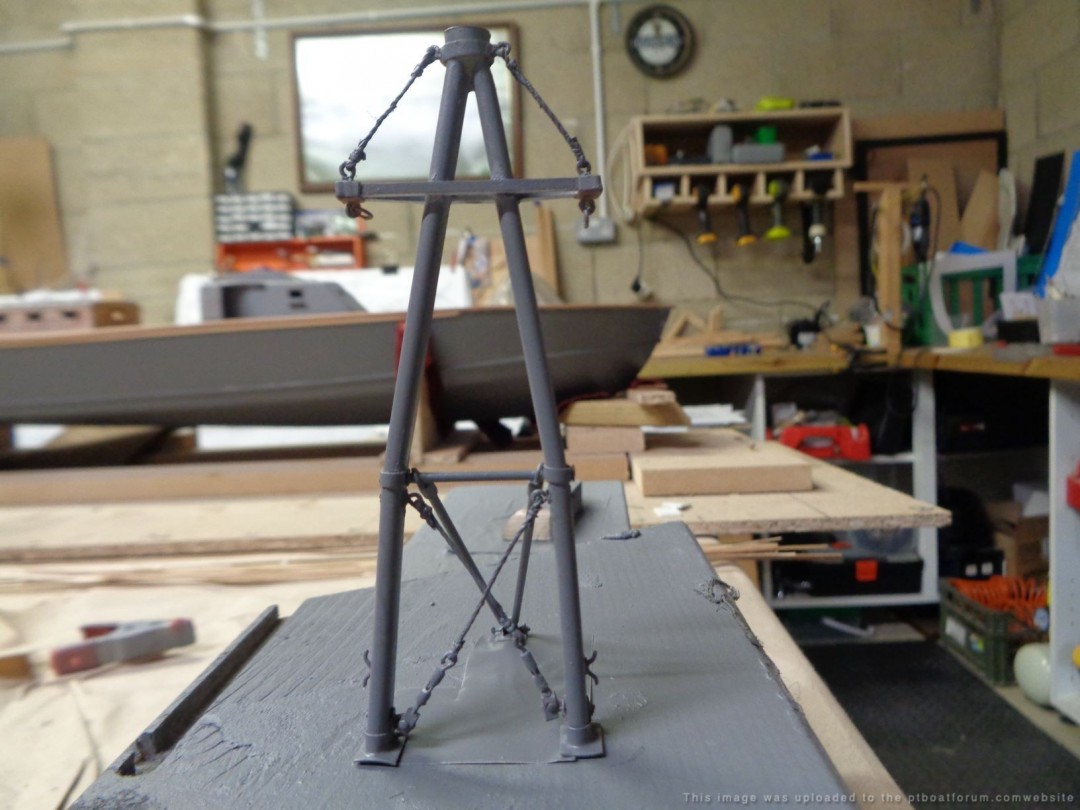
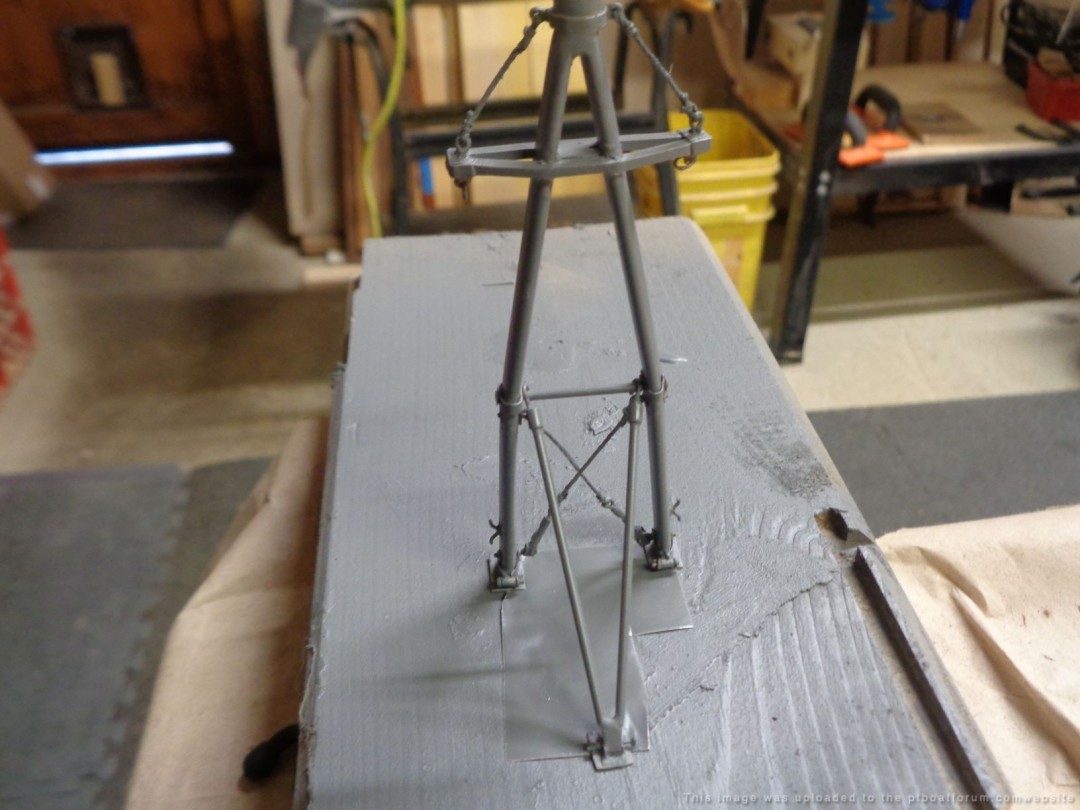
I hope all are being safe.
Scratch Built the mast, took 3 weeks & 68 fabricated parts, After final paint I will add the light & cover & the power cord.
Posted By: Grady | Posted on: Mar 31, 2020 - 11:06am
Total Posts: 157 | Joined: Oct 2, 2018 - 8:04am
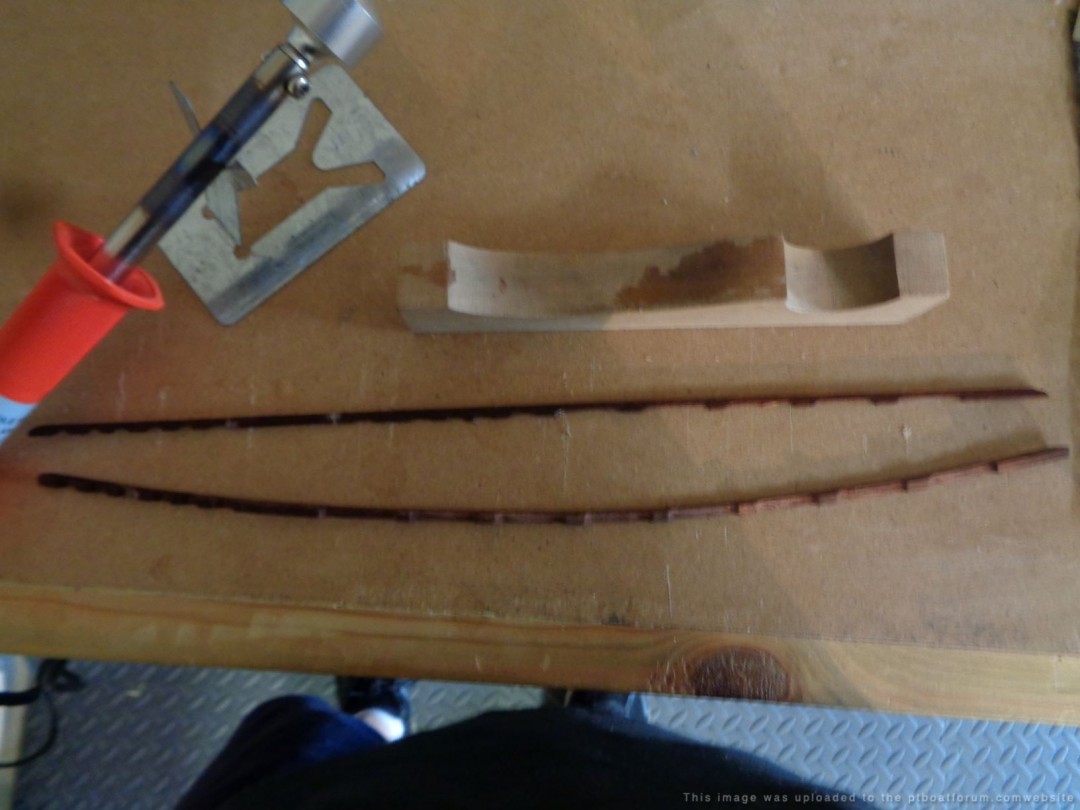
Made the foot rails from Mahogany, with guidance from Jeff D pt103.com I followed a cross of his drawings & Dumas patterns. Given the fragile scale here I will soak in water then heat bend them in place. Being very careful not to snap them.
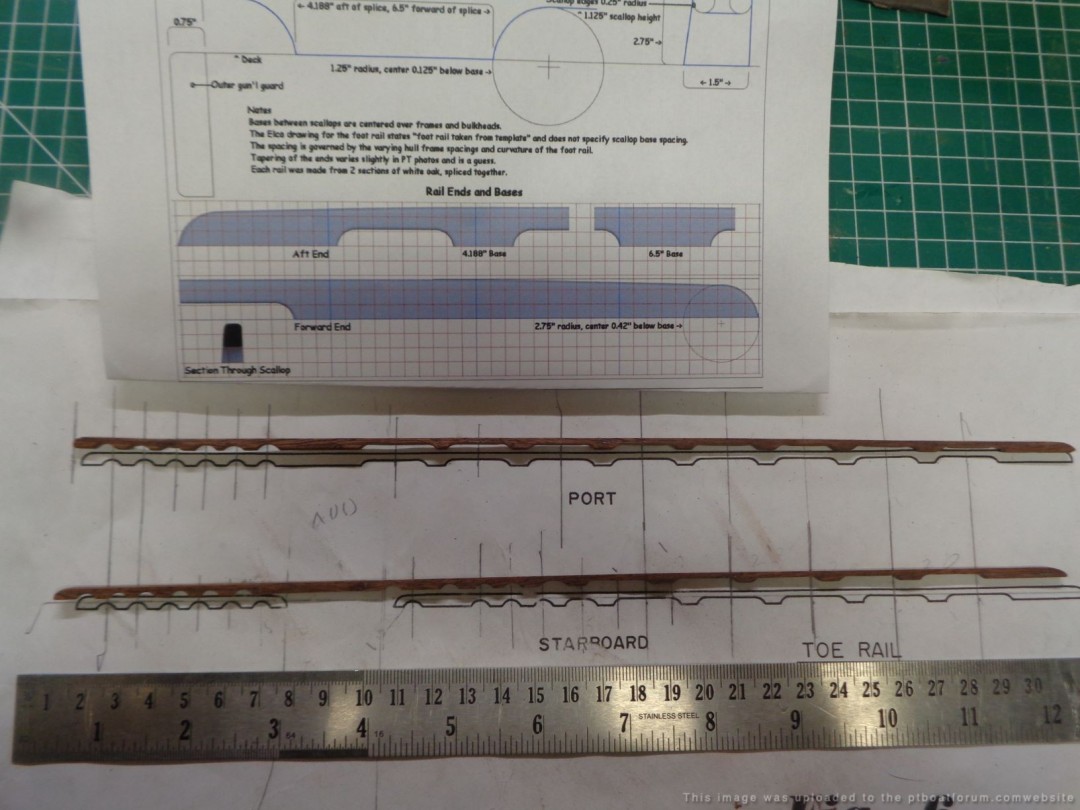
Posted By: Grady | Posted on: Apr 3, 2020 - 11:23am
Total Posts: 157 | Joined: Oct 2, 2018 - 8:04am
Smoke generator/w hold down straps& base
Need some advise 1) the foot stand on the bridge , from Jeff D the later boats after 123 had rubber mats , what did the early 103 class boats have , if anything ?? 2) control panel gauges again I know the type from Jeff, however its sizing a color image down to 1/30 scale to print that's the problem, I got with Gene Berger how he got a great result, he said copy ,resize , print very simple, OK Genes a professional builder, and kind of Tech smart, two things I'm not. Does anyone know what I'm missing here ? I know it's got to be a simple thing, At this point I'm down to I guess I need a very simple how to lesson. Thanks Grady .
Posted By: Grady | Posted on: Apr 11, 2020 - 2:47am
Total Posts: 157 | Joined: Oct 2, 2018 - 8:04am
Hope all are well
Working on the window drain scoops, fabrication almost complete. Question If Iâm reading Jeff Ds plans right there is not a drain on day cabin window starboard forward ??
Advise would be great
Posted By: Grady | Posted on: May 3, 2020 - 8:38am
Total Posts: 157 | Joined: Oct 2, 2018 - 8:04am
Correct Grady, the drains were only on the windows that could be opened. The smoke gen looks good!
Posted By: Jeff D | Posted on: May 4, 2020 - 4:13am
Total Posts: 2200 | Joined: Dec 21, 2006 - 1:30am
That window is unique because there is a ladder there. Correct me if I'm wrong but it's the same window as the two on the forward side of the Chart House.
Dave
David Waples
Posted By: David Waples | Posted on: May 5, 2020 - 11:48am
Total Posts: 1679 | Joined: Jan 2, 2007 - 9:55pm
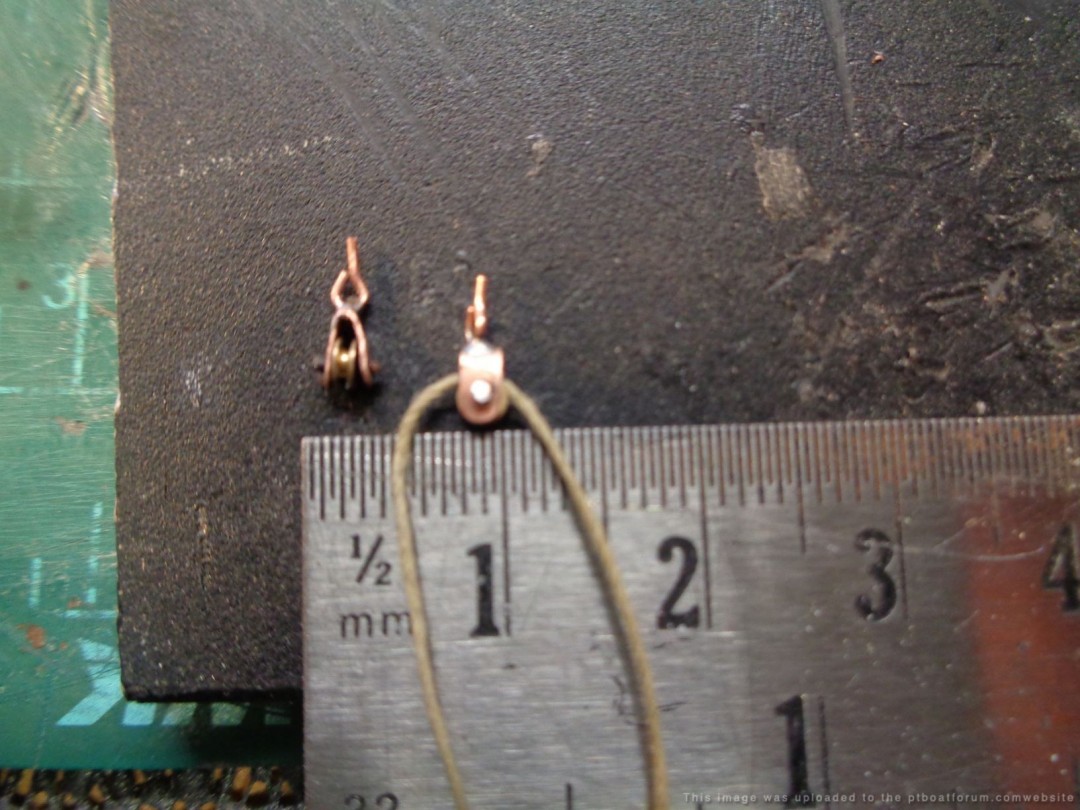
Lanyard pullies for the mast and start of cockpit rework , and my first shot at making the drains
Posted By: Grady | Posted on: May 7, 2020 - 3:32am
Total Posts: 157 | Joined: Oct 2, 2018 - 8:04am
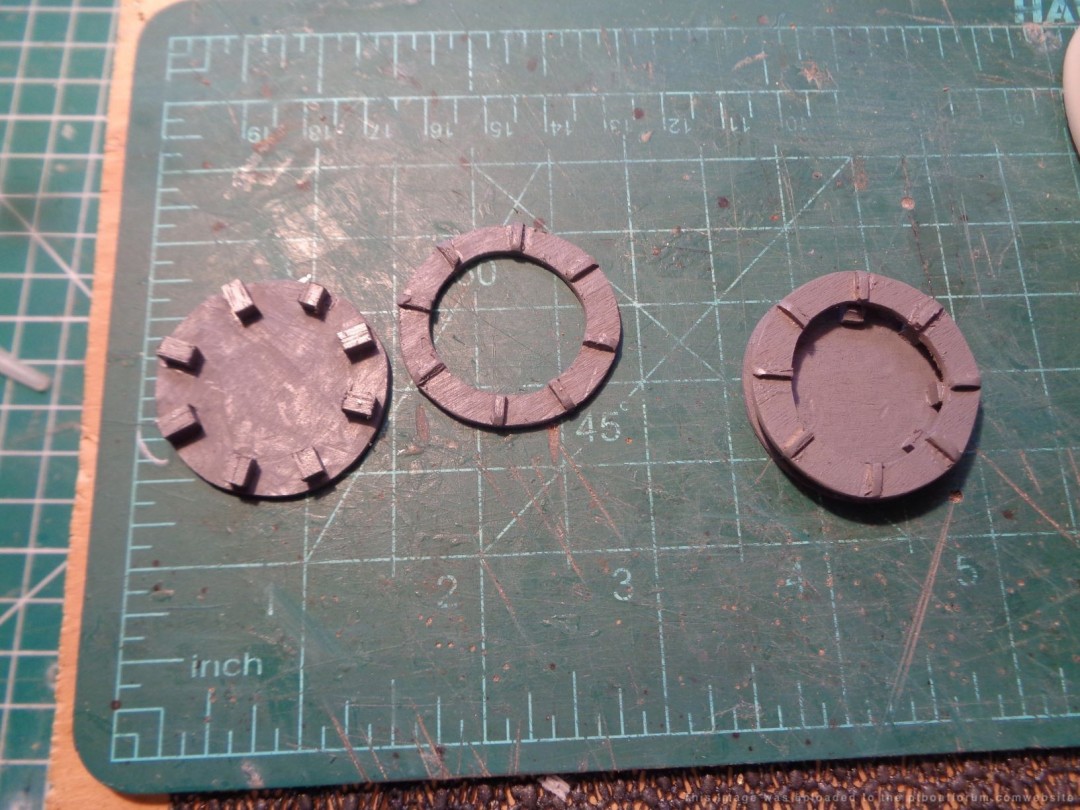
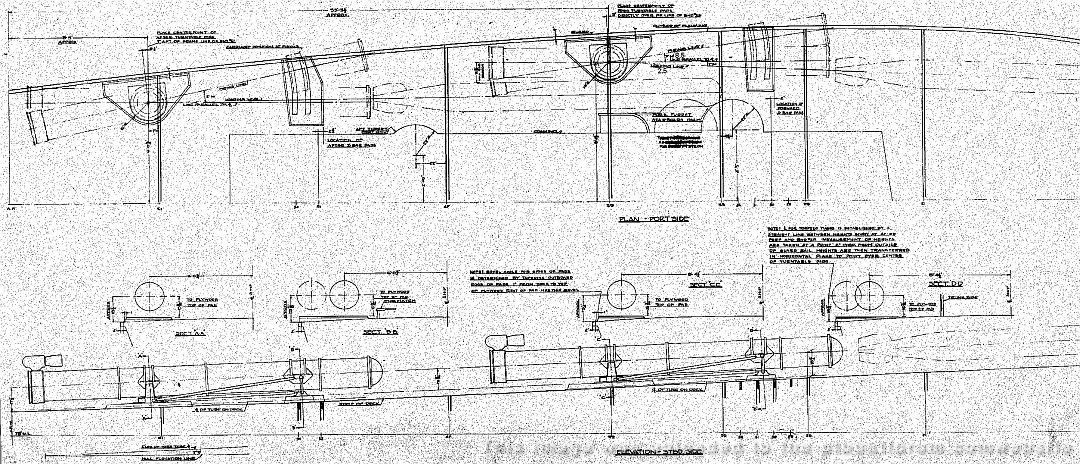
Hello all, I hope everyone is staying safe , Looking at Jeff D site ABO MK 18 drawing provided by Al Ross, allot of great plans to sort thru, is there anything else out there I can also reference for working on the tubes, starting with the pads & turntables ??
Posted By: Grady | Posted on: May 10, 2020 - 4:38am
Total Posts: 157 | Joined: Oct 2, 2018 - 8:04am
Dick has made his wonderful Elco drawing collection available for free download. You can get lost in them for months! Or years in my case. [url]http://ptboatforum.com/documents.html[/url] There are detailed drawings showing pad dimensions, angles of tubes on the boats, etc. There is a text file list by subject that will help you find the drawing you are looking for.
The turntable should be in Al's tube drawing collection.
Have fun Mike and stay well.
Posted By: Jeff D | Posted on: May 10, 2020 - 5:10am
Total Posts: 2200 | Joined: Dec 21, 2006 - 1:30am
Just wanted to take a moment to thank Dick Washichek, for allowing the use of his Elco engineer drawing. When I first decided to take a break from masted sailing ships I could never have imagined just how hooked I would become by the world of the PT boat, from the special breed of men who servered on them to beautiful decks the walked . I guess you could say the new guy is all in. Jeff D was right about the Dicks drawing, itâs like a kid at Xmas . Anyway just thought this needed to be said not only to Jeff, Ted, Dave and Dick, but to all who generously contribute there vast knowledge to the forum.
Mike
Posted By: Grady | Posted on: May 13, 2020 - 3:07am
Total Posts: 157 | Joined: Oct 2, 2018 - 8:04am
Without Dick, the knowledge of American PT boats we enjoy today would be a small fraction of what it is. For decades he has run this forum and footed the bill so we would have a stable place to call home. The drawings alone were well over a $1,000 that came right out of his pocket. My site for one of the PT types would not have been possible, at least not with the accuracy it now has thanks to his drawings. He even sent me a very expensive computer after learning of the issues I was having trying to render out my work. The list of all he has done to keep the memory of PT boats alive could go on for pages. What a guy! People like Dick make the world a better, and more knowledgeable, place. Every time I see a member like Charlie help someone looking for information on a family member with ties to PT service, I get a warm fuzzy feeling in my heart when I see how much it means to them.
Posted By: Jeff D | Posted on: May 13, 2020 - 4:28am
Total Posts: 2200 | Joined: Dec 21, 2006 - 1:30am
AMEN, BROTHER...
Will
Posted By: Will Day | Posted on: May 13, 2020 - 10:49am
Total Posts: 1955 | Joined: Oct 8, 2006 - 4:19pm
I'll chime in and add my continual thanks to Dick, our great webmaster (who has always put up with my photo-posting requests)!
Posted By: Drew Cook | Posted on: May 13, 2020 - 11:37am
Total Posts: 1306 | Joined: Oct 19, 2006 - 10:44am
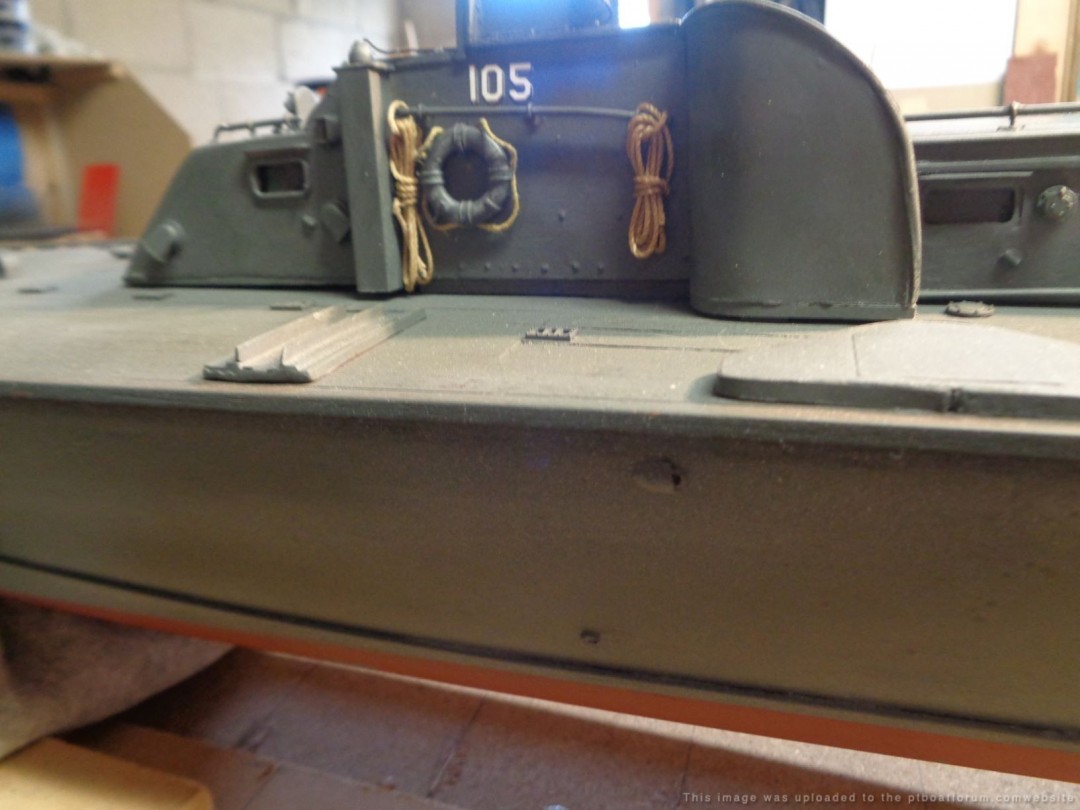
Did a Paint scheme trial on this piece . according to Dave Maples conversion with Dick Keresey , first skipper of the 105 he thought she was Battleship Grey, , Al Ross had her with measure 1 overall 5D , according to the fine folks at Vallejo 5D is very close to their Black Grey . I donât know if the picture is clear enough to tell , but this how the black grey came out

Posted By: Grady | Posted on: May 21, 2020 - 10:29am
Total Posts: 157 | Joined: Oct 2, 2018 - 8:04am
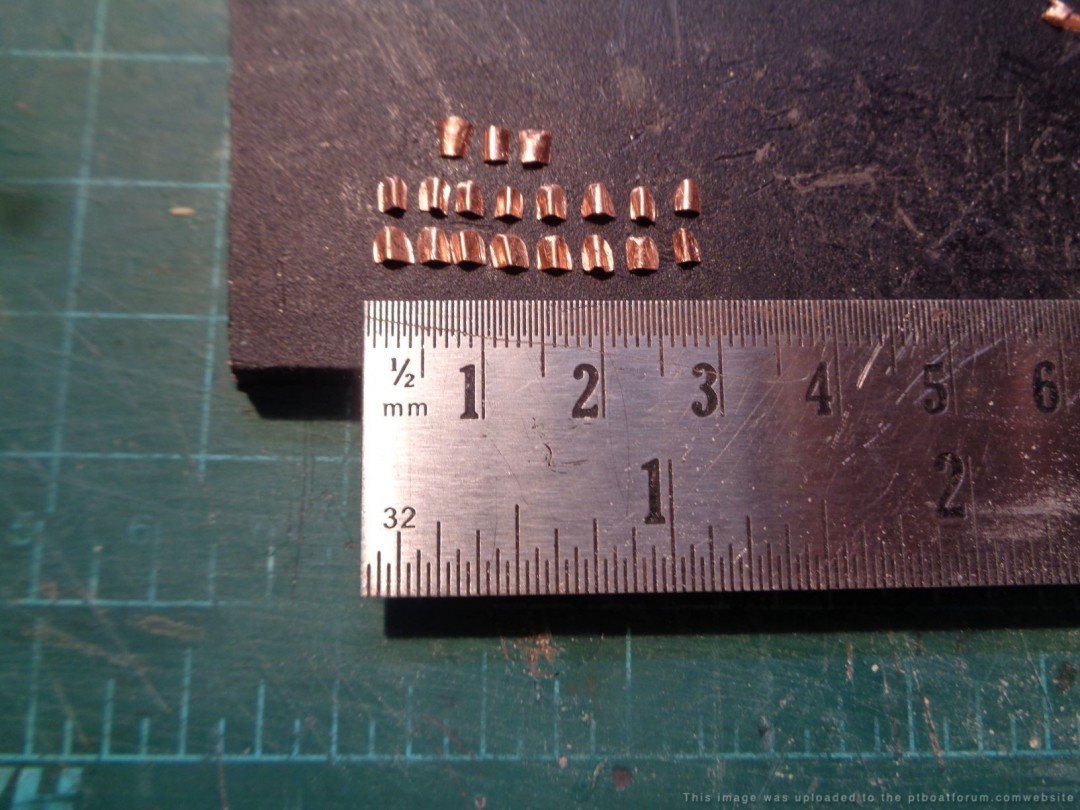
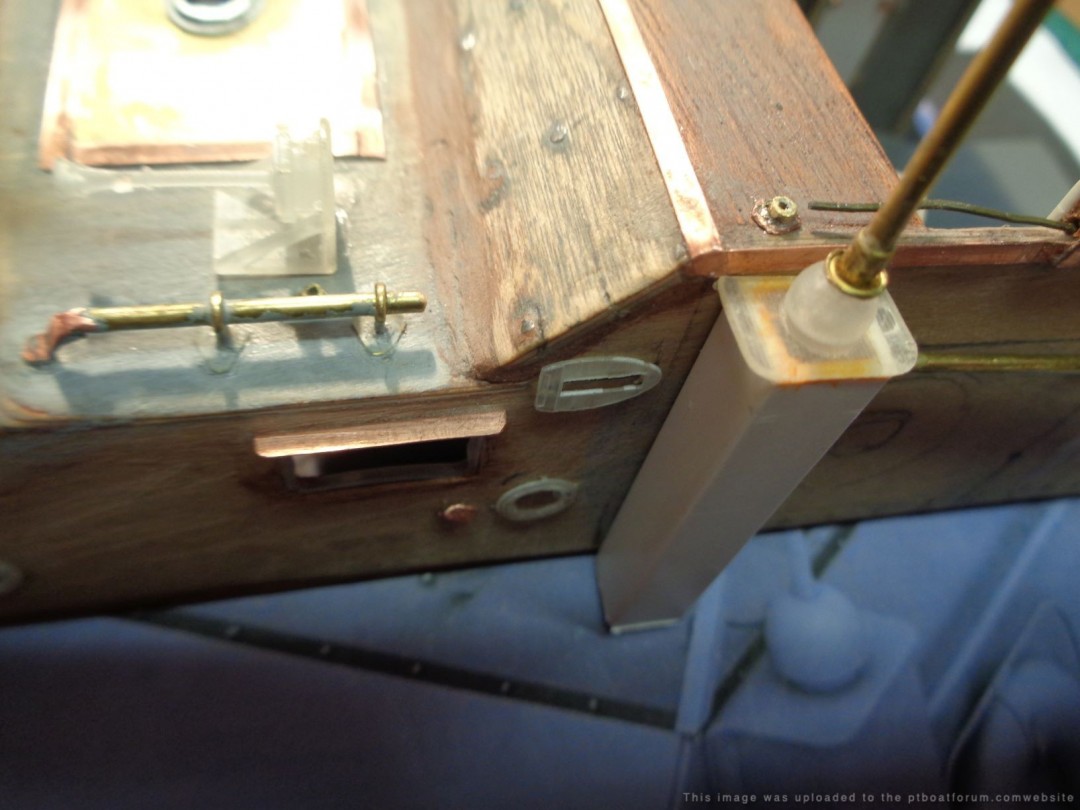
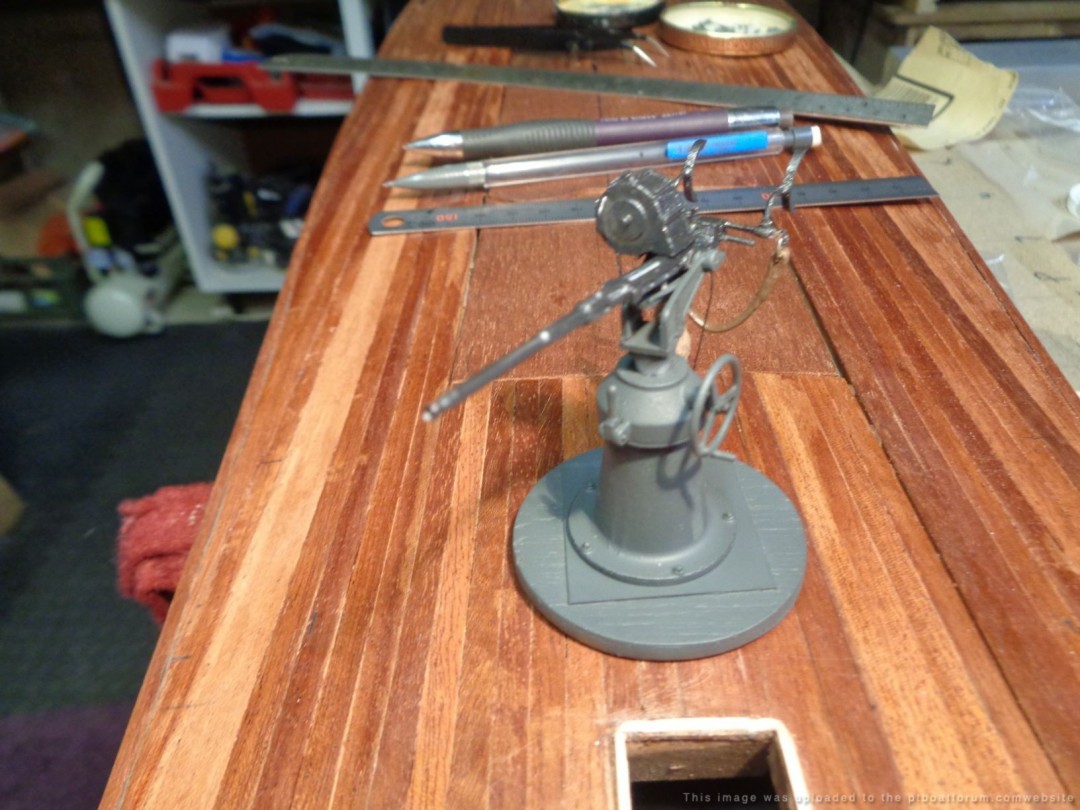
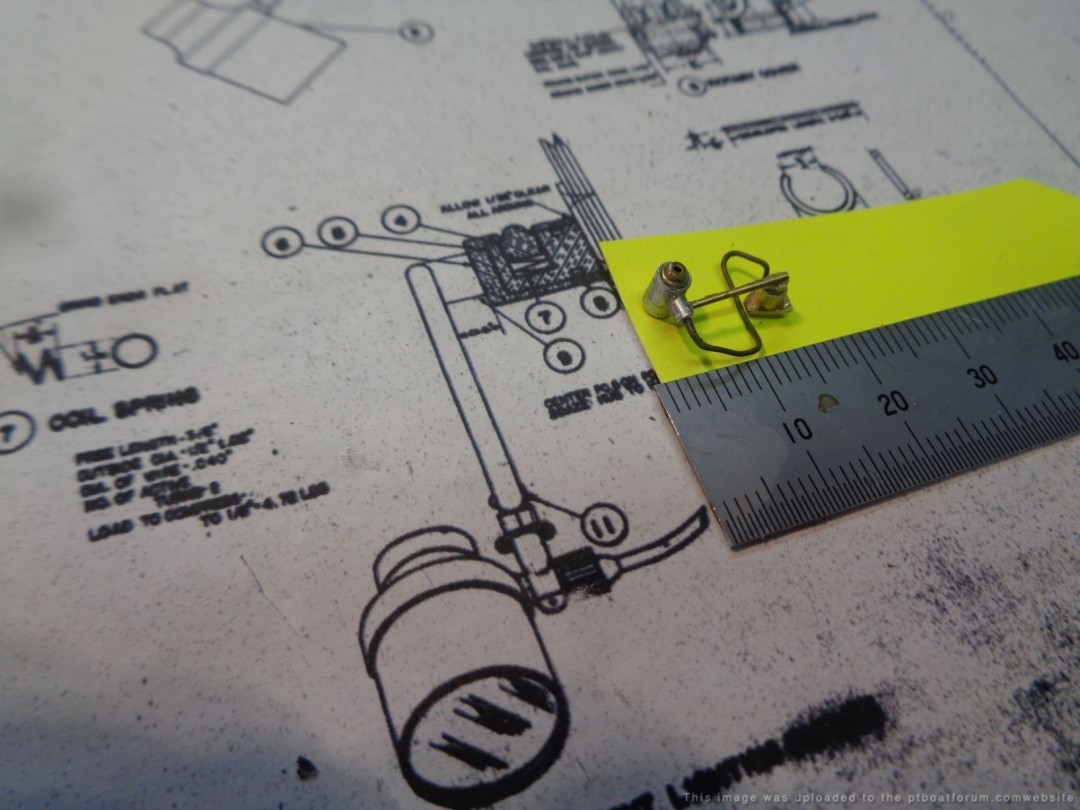
While waiting for supplies, worked on the wiring plugs for the Nav horn, port spotlight bracket. There small, hard to shape, but I think they will add to the effect, when the cables are connected, also added the mounting brackets for the cabin vents and running lights. Test fitted the reworked 20MM mount
Question on the wiring for the mast, horn, spot lights. Itâs a small thing but are wires painted or were they left black??
Posted By: Grady | Posted on: Jun 8, 2020 - 11:39am
Total Posts: 157 | Joined: Oct 2, 2018 - 8:04am
Coming right along Mike!
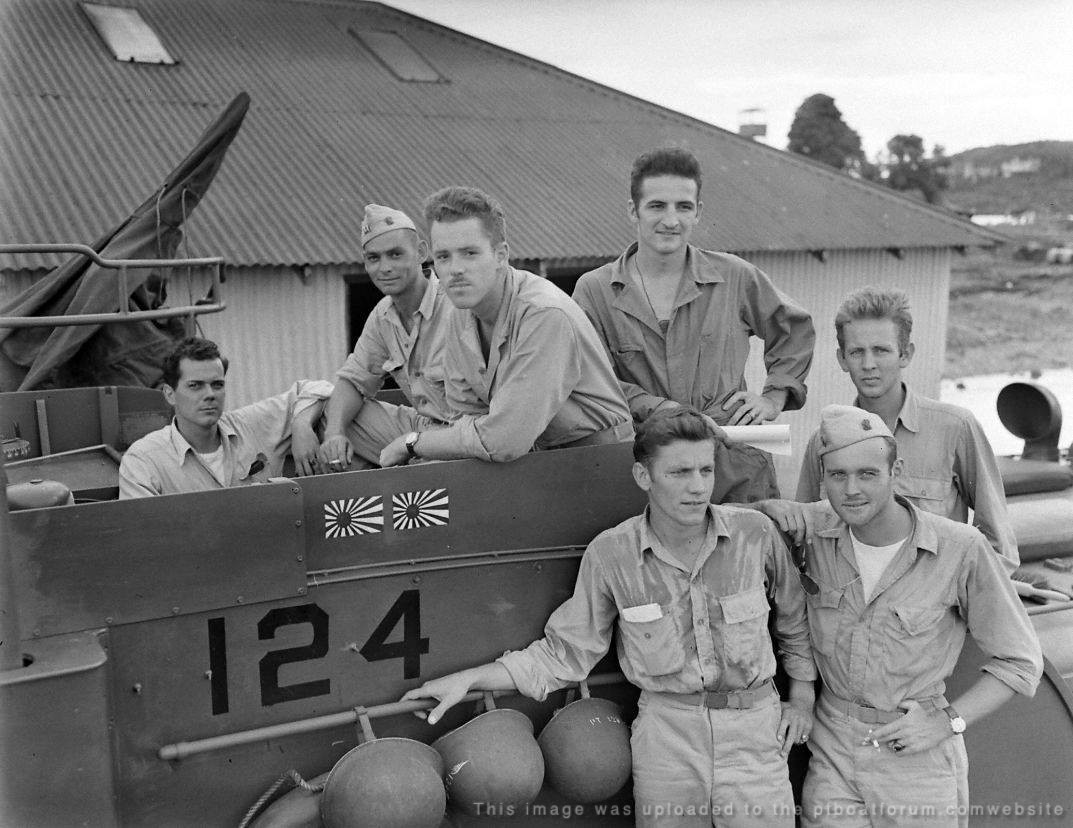
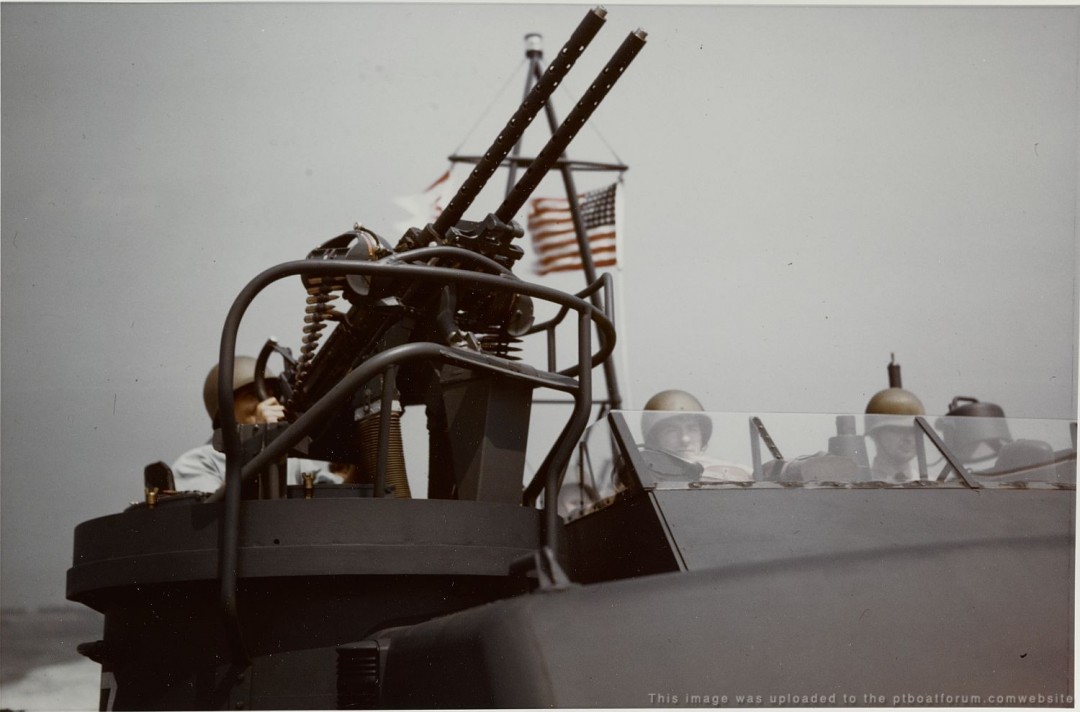
Good question, I have no real clue but the general rule was If it don't move, paint it. It looks like the searchlight cable (right below the kill marks) was painted on this boat:
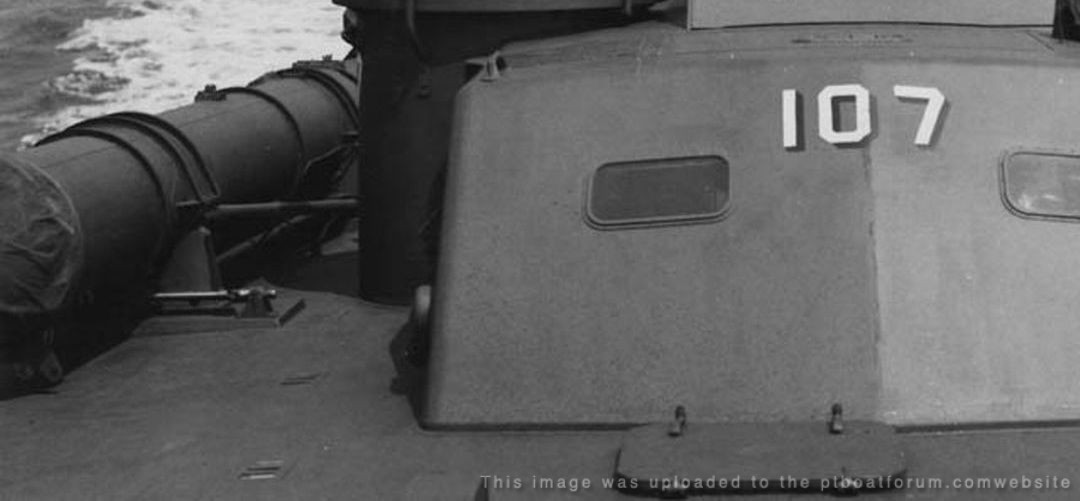
Your color looks pretty close to these shots of PT 134 (top) and 107:
Posted By: Jeff D | Posted on: Jun 9, 2020 - 3:36am
Total Posts: 2200 | Joined: Dec 21, 2006 - 1:30am
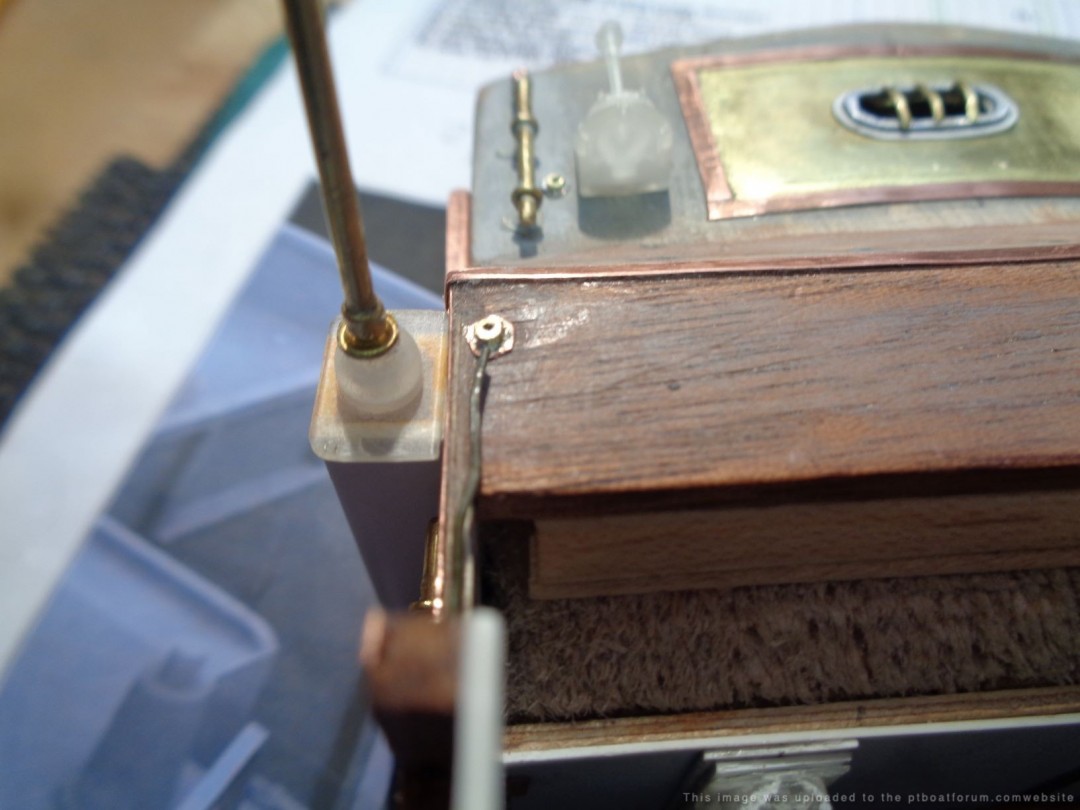
Jeff great pics, they really helped, So while I'm running cables, does the spotlight cable plug into the plug on top of the Aldis locker ?
thanks
Mike
Posted By: Grady | Posted on: Jun 11, 2020 - 11:10am
Total Posts: 157 | Joined: Oct 2, 2018 - 8:04am
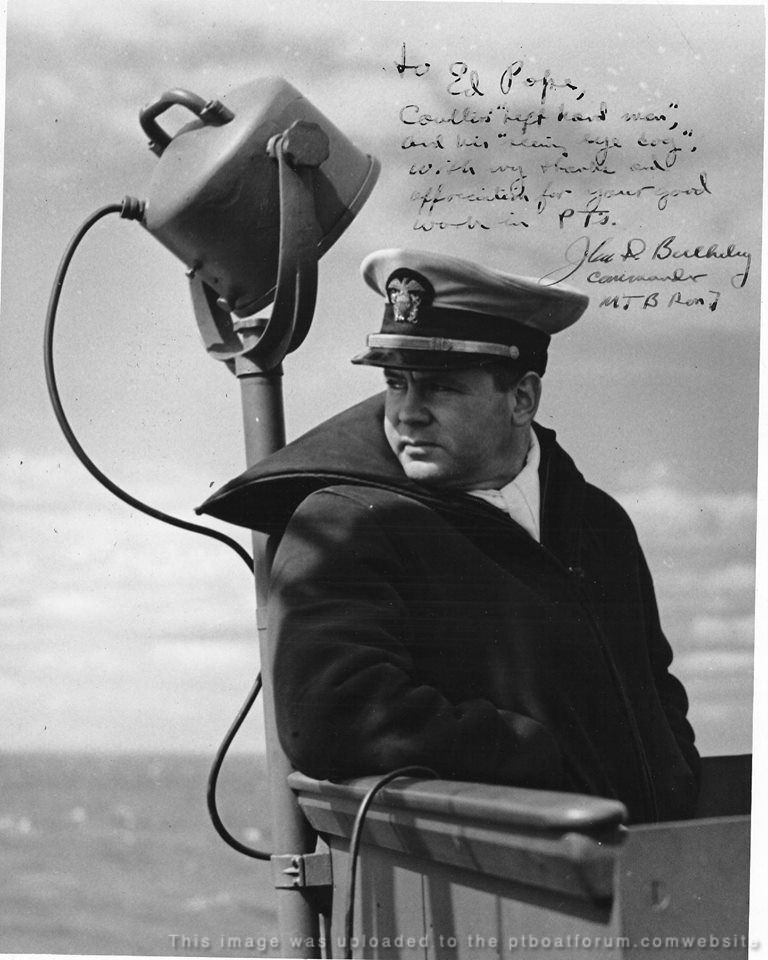
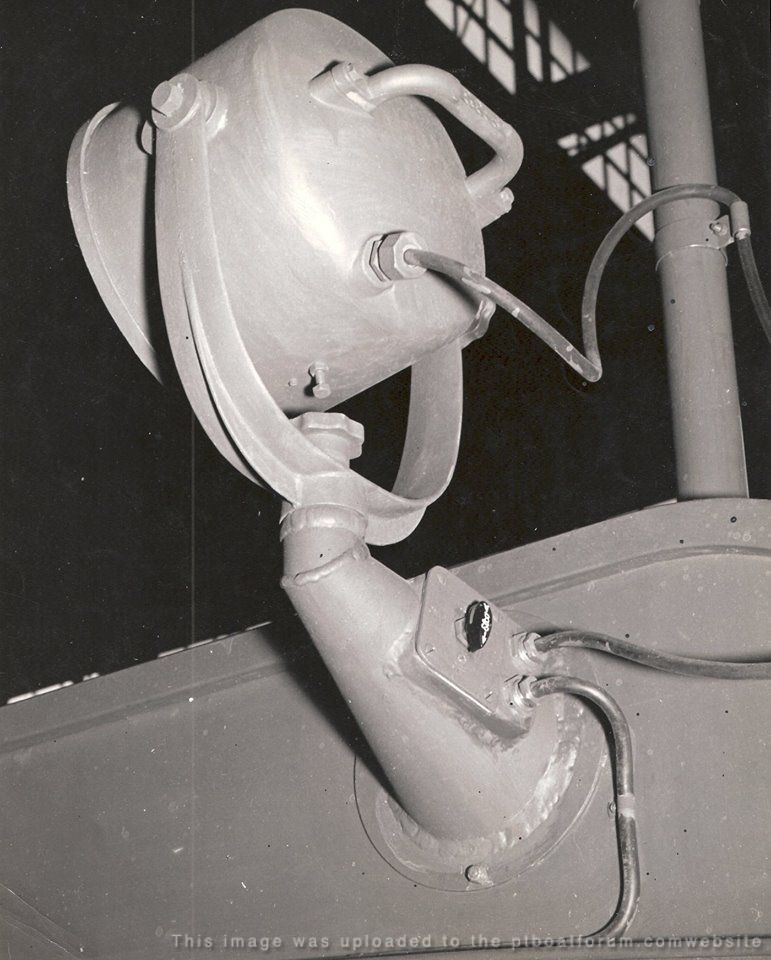
The one on the Aldis locker aft of the aft armor plate was for the Aldis light. The cable shown in the photo goes to the side mounted cone shaped bracket with the builtin on / off switch. Another cable ran from there to the searchlight mounted either on the port cone or aft pipe bracket:
Posted By: Jeff D | Posted on: Jun 11, 2020 - 12:41pm
Total Posts: 2200 | Joined: Dec 21, 2006 - 1:30am
Got it , totally missed the second plug , again Jeff so grateful for all the help and advise
Posted By: Grady | Posted on: Jun 12, 2020 - 3:02am
Total Posts: 157 | Joined: Oct 2, 2018 - 8:04am
You're very welcome Mike.
Posted By: Jeff D | Posted on: Jun 12, 2020 - 6:25am
Total Posts: 2200 | Joined: Dec 21, 2006 - 1:30am
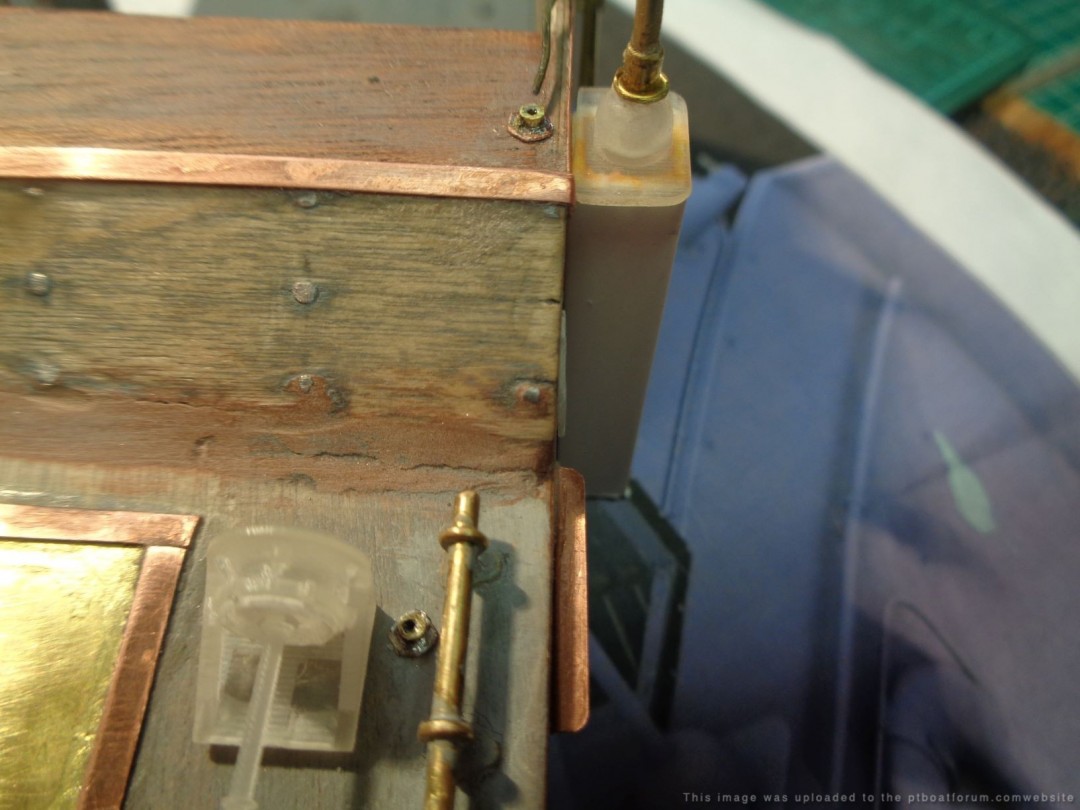
Interesting to note that the 124, in that photo, doesn't have the half-ball-like (rain guard?) device over the bottom of the antenna where it goes into the base...
Posted By: Drew Cook | Posted on: Jun 14, 2020 - 10:10am
Total Posts: 1306 | Joined: Oct 19, 2006 - 10:44am
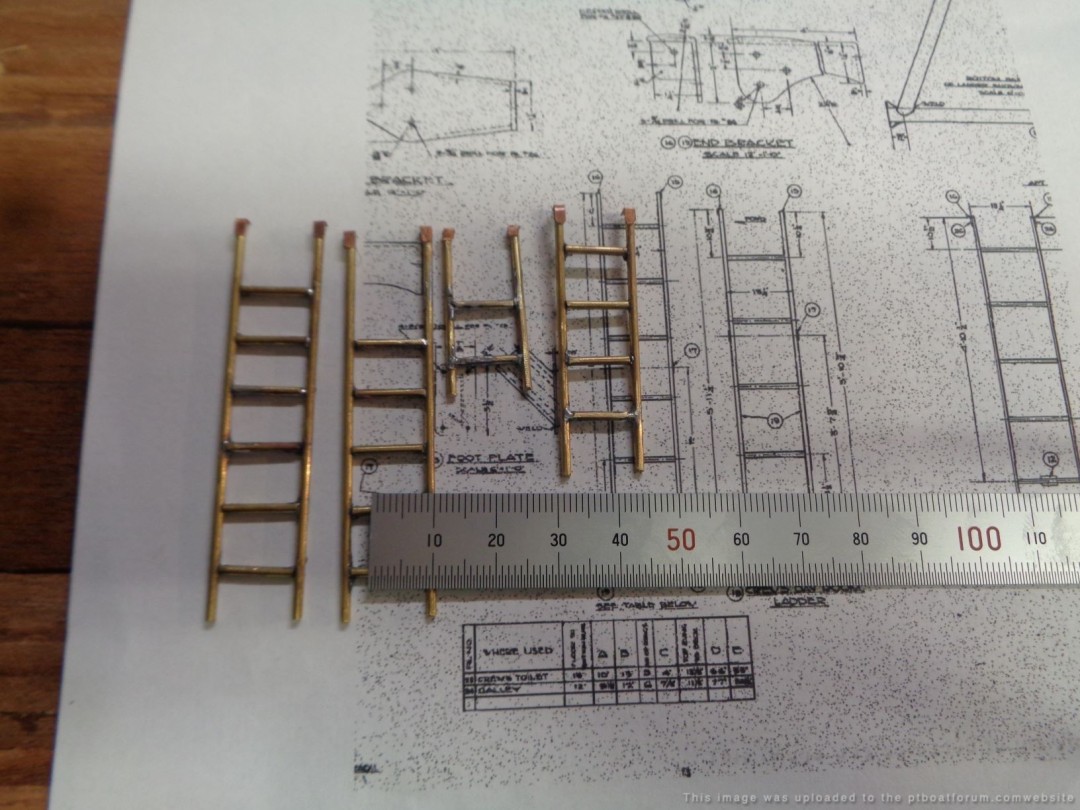
Deck Hatch ladder, I know a ladder will not be hard to fabricate, 2 legs & some rungs, however just for the sake of comparison does anyone know what they looked like ??
Posted By: Grady | Posted on: Jun 17, 2020 - 11:05am
Total Posts: 157 | Joined: Oct 2, 2018 - 8:04am
For which hatch?
Posted By: Jeff D | Posted on: Jun 18, 2020 - 3:24am
Total Posts: 2200 | Joined: Dec 21, 2006 - 1:30am
Sorry Jeff I did not know there was a difference , still a new guy you know. Just in case I want to show the hatches open , want to do three both forward, 1 Aft , also the hatch opening it has just a slight lip above the deck correct,
Posted By: Grady | Posted on: Jun 18, 2020 - 4:20am
Total Posts: 157 | Joined: Oct 2, 2018 - 8:04am
Here's what the hatch looked like both closed and open: [url]http://www.pt103.com/PT_Boat_Components_Deck_Hatch.html[/url]
I didn't know either but thought I'd narrow it down before looking into them. They are close to the same. Dick's drawing names are ELCO_Roll_5535-2_72SCAN_00151.pdf and ELCO_Roll_5535-2_72SCAN_00152.pdf if you need a better view to see the numbers or whatever:
Posted By: Jeff D | Posted on: Jun 18, 2020 - 5:04am
Total Posts: 2200 | Joined: Dec 21, 2006 - 1:30am
Thanks Jeff, getting old I guess, I keep forgetting to give the film rolls a look
Posted By: Grady | Posted on: Jun 18, 2020 - 5:15am
Total Posts: 157 | Joined: Oct 2, 2018 - 8:04am
Made some progress in in the odds & ends areas Life ring with rope grab, added the mast light cable , the mast is aluminium & brass so it will take a few coats to cover, or I might just leave the used look, reworked the training gear cranks on the day room cabin, added the port search light cable, placed items on the engine hatch cover & gave a coat of paint, missing the engine hatch ( work in progress)

Posted By: Grady | Posted on: Jun 19, 2020 - 11:30am
Total Posts: 157 | Joined: Oct 2, 2018 - 8:04am
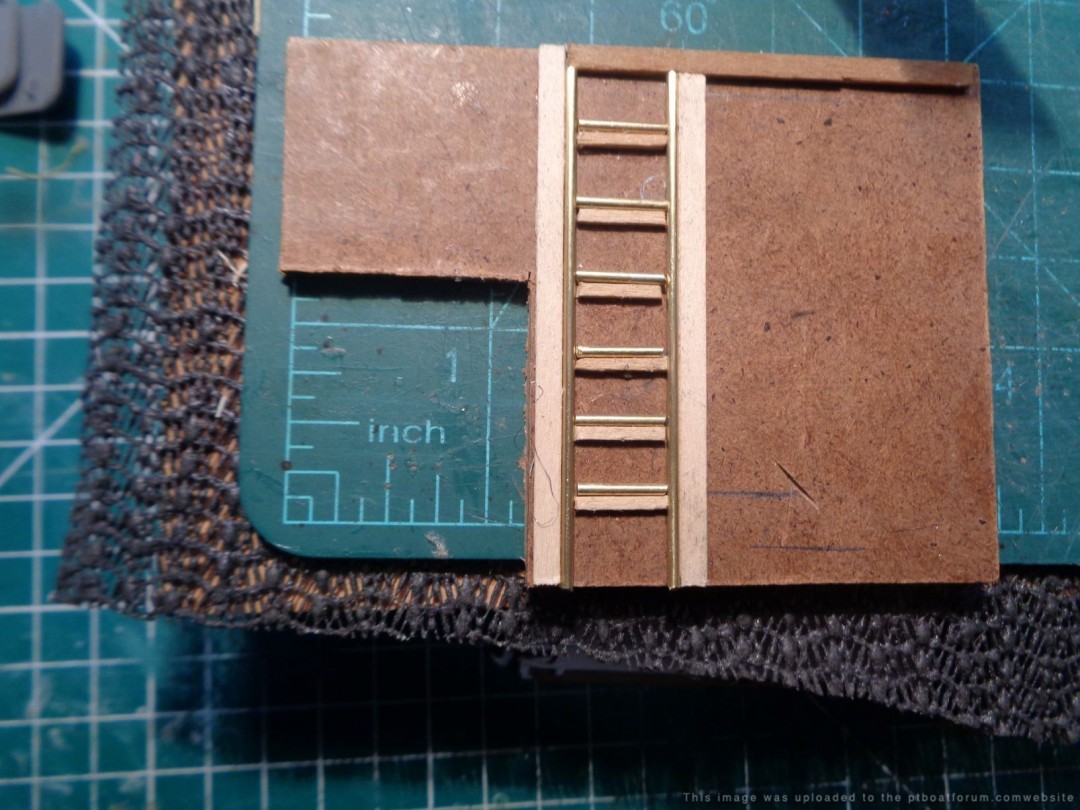
Thanks to Jeff D at pt103.com for the advise on the hatch ladders, made a simple jig for soldering , shaped and framed the deck hatch opening
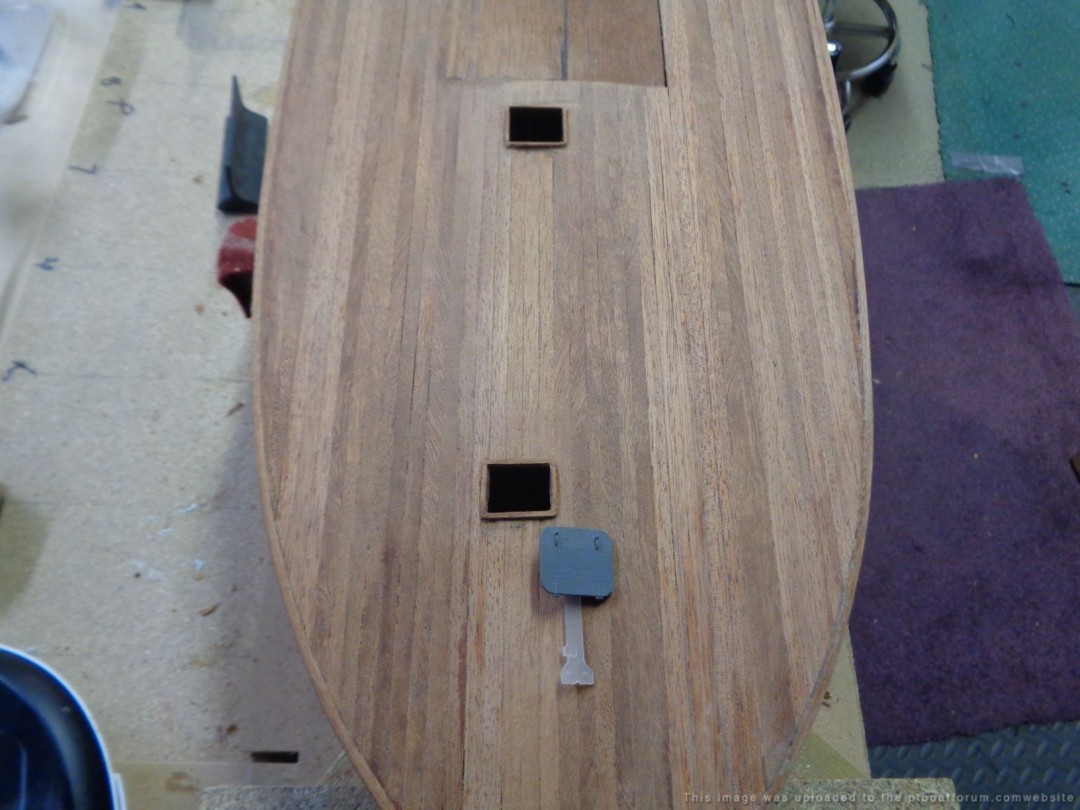
Posted By: Grady | Posted on: Jun 19, 2020 - 11:32am
Total Posts: 157 | Joined: Oct 2, 2018 - 8:04am
Hi,
Following your build and enjoying the progress. Sorry to say I am pretty sure 105 did not have the speed cranks on the daycabin roof as she was not fitted with the 90 degree gearboxes for them, certainly not early on anyway.
Best Regards,
Stu.
Posted By: Stuart Hurley | Posted on: Jun 19, 2020 - 1:25pm
Total Posts: 255 | Joined: Mar 19, 2013 - 3:32am
Thanks Stu, I did not know about the cranks, However I do use your Italeri 109 build as part of my reference guides, so I went back to Jeffs site and looked at your notes . I will remove the cranks, do the mounts stay?? I have no idea what a 77 horizontal type gear box looks like any help here would be great, I will also reach out to Jeff D, last question the hatch ladders which way do they face ? to bad about the cranks I really had a tough time getting the bends to look right.
Thanks Mike
Posted By: Grady | Posted on: Jun 20, 2020 - 3:00am
Total Posts: 157 | Joined: Oct 2, 2018 - 8:04am
Mike,
I believe the mounts were absent Have a look at the photos taken just prior to shipping out on the Stanton. 105 features among the shots and i don't see the mounts. The gearboxes were still in design so not fitted at that time so i doubt any provision was made to cater for them. I made the same effort to fit them on my model but discovered they were not fitted to the 109 either. Ladders were fitted to port in the forward hatchways and lazarette and over the stbd forward window of the daycabin. The engine room ladder was fitted forward. Note, the daycabin hatch opened to port on these early boats. The tube training gear screwjacks are featured amongst the pdfs linked to Jeffs torpedo tube drawings. They were just a square drive and shaft held in a u shaped mount. I was still learning (still am) when i built my 109 model and was continually refining it. I have changed a couple of little details since the article, notably the rounded off daycabin rear corner and some other very small things. I missed the z shaped stiffeners between the lower tube frames but decided not to fit those as i would have caused more damage than they were worth as they are pretty much invisible anyway. Jeff helped me along the way with many photos and drawings. I am sure you will get all the help you need on this board, everyone here is most generous. Keep up the good work.
Best Regards,
Stu.
Posted By: Stuart Hurley | Posted on: Jun 20, 2020 - 6:07am
Total Posts: 255 | Joined: Mar 19, 2013 - 3:32am
Added the foot rails, had to soak & heat bend them into place, always run the risk of snapping or splintering long single pieces when shaping the curve. luckily I took it slow and easy, they turned out the way it should. Thanks again Stu, When I started this build I knew nothing about PTs ( still donât know much, but learning) All I knew I was fascinated by the boats and there crews, that has evolved into being horribly hooked, Jeff D said I was joining the nut club. Also attempted to round off the starboard Aft corner of the day cabin, not to sure how much it needs.
Thanks for all the support
Mike
Posted By: Grady | Posted on: Jun 20, 2020 - 11:29am
Total Posts: 157 | Joined: Oct 2, 2018 - 8:04am
The edge rounding of the day cabin stbd aft corner is hard to see in photos. It took me a while to verify exactly where this F-F section view was showing:
You can see the early tube training gear in a few images here: [url]http://www.pt103.com/PT_Boat_Components_Torpedo_Tube_Images_Elco.html[/url] The PT 107 view from the fwd deck should be of help. It shows this bracket from Al's torpedo tube drawings well:
Posted By: Jeff D | Posted on: Jun 21, 2020 - 5:25am
Total Posts: 2200 | Joined: Dec 21, 2006 - 1:30am
Thanks Jeff, the gear box looks pretty straight forward to make, The day cabin aft corner curve looks to be a slight round at the roof corner ???
your right it does not really stand out much so easy to miss.
again thanks Mike
Posted By: Grady | Posted on: Jun 22, 2020 - 2:04am
Total Posts: 157 | Joined: Oct 2, 2018 - 8:04am
It's mostly just on the straight vertical part and ends / blends in before it reaches the aft roof molding:
Posted By: Jeff D | Posted on: Jun 22, 2020 - 4:34am
Total Posts: 2200 | Joined: Dec 21, 2006 - 1:30am
Hey Mike, Dick rescued a good discussion we had about the torpedo tubes and fixed all the broken images (thanks PHOTOBUCKET). There's some good info on the earlier parts like what the 105 had: [url]http://www.ptboatforum.com/cgi-bin/MB2/netboardr.cgi?fid=102&cid=101&tid=3708&st=0&nd=10&pg=1&sc=20[/url].
Posted By: Jeff D | Posted on: Jun 22, 2020 - 4:51am
Total Posts: 2200 | Joined: Dec 21, 2006 - 1:30am
Jeff , hope all is well your way
Anyway 2 questions, the 20mm did the early boats use the spent cartridge bag , and or the gunners belt ? can find pics of the 20mm in trials, training , but not many pics of the aft section in theatre. 2. The 77 training gear box , guessing here but it looks like it did not set on the rail pad ?
Once again your help is always appreciated .
Mike
Posted By: Grady | Posted on: Jun 24, 2020 - 2:40pm
Total Posts: 157 | Joined: Oct 2, 2018 - 8:04am
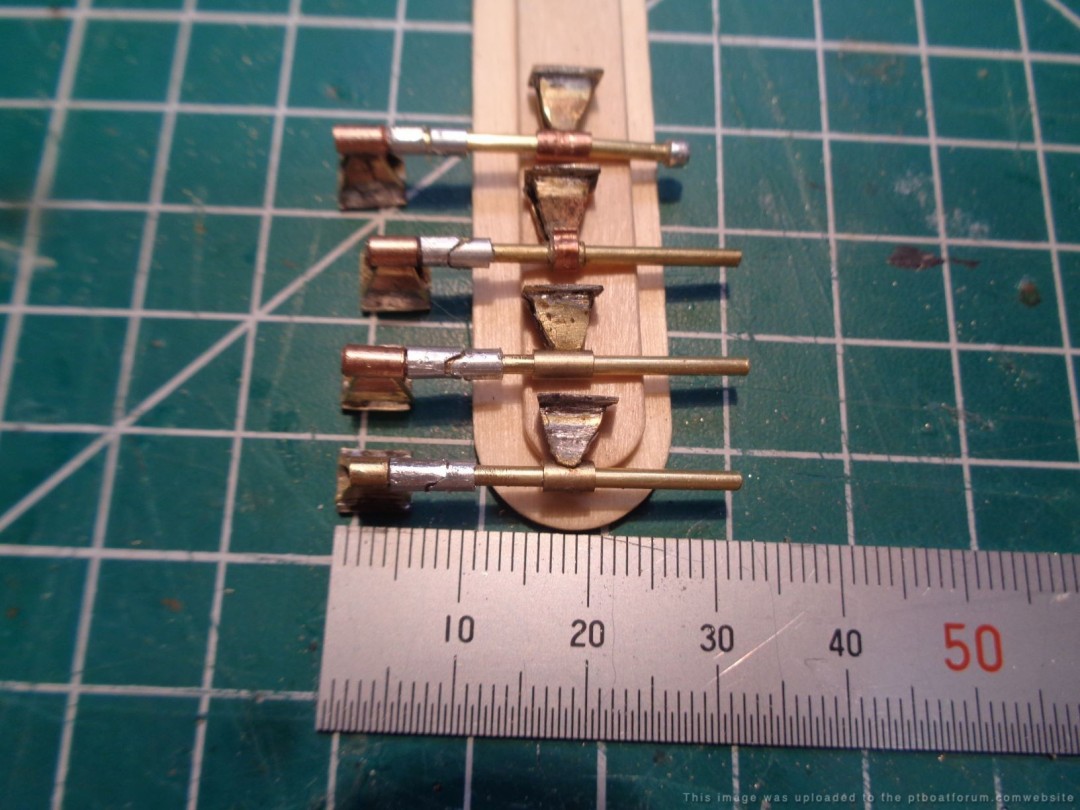
I do not have an answer for your 20mm question but here's some shots of the early 80 Elco training gear, the type without the right angle adapter. It's hard to see the little spuds in photos especially for the aft tubes:

For comparison, PT 149 with the right angle adapter:
Posted By: Jeff D | Posted on: Jun 25, 2020 - 6:13am
Total Posts: 2200 | Joined: Dec 21, 2006 - 1:30am
Great CUs.....
Will
Posted By: Will Day | Posted on: Jun 26, 2020 - 1:34pm
Total Posts: 1955 | Joined: Oct 8, 2006 - 4:19pm
The refueling at sea operation looked like a tricky, dangerous business.
Posted By: Jeff D | Posted on: Jun 27, 2020 - 4:43am
Total Posts: 2200 | Joined: Dec 21, 2006 - 1:30am
Jeff;
It is.
Take care,
TED
Posted By: TED WALTHER | Posted on: Jun 27, 2020 - 9:15am
Total Posts: 3059 | Joined: Oct 16, 2006 - 7:42am
First may you all have and enjoyable 4th. The strength of our nation will always shine thru.
I know this is a small, however was the inside of the deck hatches painted the same as the deck ? the inside lip of the hatch frame what color was it painted ?
Posted By: Grady | Posted on: Jul 4, 2020 - 6:46am
Total Posts: 157 | Joined: Oct 2, 2018 - 8:04am
The drawing states that they were to be painted gray on the outside and white on interior surfaces (note 1) but several photos of boats in theater show that the interior was painted dark / maybe deck color. The 2 photos below may be deck colored but unfaded. The lower frame rim that seals against the hatch gasket looks to be unpainted:

Posted By: Jeff D | Posted on: Jul 4, 2020 - 11:11am
Total Posts: 2200 | Joined: Dec 21, 2006 - 1:30am
Thanks Jeff great pics , I really didn't think they left them white, but I always like that second look from the experts In my group we changed every surface before entering the theater, thanks Grady
Posted By: Grady | Posted on: Jul 5, 2020 - 3:35am
Total Posts: 157 | Joined: Oct 2, 2018 - 8:04am
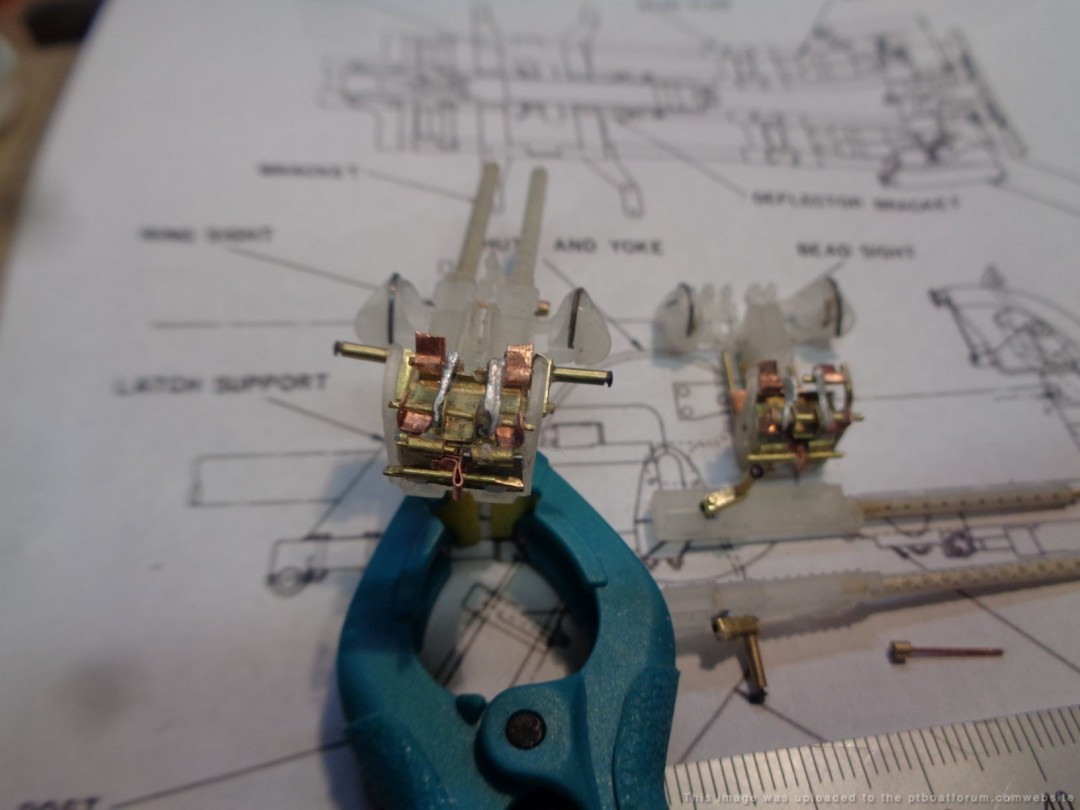
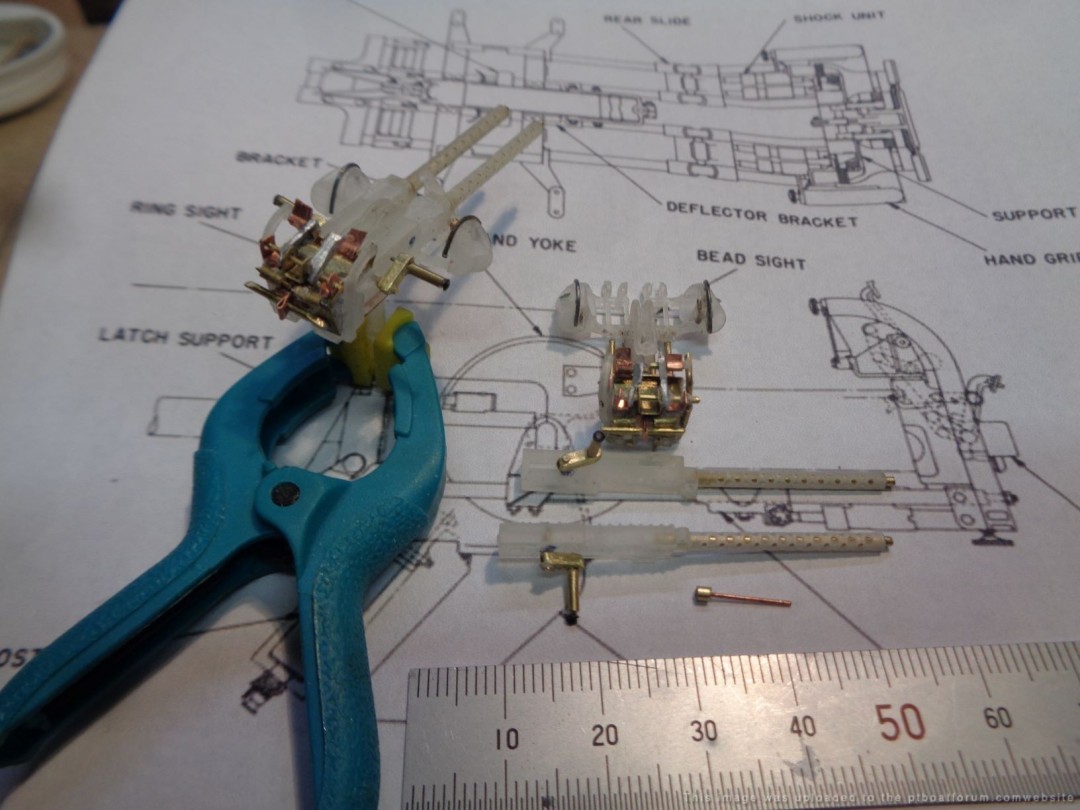
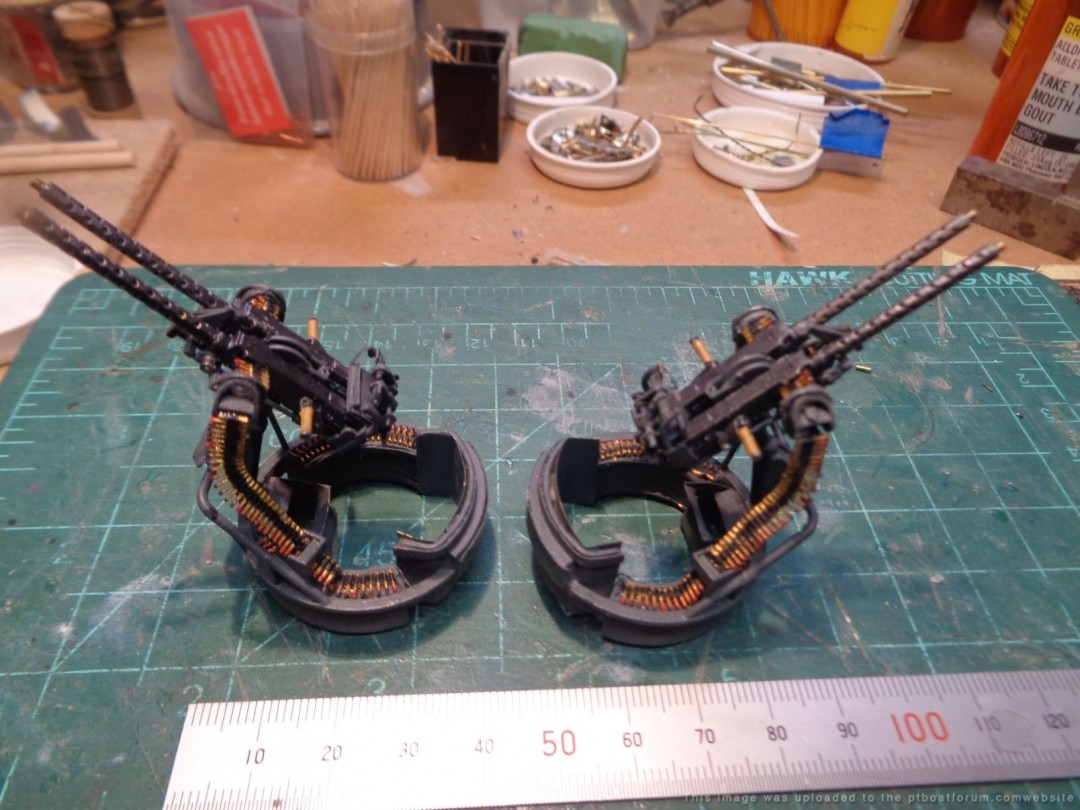
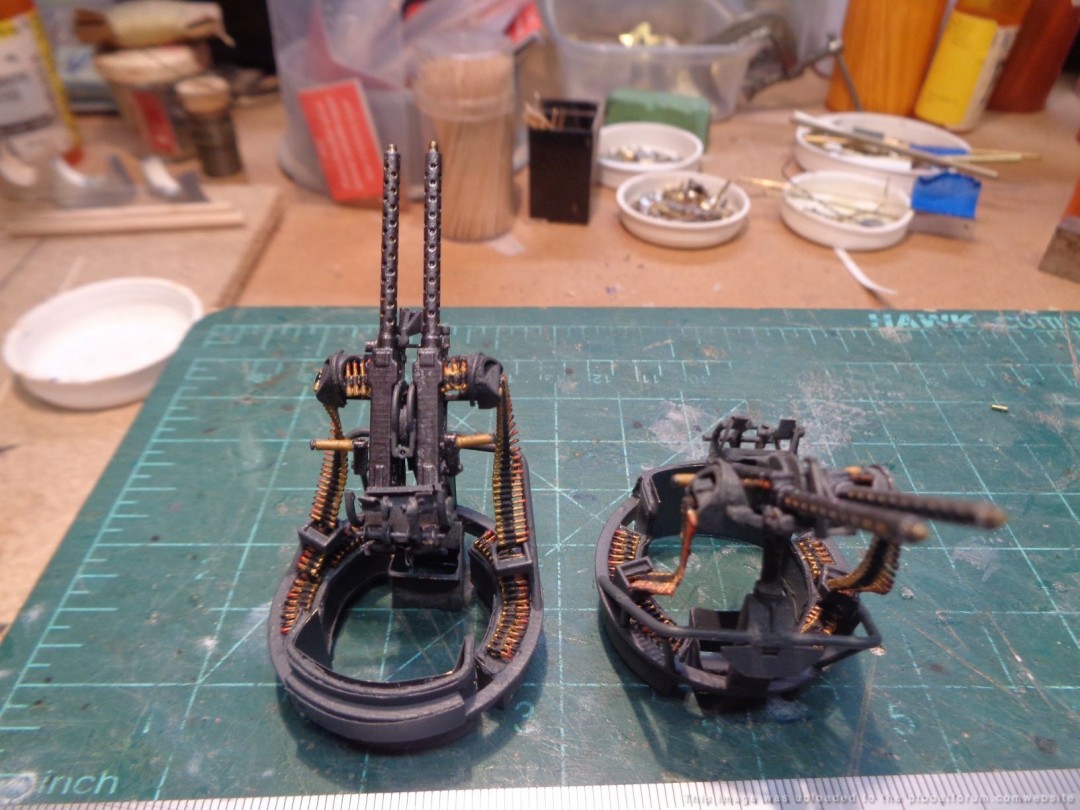
Finished the 20mm Oerlikon, pretty happy with it
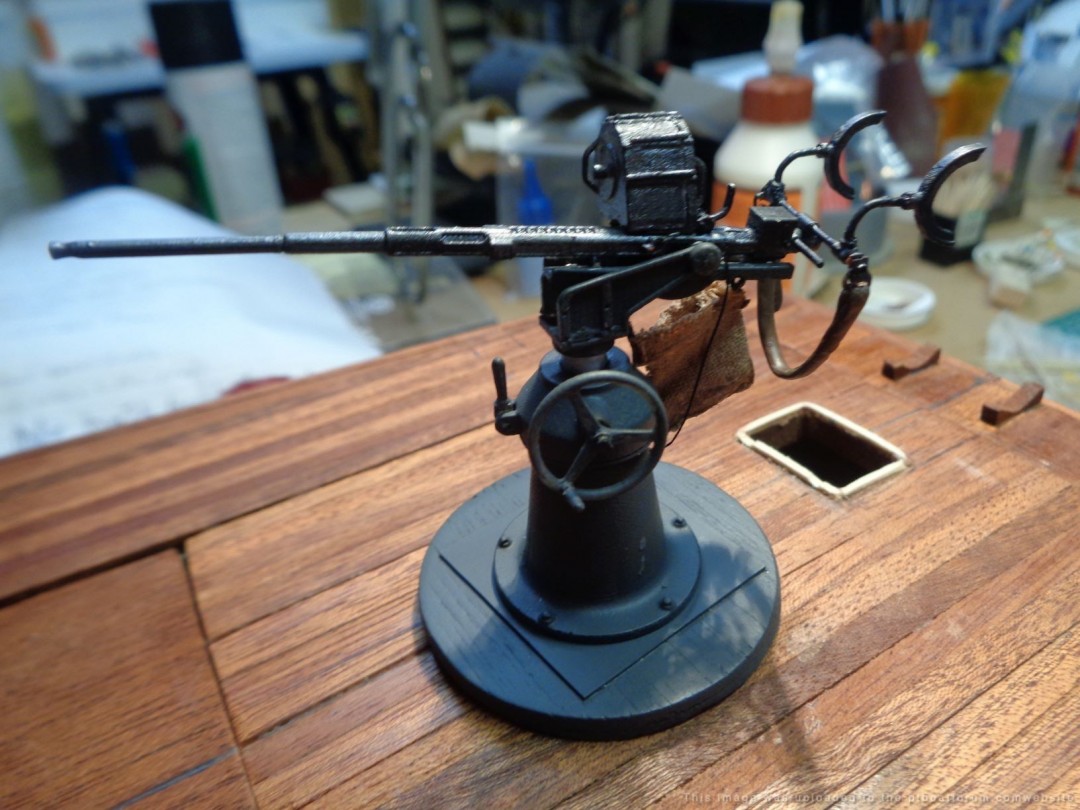
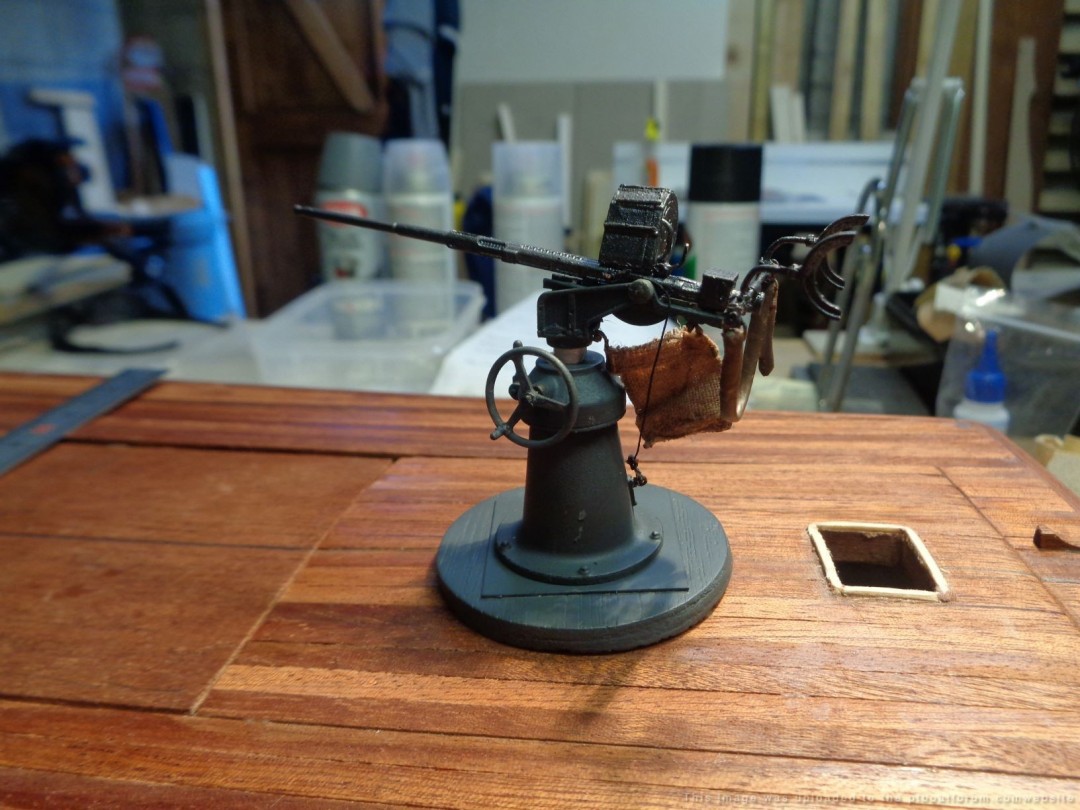
Posted By: Grady | Posted on: Jul 5, 2020 - 6:59am
Total Posts: 157 | Joined: Oct 2, 2018 - 8:04am
Good job on the 20mm Mike. You sure are productive!
What does this mean, in your previous post?:
[green]In my group we changed every surface before entering the theater[/green]
Posted By: Jeff D | Posted on: Jul 6, 2020 - 5:23am
Total Posts: 2200 | Joined: Dec 21, 2006 - 1:30am
Jeff D do you have any drawing for the 50 Cal Gun tub? Allot of good info on the guns & mounts, having trouble with the basic tubs.
Grady
Posted By: Grady | Posted on: Jul 10, 2020 - 6:15am
Total Posts: 157 | Joined: Oct 2, 2018 - 8:04am
In Dick's Elco drawing collection, the turret plan is ELCO_Roll_5535-2_72SCAN_00528.pdf / ELCO_Roll_5535-2_72SCAN_00527.pdf. The machine gun mount brackets is ELCO_Roll_5535-2_72SCAN_00522.pdf. I used them on my drawing here: [url]http://www.pt103.com/PT_Boat_Components_Turrets.html[/url]. I also have the layout for the limiting stops on it which should come in handy. The Elco drawings for them are not accurate above the support pieces and mentions that they are to be constructed from full scale templates that were. Note that the 105 would not have had the door shown here:
[image]http://www.pt103.com/images/PT_Boat_Elco_103_Class_Turret_Forward_Perspective.jpg[/image]
Posted By: Jeff D | Posted on: Jul 10, 2020 - 1:59pm
Total Posts: 2200 | Joined: Dec 21, 2006 - 1:30am
Torpedo tube training gear, rope locker hatch

Posted By: Grady | Posted on: Jul 13, 2020 - 11:15am
Total Posts: 157 | Joined: Oct 2, 2018 - 8:04am
LOL, the hatch cover is about 3/8". Ffinerr work than I could do! What did you do, train ants to cut file and solder??? [:-laughing-:]
Posted By: Jeff D | Posted on: Jul 14, 2020 - 1:50am
Total Posts: 2200 | Joined: Dec 21, 2006 - 1:30am
turrets ,and foot stands still very much a work in progress
Posted By: Grady | Posted on: Jul 26, 2020 - 10:52am
Total Posts: 157 | Joined: Oct 2, 2018 - 8:04am
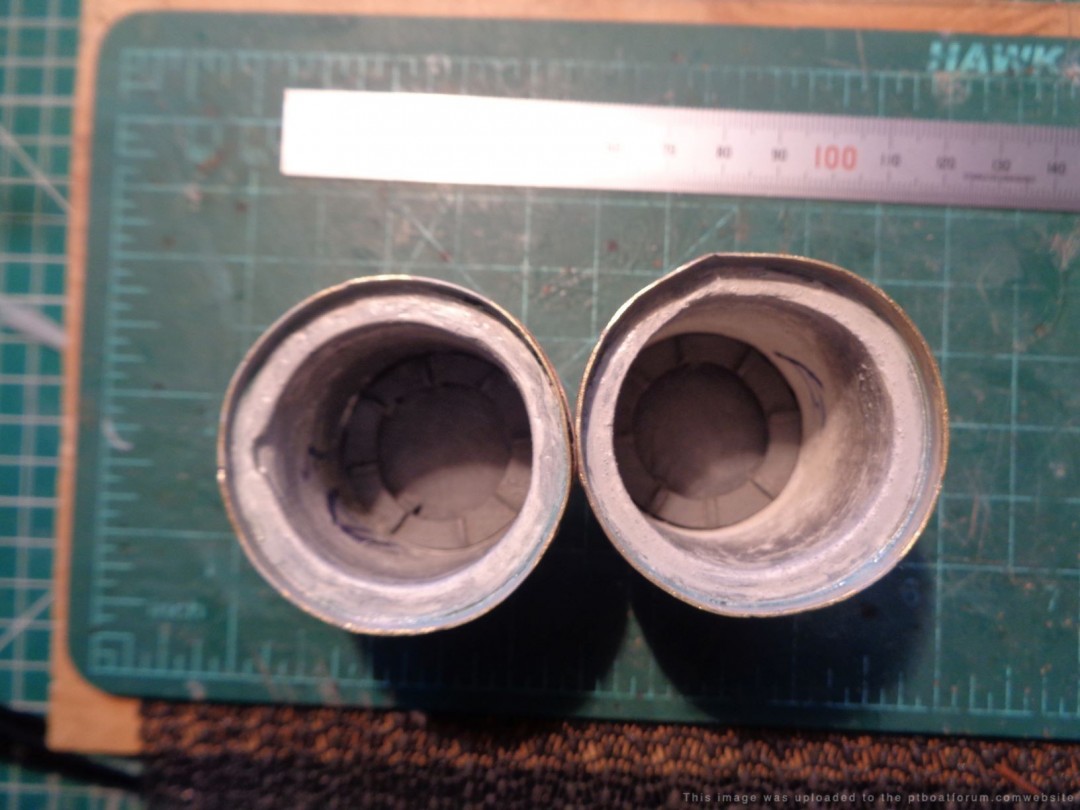
Torpedo tubs cut ready to fabricate Also Jeff D do you know the roll number's for the tube plans on Dicks film ?? i
Posted By: Grady | Posted on: Aug 6, 2020 - 3:39am
Total Posts: 157 | Joined: Oct 2, 2018 - 8:04am
It's not in the Elco plan set, you can grab them on Dick's web site here: [url]http://www.pt103.gdinc.com/drawings/21inchAWTorpedoTubeMark18.zip[/url]. A big thanks to Dr. Al Ross for sourcing and sharing them! I'll take some credit also for scanning scaling straightening and stitching them together.
Be aware of some minor changes in the different Mods included in the set.
Posted By: Jeff D | Posted on: Aug 6, 2020 - 5:44am
Total Posts: 2200 | Joined: Dec 21, 2006 - 1:30am
Thanks Jeff, and always a big thanks to Al Ross. New guys like me would be nowhere without all much valued expertise provided here.
Posted By: Grady | Posted on: Aug 6, 2020 - 9:03am
Total Posts: 157 | Joined: Oct 2, 2018 - 8:04am
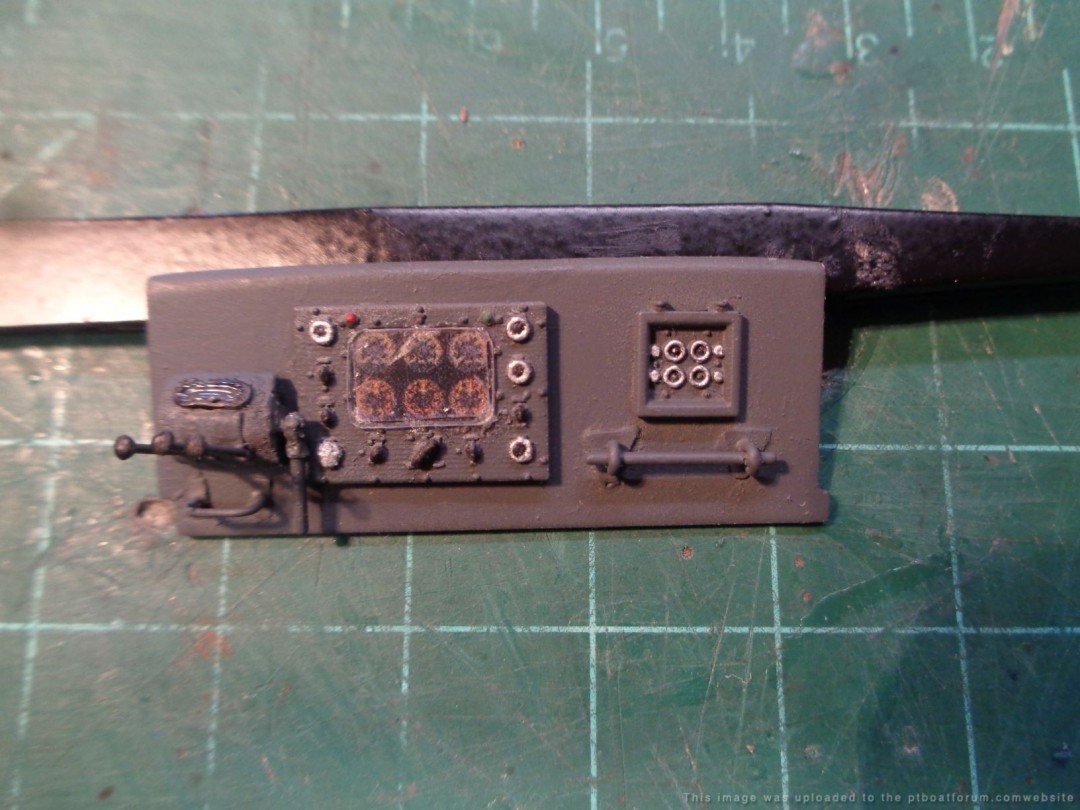
Test fitting the control panel before cleaning it up
Posted By: Grady | Posted on: Aug 10, 2020 - 10:44am
Total Posts: 157 | Joined: Oct 2, 2018 - 8:04am
Starting to show a little progress , attempting to scratch build the torpedo tubes, learning from plans & pictures . its fun but trying to get it right is slow work. fit tested parts of the of the superstructure, and cleaned up the control panel
Posted By: Grady | Posted on: Aug 29, 2020 - 8:44am
Total Posts: 157 | Joined: Oct 2, 2018 - 8:04am
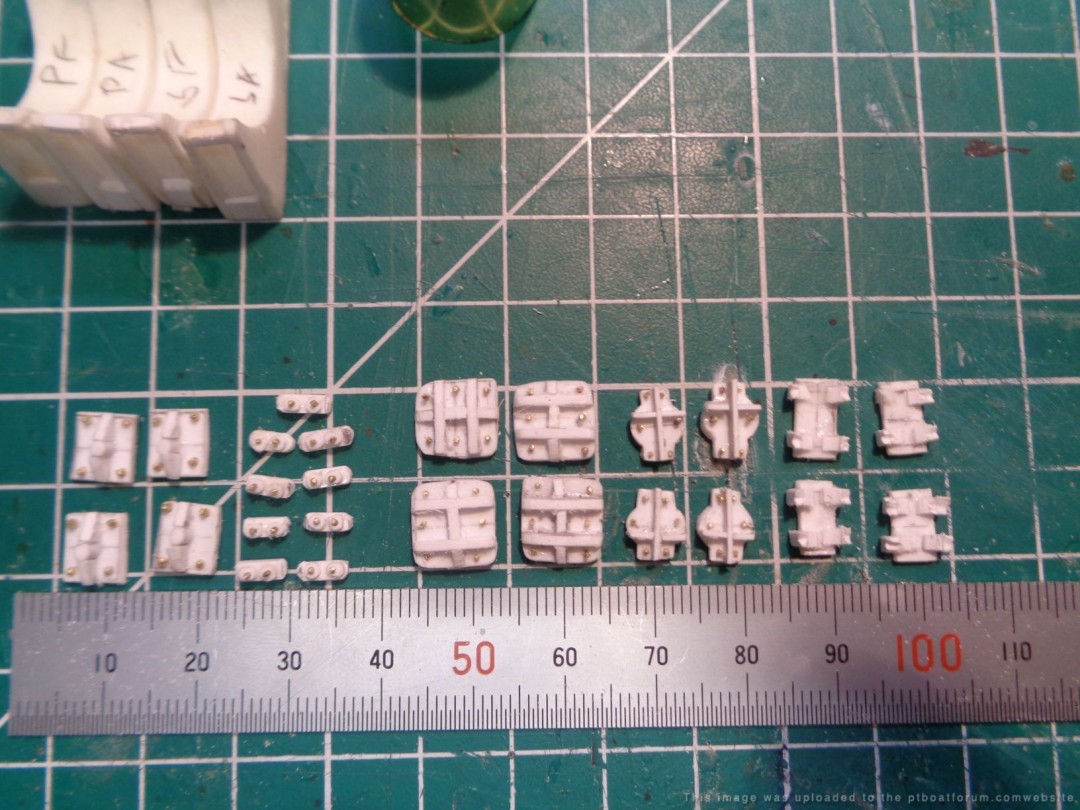
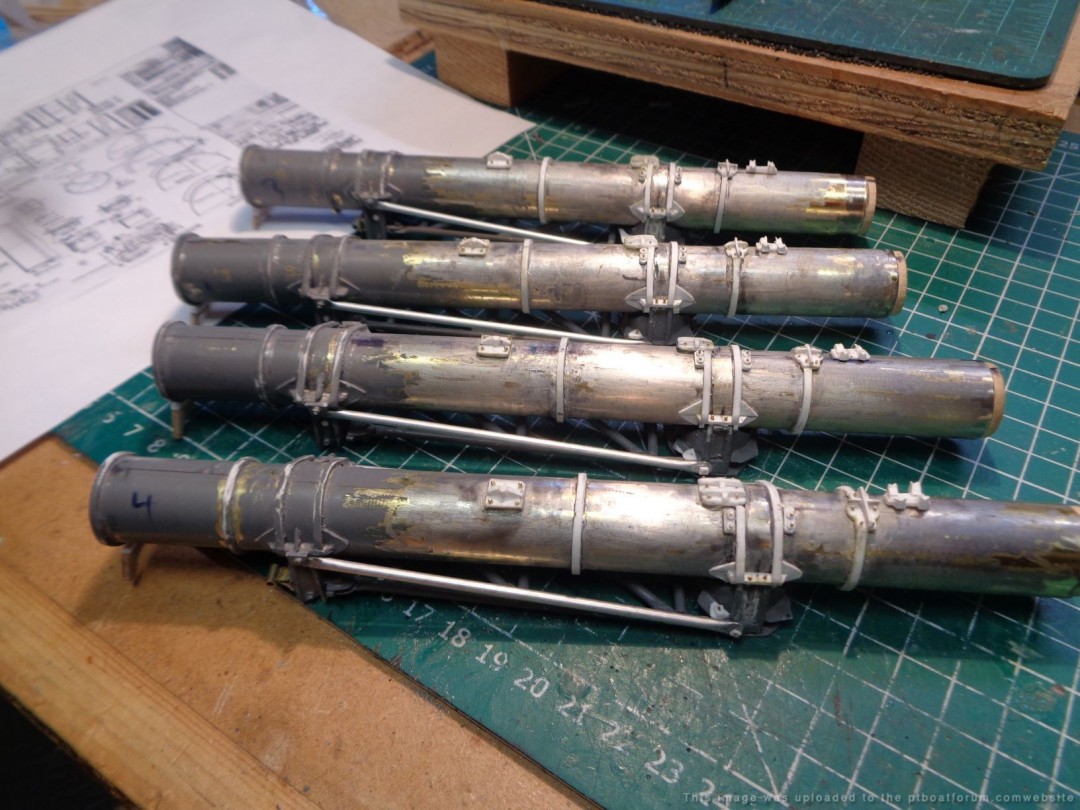
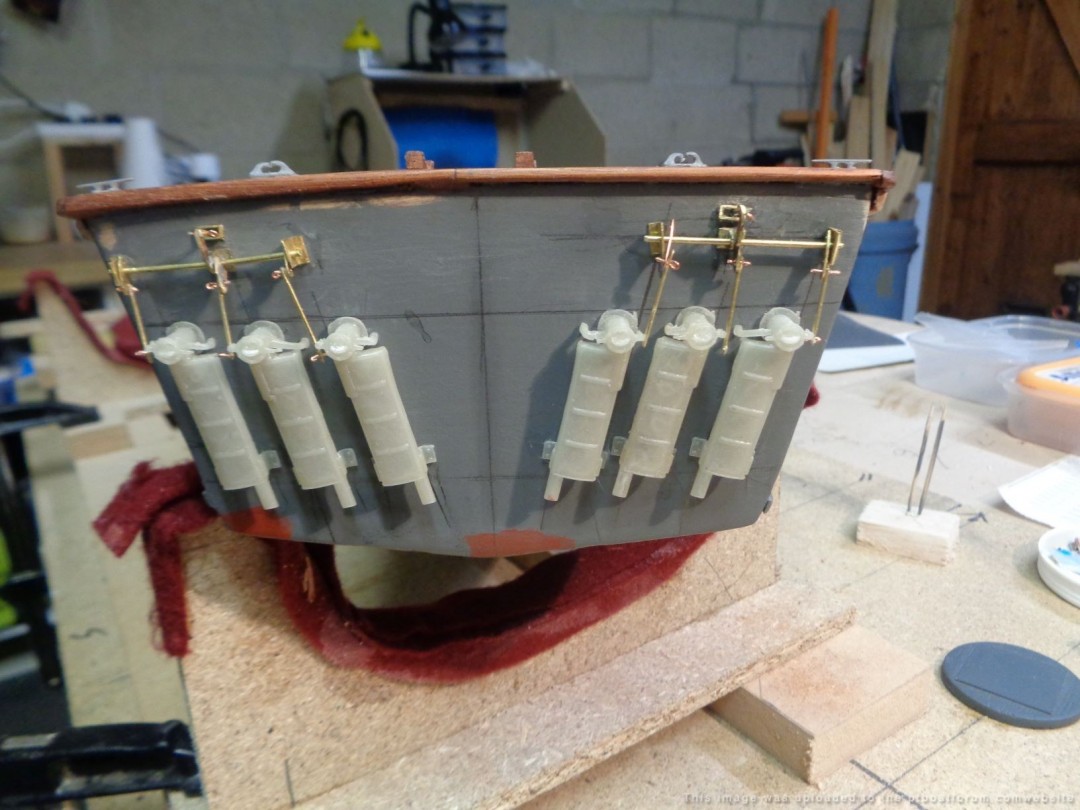
First stage building the components for the torpedo tubes, ready to be cleaned up. Been tough going trying to get all the repeated parts a close match,
Posted By: Grady | Posted on: Sep 16, 2020 - 2:48am
Total Posts: 157 | Joined: Oct 2, 2018 - 8:04am
Nicely done, all these little details x 4 must be an exercise in patience! Keep up the good work Mike.
Posted By: Jeff D | Posted on: Sep 17, 2020 - 4:15am
Total Posts: 2200 | Joined: Dec 21, 2006 - 1:30am
The early stages of fabrication on the AFT torpedo turntable cradle mounts AFT turntable base complete ready to prime
Posted By: Grady | Posted on: Sep 29, 2020 - 2:54am
Total Posts: 157 | Joined: Oct 2, 2018 - 8:04am
Jeff D , Dave, Ted or one of the other experts here Forward torpedo tracks 2 sizes/shapes, which one goes with the forward tubes and which goes with the Aft tubes ??? Iâ must be looking at the plans wrong, or I simple missed it. Again your help is needed and valued
Mike
Posted By: Grady | Posted on: Sep 30, 2020 - 10:54am
Total Posts: 157 | Joined: Oct 2, 2018 - 8:04am
I'm not quite sure what you're asking, what drawing are you referencing? One of the Elco or one of the tube drawings? This is from Elco drawing ELCO_Roll_5535-2_72SCAN_00610.pdf / ELCO_Roll_5535-2_72SCAN_00611.pdf and may answer your question. I notice that the aft tubes have longer tracks and a longer train out:
Posted By: Jeff D | Posted on: Oct 1, 2020 - 5:14am
Total Posts: 2200 | Joined: Dec 21, 2006 - 1:30am
Thanks Jeff , totally missed this plan , like you once told me there are many & going thru them is pain staking , I followed many of the sheets to get his far, again I missed
a few , do still get a new guy pass ?? again thanks
Posted By: Grady | Posted on: Oct 1, 2020 - 6:48am
Total Posts: 157 | Joined: Oct 2, 2018 - 8:04am
Jeff Disregard my last post , I don't deserve to be considered anything but a new guy
I did not miss the plan I never looked for it , was working off the Torpedo rolls , The new guy did not think to look at the ELCO rolls. The tubes are mounted on the deck so why would I want to look at a deck plan ??? 1 year into this boat & still have so much to learn. have what I need know . Thanks
Mike
Posted By: Grady | Posted on: Oct 1, 2020 - 7:14am
Total Posts: 157 | Joined: Oct 2, 2018 - 8:04am
Lol Mike don't be hard on yourself. You're the one doing the tough work that's way above my physically modeled pay grade! Happy building my friend. [:-cheers-:]
Posted By: Jeff D | Posted on: Oct 1, 2020 - 2:38pm
Total Posts: 2200 | Joined: Dec 21, 2006 - 1:30am
Finished fabricating the torpedo mounts suspension ( ok guys not really sure what sure what there called) . I donât like using aluminum because it doesnât solder with getting into a painful process, so it has to be glued, which it equally does not like, anyway it got there in the end,
Posted By: Grady | Posted on: Oct 10, 2020 - 3:09am
Total Posts: 157 | Joined: Oct 2, 2018 - 8:04am
Torpedo tube training gear & drive screws
Posted By: Grady | Posted on: Oct 12, 2020 - 10:43am
Total Posts: 157 | Joined: Oct 2, 2018 - 8:04am
really helps if you add the pic, damn old age
Posted By: Grady | Posted on: Oct 12, 2020 - 10:47am
Total Posts: 157 | Joined: Oct 2, 2018 - 8:04am
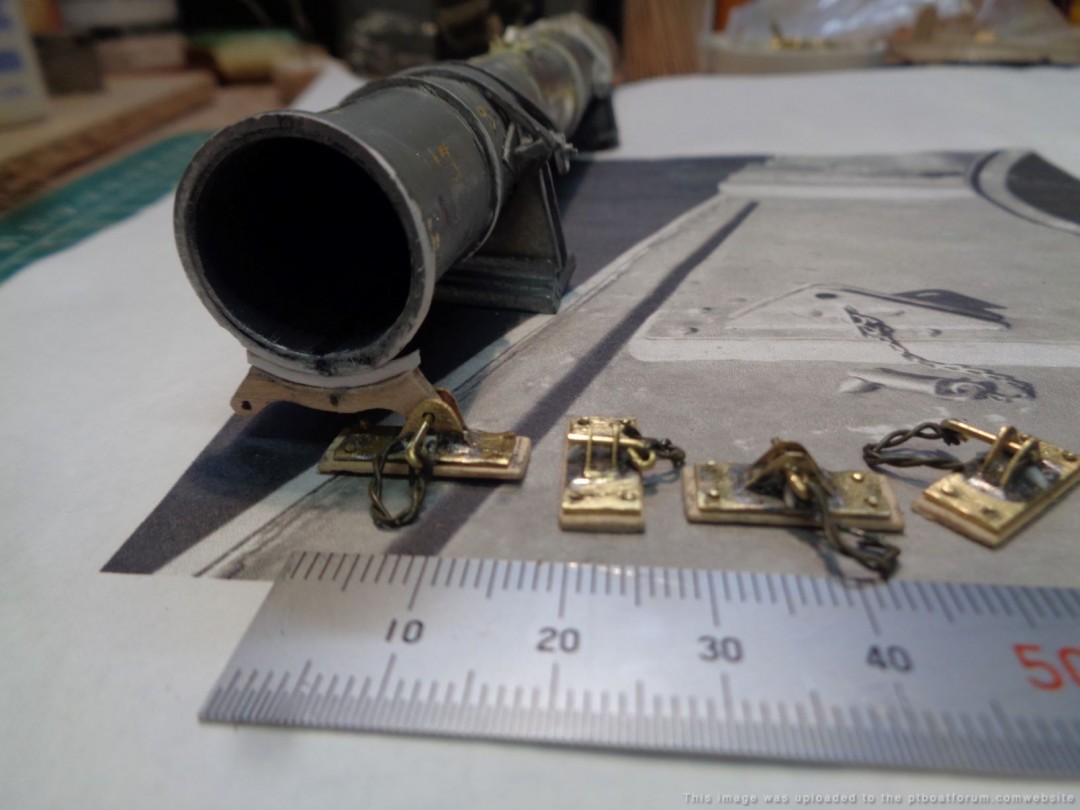
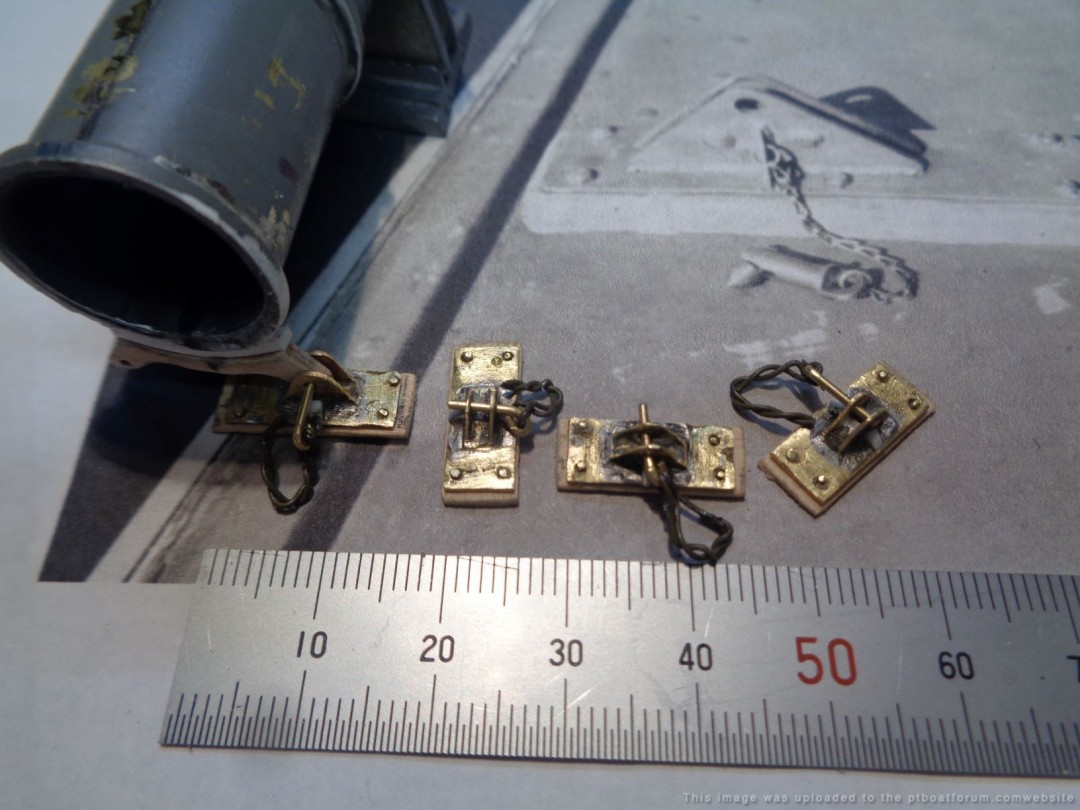
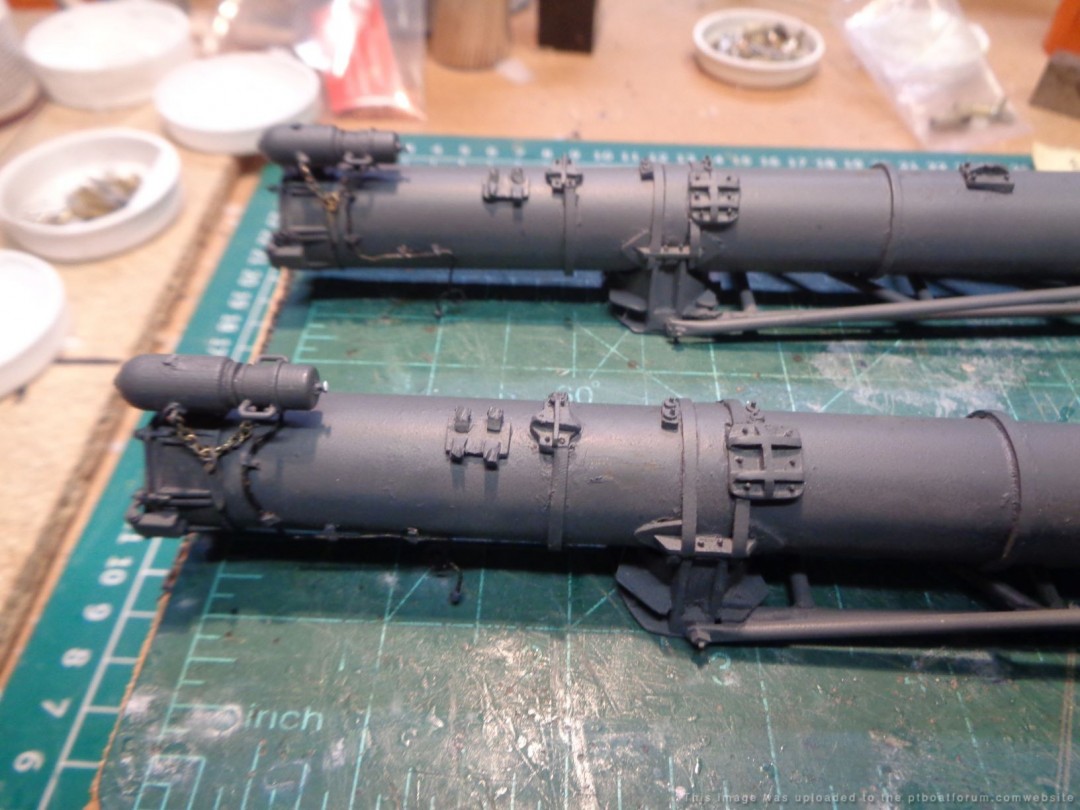
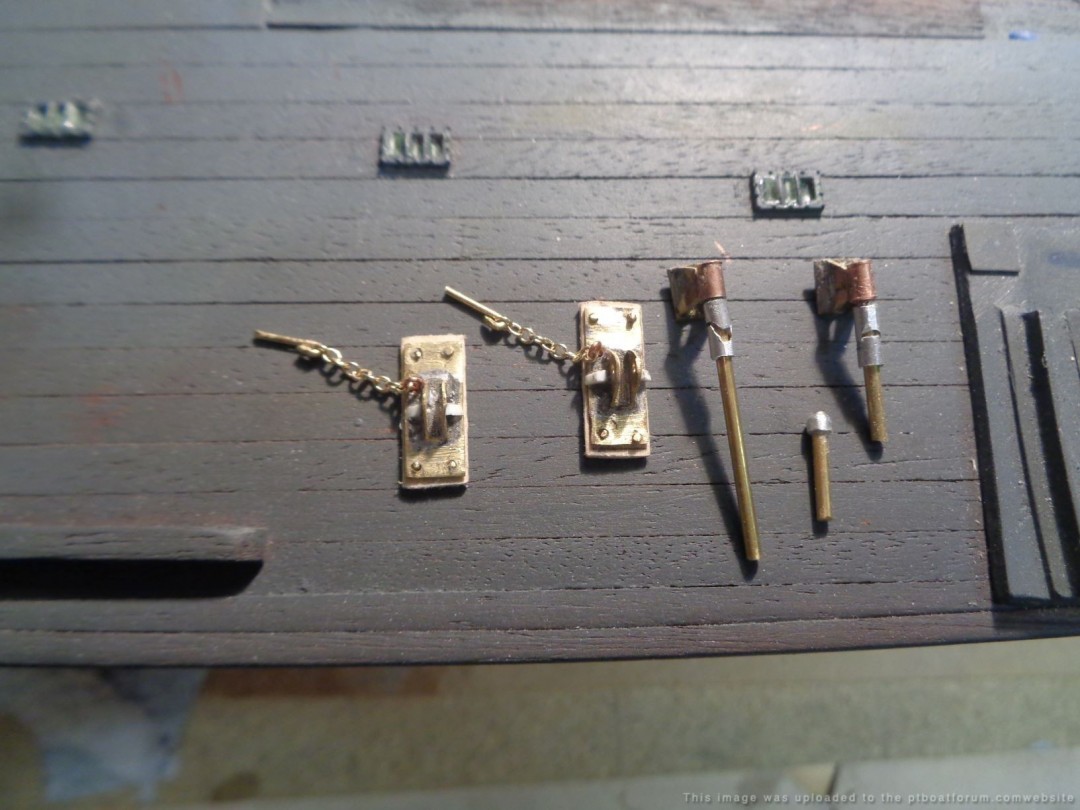
Fabricated torpedo tube brackets and locks. Took allot of time but Iâm happy with the result.

Posted By: Grady | Posted on: Oct 21, 2020 - 3:37am
Total Posts: 157 | Joined: Oct 2, 2018 - 8:04am
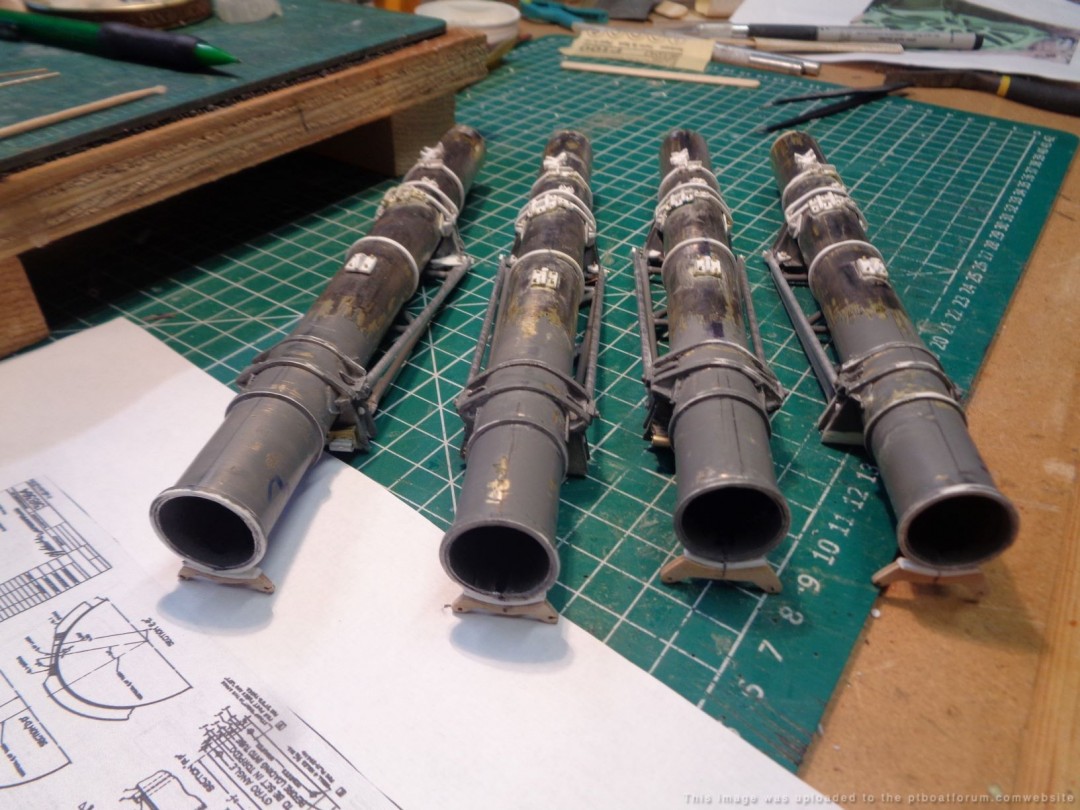
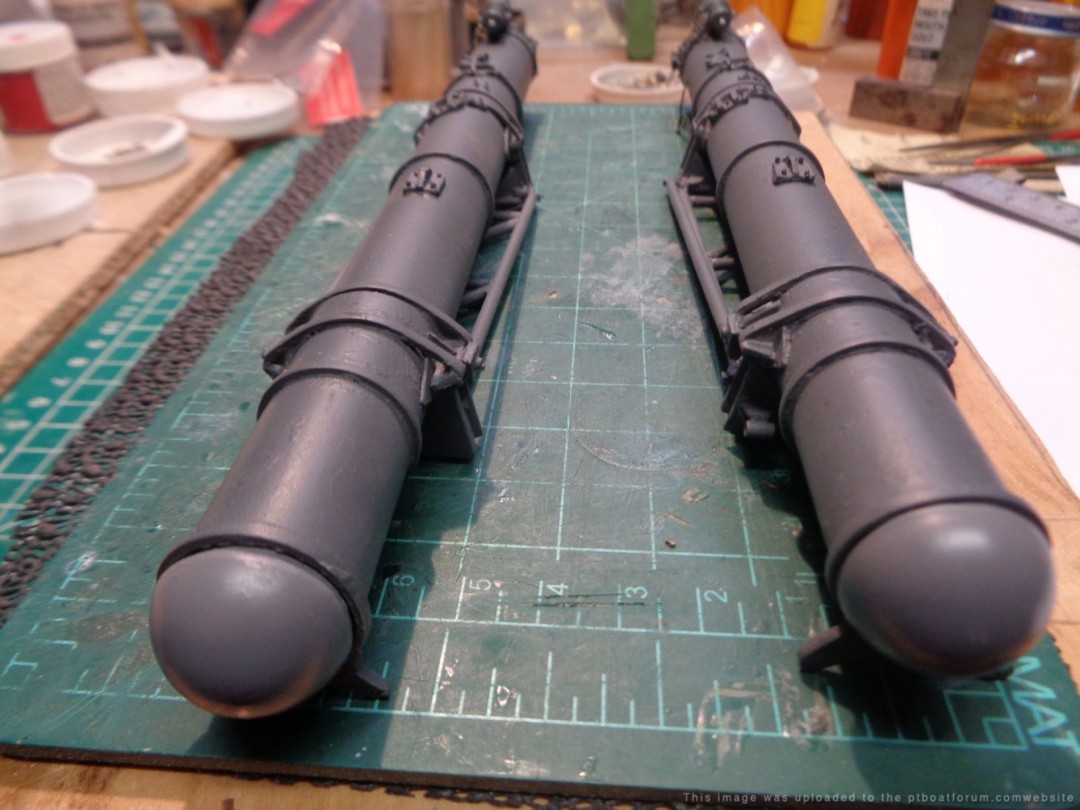
Torpedo tubes fabrication coming along, looking at maybe 2 more weeks to complete
Posted By: Grady | Posted on: Oct 26, 2020 - 2:49am
Total Posts: 157 | Joined: Oct 2, 2018 - 8:04am
That is a lot of fine detail Mike, they look good!
Posted By: Jeff D | Posted on: Oct 27, 2020 - 6:48am
Total Posts: 2200 | Joined: Dec 21, 2006 - 1:30am
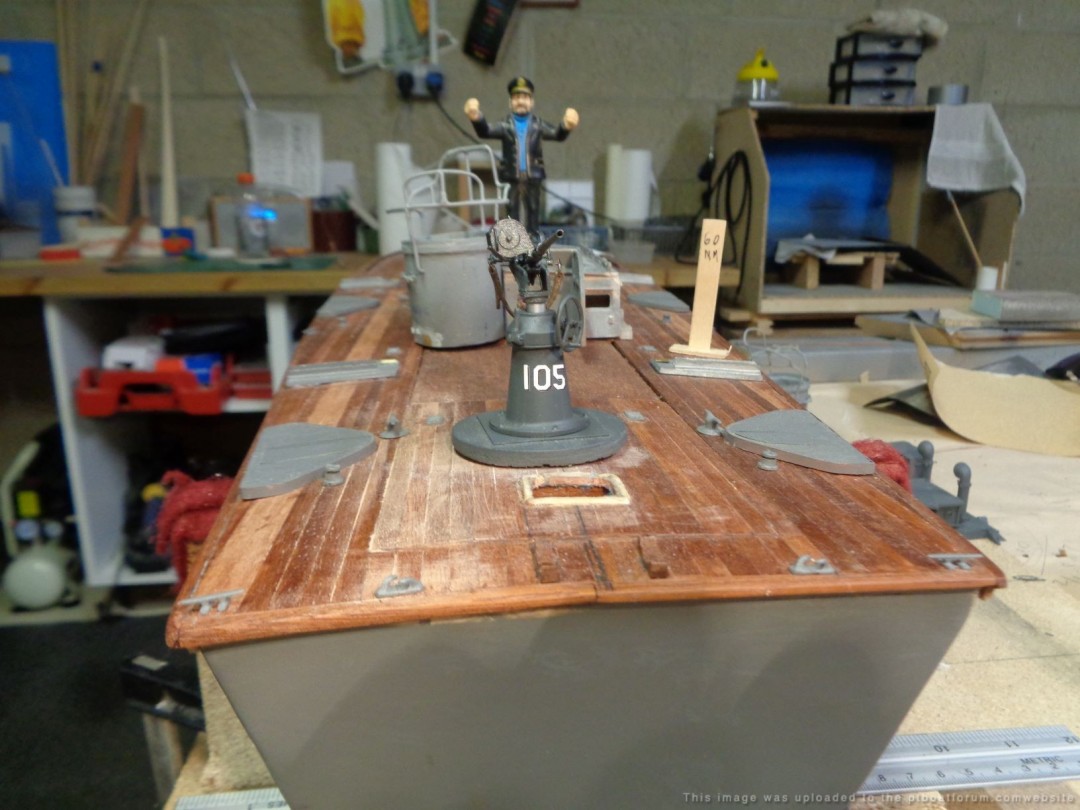
Test fitting the tubes , added the detonator housing, and the âCaptain â in not in scale, he just likes being in charge
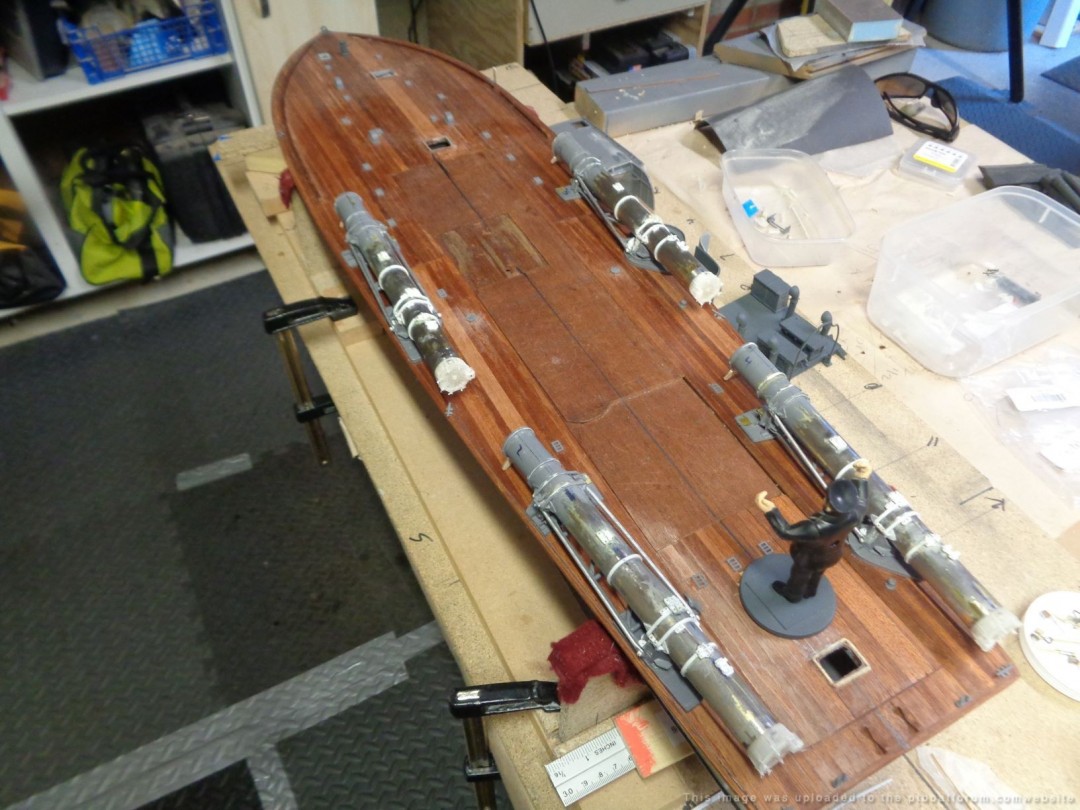
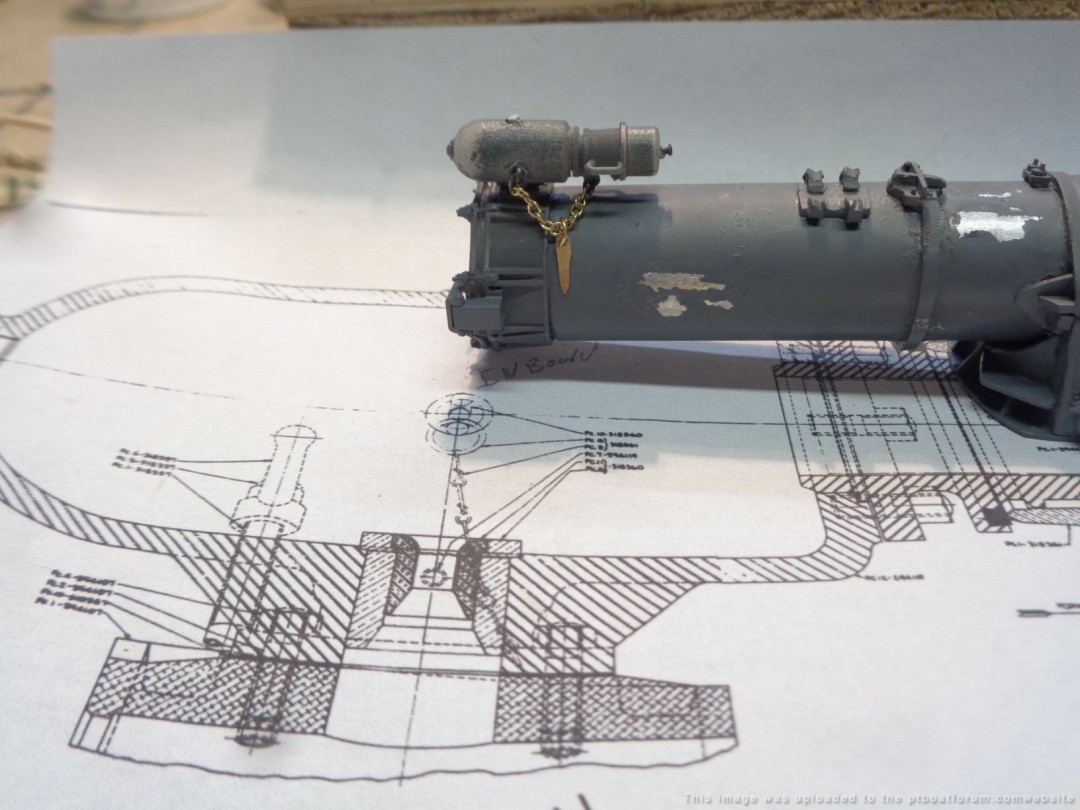
Posted By: Grady | Posted on: Oct 30, 2020 - 3:04am
Total Posts: 157 | Joined: Oct 2, 2018 - 8:04am
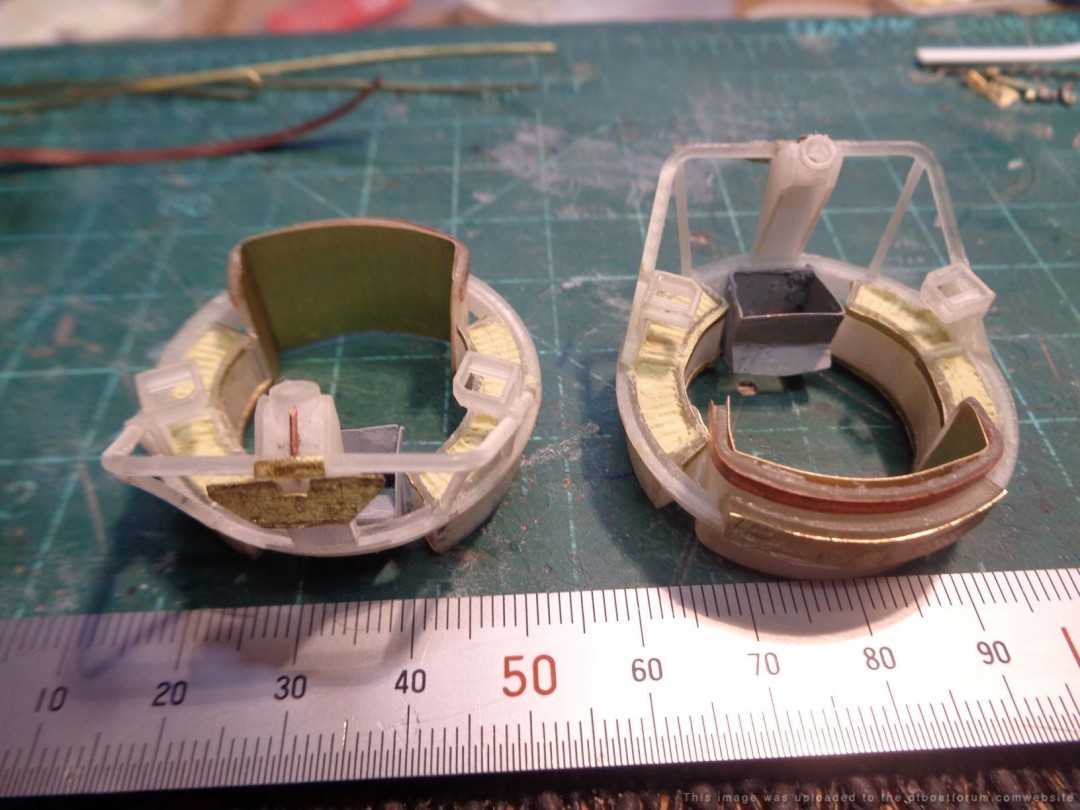
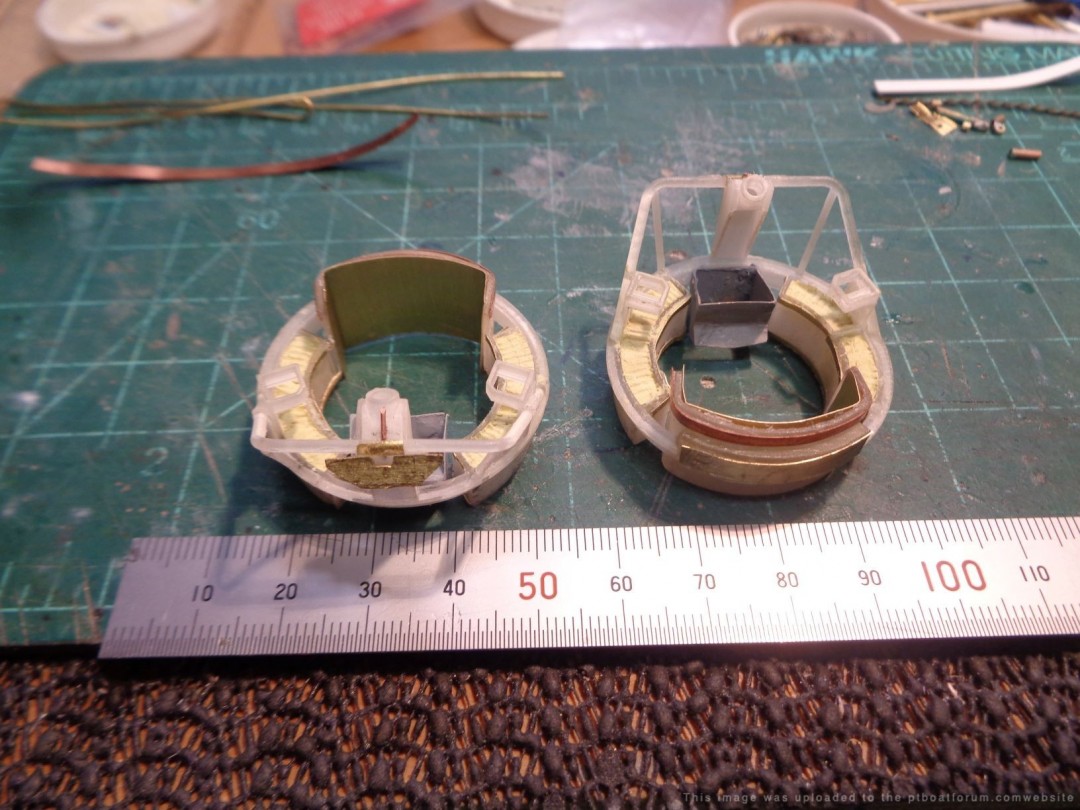
Forward & Aft 50 Cal stops and 50 Cal spent cartridge hopper not sure if I will use the hopper yet?
Still being very much a metal fabrication novice , doing the stops rate the toughest project yet with every piece having to conform with the turret ring , plus bends, shaping & getting the heights right , much reworking & a few choice words for something that might look simple , which I quickly found out was not.
Posted By: Grady | Posted on: Nov 18, 2020 - 9:50am
Total Posts: 157 | Joined: Oct 2, 2018 - 8:04am
Awesome effort...
Will
Posted By: Will Day | Posted on: Nov 18, 2020 - 6:25pm
Total Posts: 1955 | Joined: Oct 8, 2006 - 4:19pm
Nope, that doesn't look simple at all... especially with how small it is. I'd go nuts!
Posted By: Jeff D | Posted on: Nov 22, 2020 - 6:25am
Total Posts: 2200 | Joined: Dec 21, 2006 - 1:30am
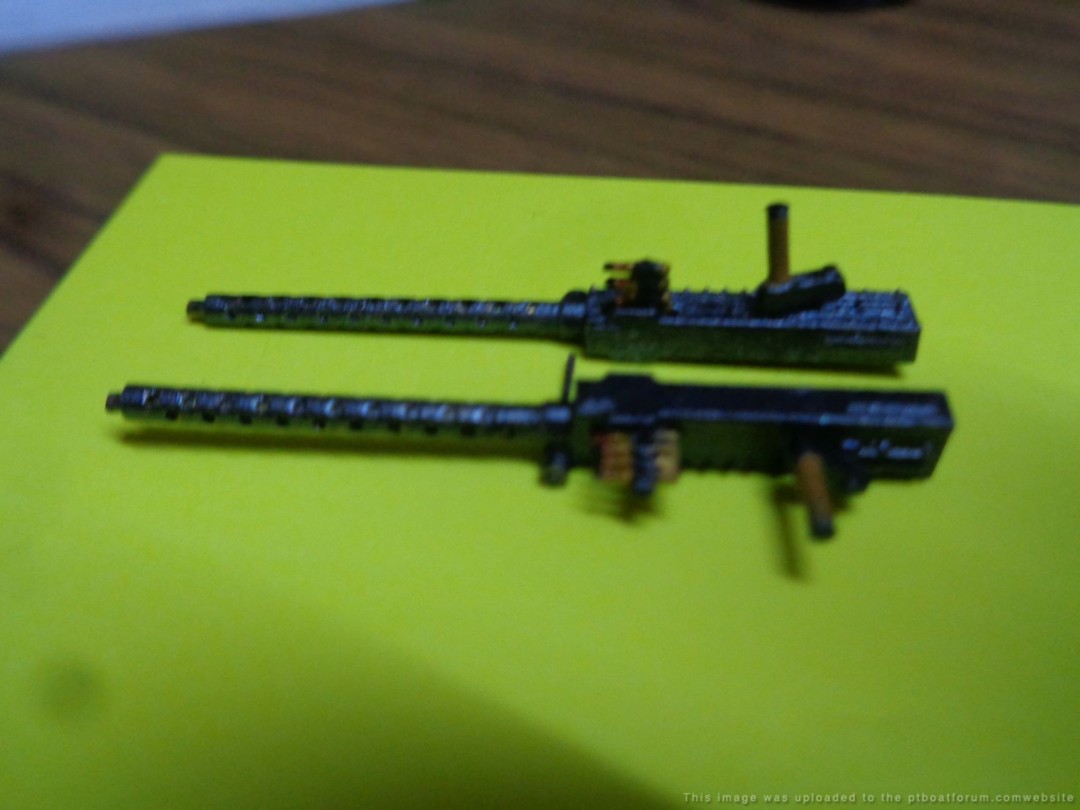
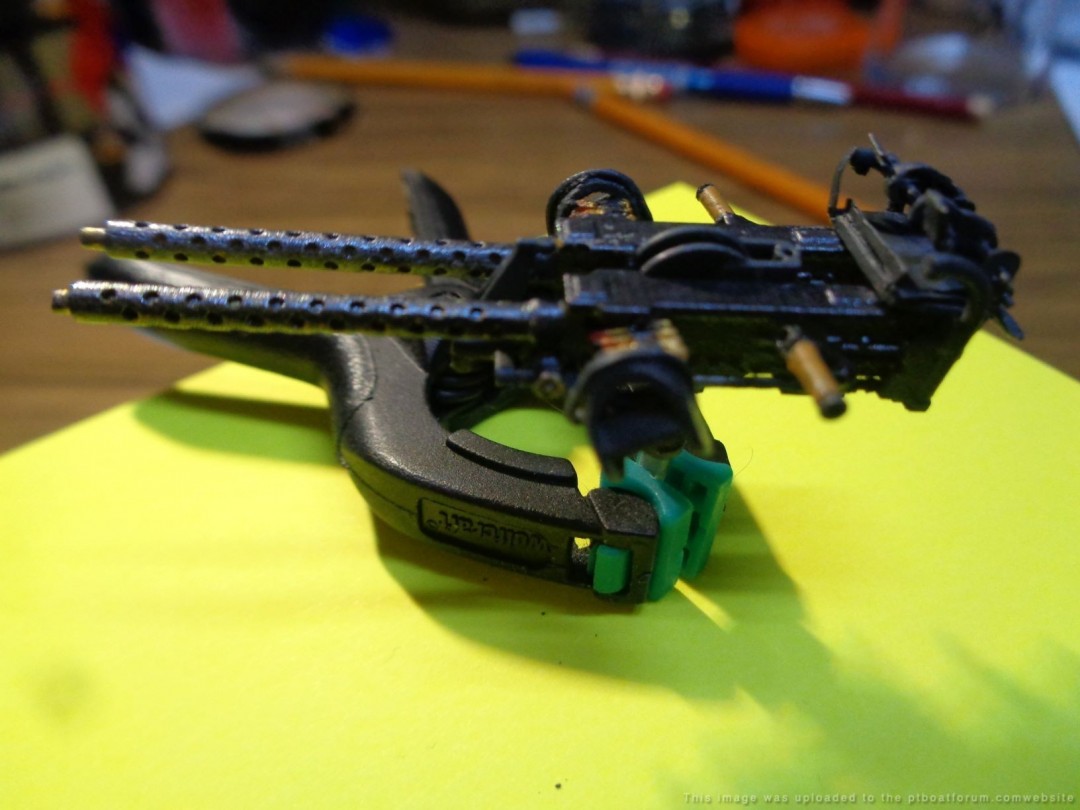
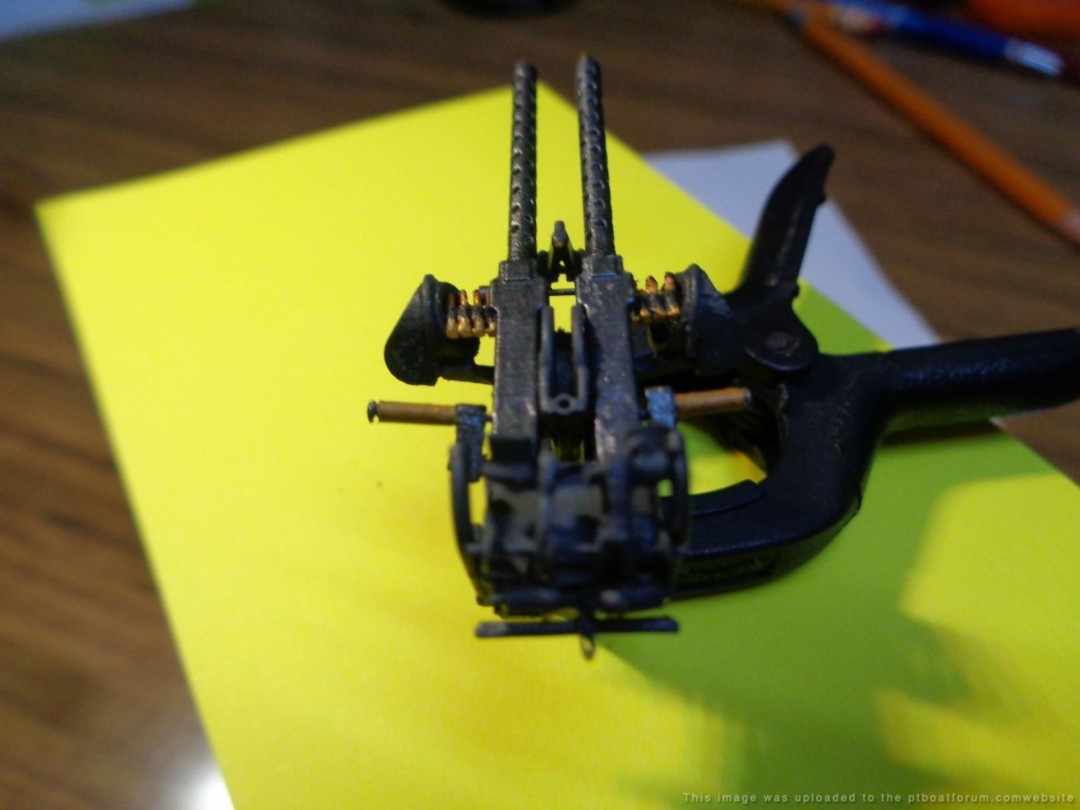
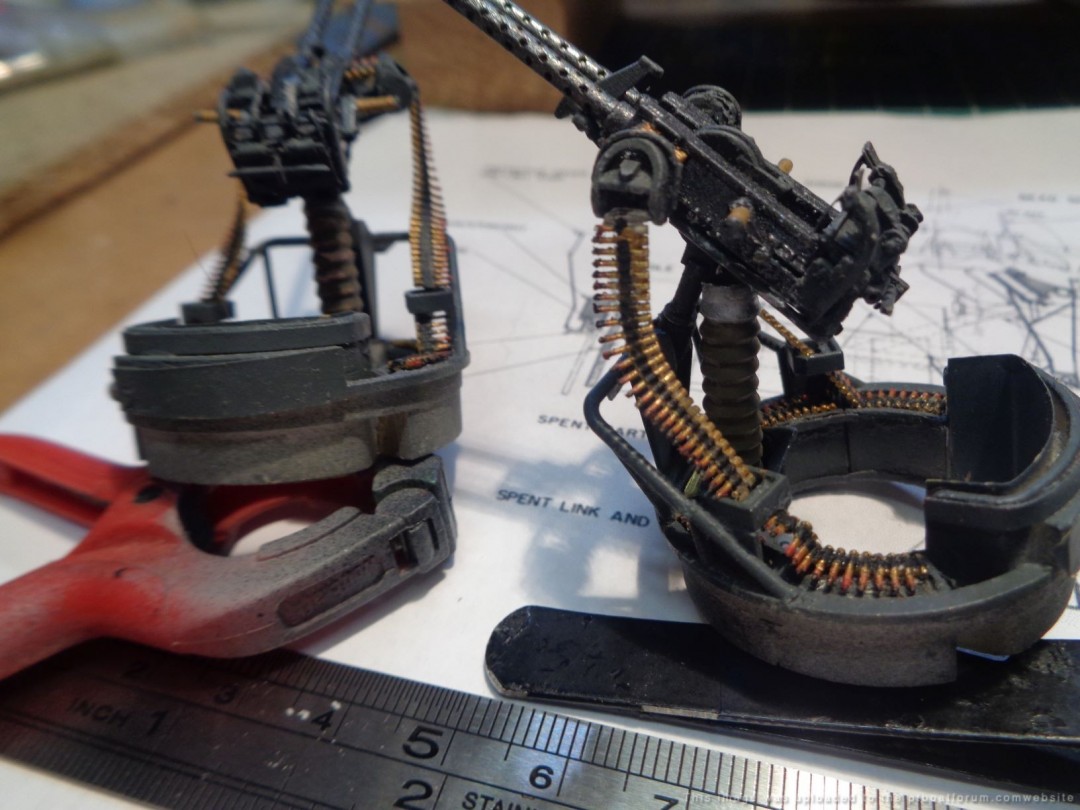
50 Cal machine gun mount with scratch built trigger assembly. And parts to assemble the second trigger group. At this scale detailing has its limits, the working space in tiny, & you can only do so much fabricating parts. Following the weapons blueprints I got it as close as I could.

Posted By: Grady | Posted on: Nov 30, 2020 - 10:50am
Total Posts: 157 | Joined: Oct 2, 2018 - 8:04am
Twin 50 Cals with mounts ready to prime. As master model builder Gene Berger is always telling me âanything worth doing is worth redoing â I did not like the first trigger assembly So did it again, Sometimes you have to use a few 3D parts , however working around 3D printed parts at this scale is very fragile, so I combined scratch built with 3D one a better look & 2 I really broke up the original parts.

Posted By: Grady | Posted on: Dec 11, 2020 - 9:35am
Total Posts: 157 | Joined: Oct 2, 2018 - 8:04am
Forward & Aft gun carriages
Posted By: Grady | Posted on: Dec 18, 2020 - 2:56am
Total Posts: 157 | Joined: Oct 2, 2018 - 8:04am
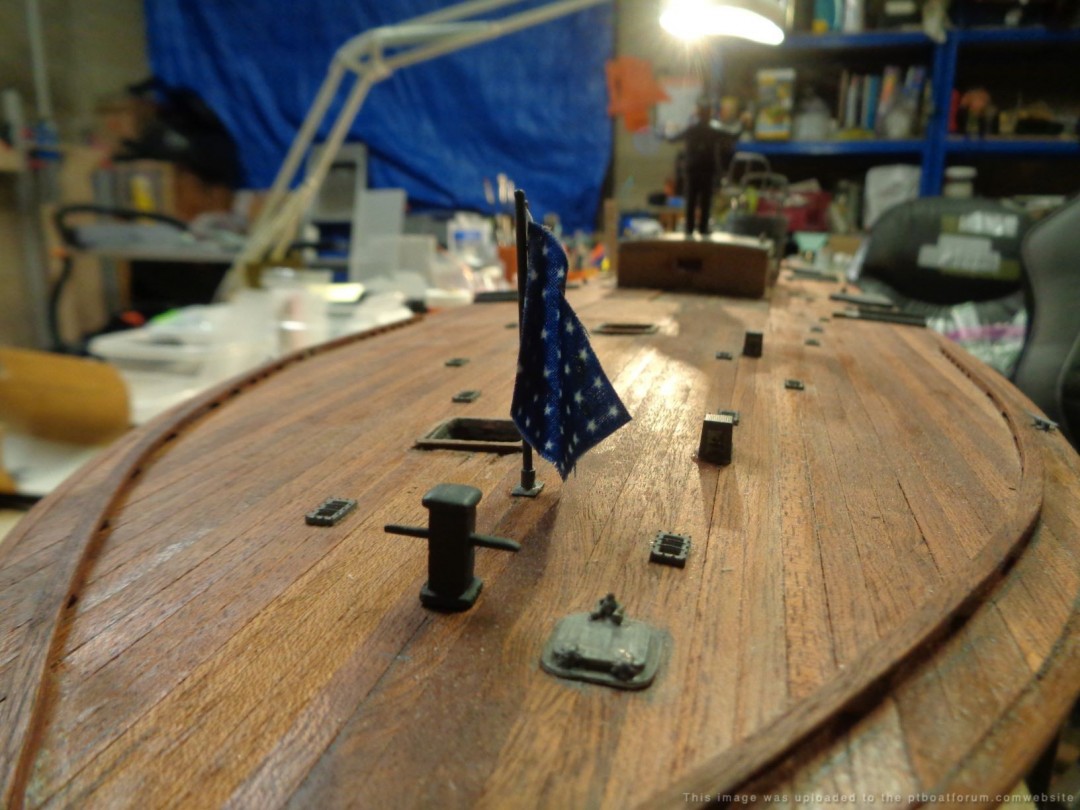
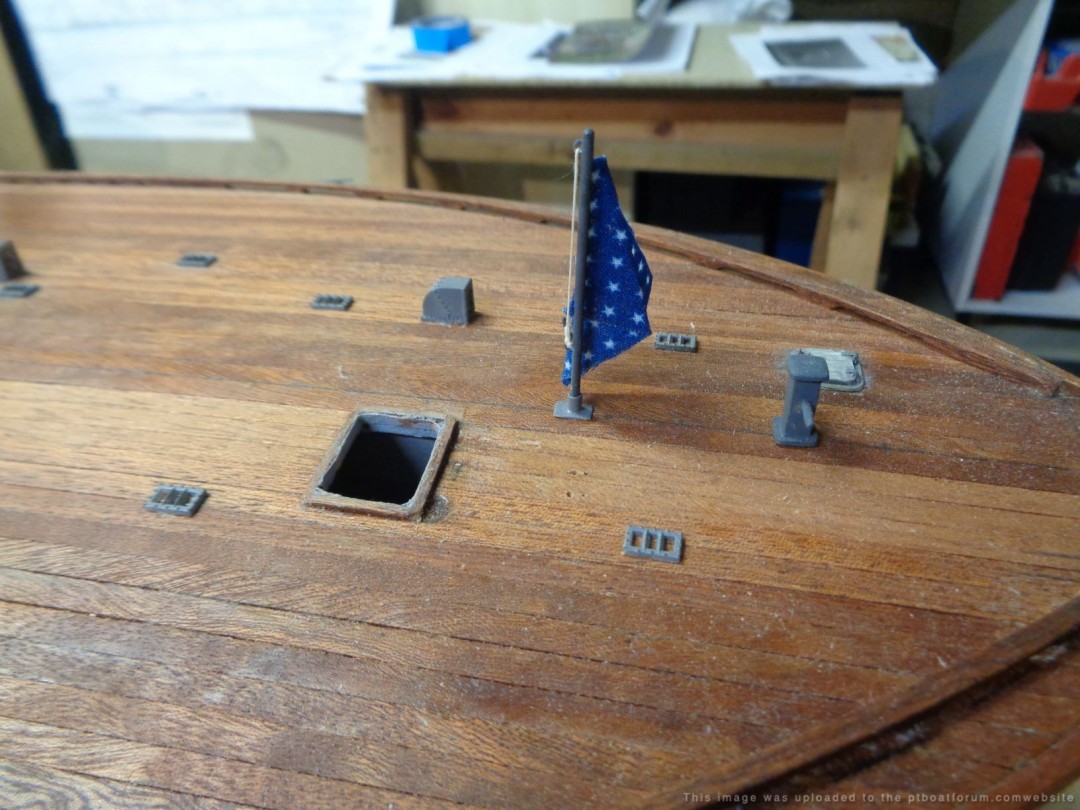
Well she finally has an official designation , the jack will soon be flying on the fore deck
Posted By: Grady | Posted on: Dec 22, 2020 - 5:58am
Total Posts: 157 | Joined: Oct 2, 2018 - 8:04am
Most of the work is caught up, now awaiting materials to proceed so I have posted the Jack while docked
Wishing all a hearty thank for all your help & advise , Please have a Merry Xmas & Happy New Year, hopefully we will see calm seas ahead.
Posted By: Grady | Posted on: Dec 24, 2020 - 9:12am
Total Posts: 157 | Joined: Oct 2, 2018 - 8:04am
Merry Christmas to you too Grady!
Posted By: Jeff D | Posted on: Dec 25, 2020 - 5:41am
Total Posts: 2200 | Joined: Dec 21, 2006 - 1:30am
SAME-SAME, GRADY!
Will
Posted By: Will Day | Posted on: Dec 25, 2020 - 11:57am
Total Posts: 1955 | Joined: Oct 8, 2006 - 4:19pm
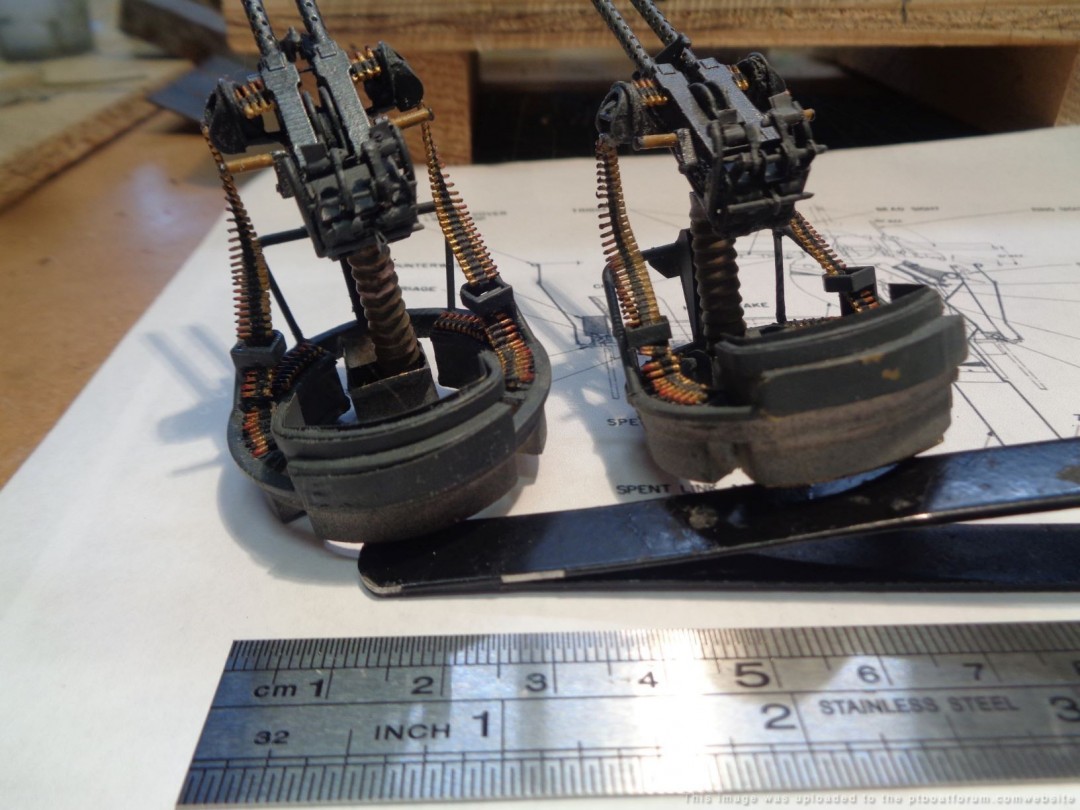
Finished the 1st set of twin 50s with mount
Posted By: Grady | Posted on: Feb 14, 2021 - 9:44am
Total Posts: 157 | Joined: Oct 2, 2018 - 8:04am
Nice Mike, so much detail for being so tiny! Much better than the blobs of plastic usually found in the average kit. [:-cheers-:]
Posted By: Jeff D | Posted on: Feb 17, 2021 - 4:51am
Total Posts: 2200 | Joined: Dec 21, 2006 - 1:30am
Great detail....
Will
Posted By: Will Day | Posted on: Feb 17, 2021 - 10:47am
Total Posts: 1955 | Joined: Oct 8, 2006 - 4:19pm
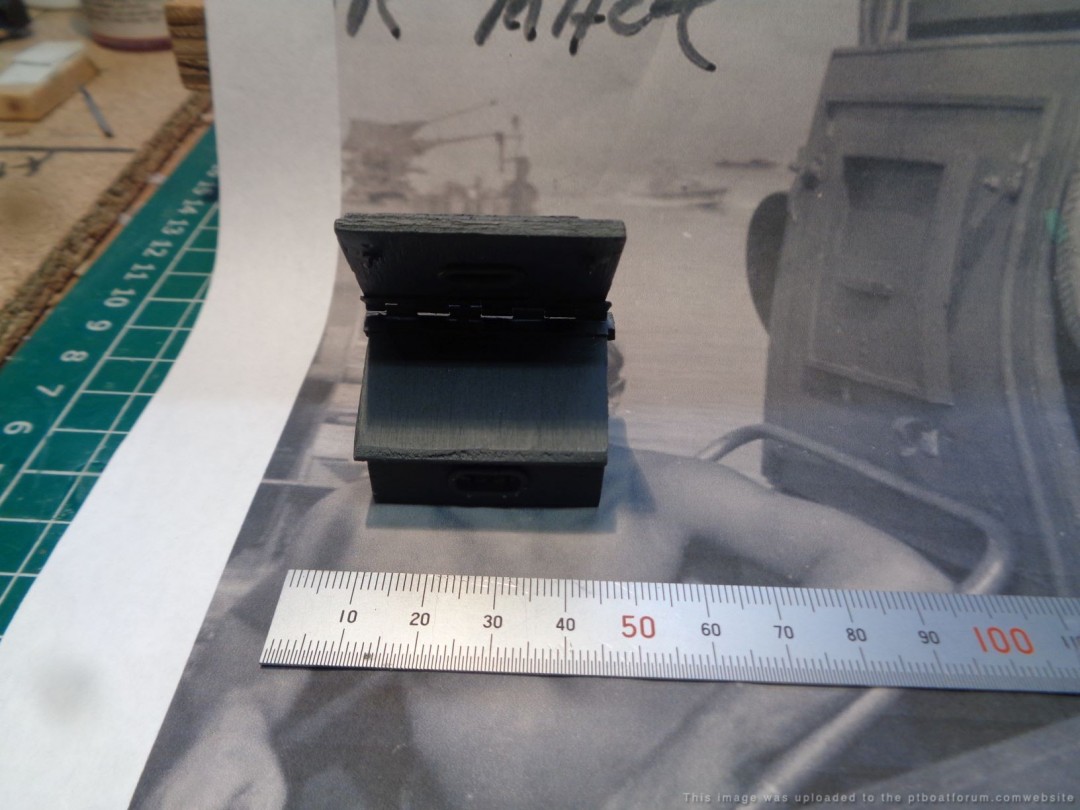
Engine room hatch, ready for final clean-up Awhile back Ted Walter pointed out to me that my hatch was not quite right he said âWhy did you paint the dead light on the engine room hatch? The amount of detail you are adding, why take this short cut?â When I joined the site I had zero working knowledge of a PT , I was warned not to be afraid of some âfriendly adviseâ Taking Teds advise I rebuilt the hatch and Iâm better off for doing it. One of the themes of this site that really stands out to me the respect shown to the crews and the boats they servered on , now being hooked by theses band of nuts that love everything PT has made me abetter builder , this build has taken on a life of its own, again I was warned from the beginning â if your in and want to learn, your in all the wayâ
Once cleaned up a little more I hope this will pass muster with Ted

Posted By: Grady | Posted on: Feb 19, 2021 - 2:37am
Total Posts: 157 | Joined: Oct 2, 2018 - 8:04am
Couple of questions 1: Torpedo tube caps , did the early boats( RON 5) have securing mounts ?
2: When docked did the boat have the colors raised or lowered on the mast ?
Thanks
Mike
Posted By: Grady | Posted on: Feb 26, 2021 - 3:50am
Total Posts: 157 | Joined: Oct 2, 2018 - 8:04am
Twin 50s completed , superstructure coming along

Posted By: Grady | Posted on: Feb 28, 2021 - 3:15am
Total Posts: 157 | Joined: Oct 2, 2018 - 8:04am
I'm not quite sure of what you mean by securing mounts but here are some photos of torpedo tubes that may answer your question. As far as I know, based on photos, the caps were not used much in theater. Some used what looked like a bikini top, see the photo of PT 149 for a closeup: [url]http://www.pt103.com/PT_Boat_Components_Torpedo_Tube_Images_Elco.html[/url]
Nice job on the guns Mike!
Posted By: Jeff D | Posted on: Mar 1, 2021 - 6:32am
Total Posts: 2200 | Joined: Dec 21, 2006 - 1:30am
Mike - Great job! (Colors were lowered when not underway.)
Will
Posted By: Will Day | Posted on: Mar 1, 2021 - 2:49pm
Total Posts: 1955 | Joined: Oct 8, 2006 - 4:19pm
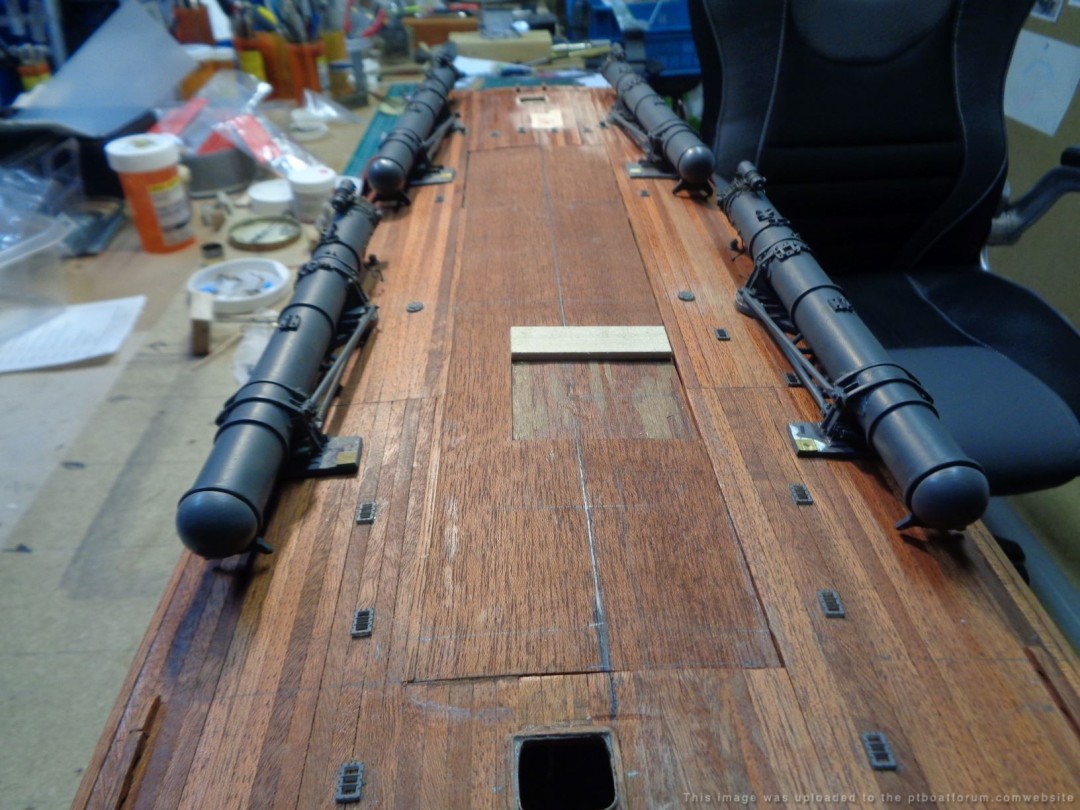
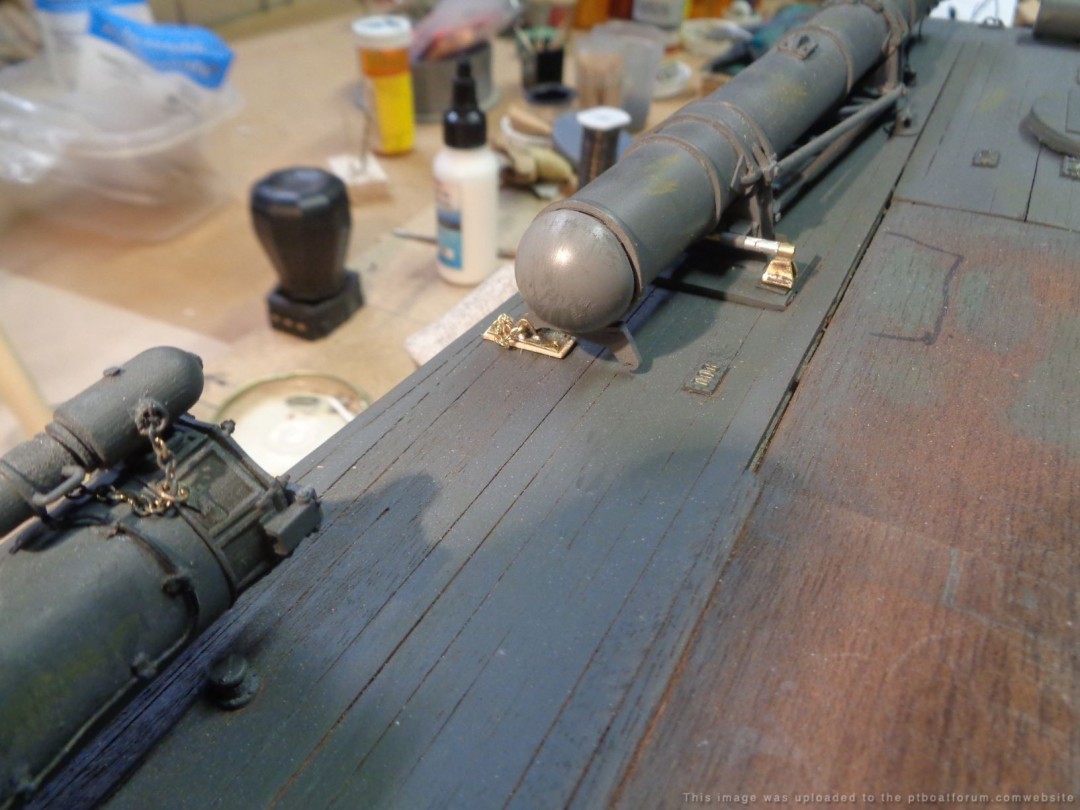
Torpedo tubes complete , test fit went  ok ,  now they go back in drydock until there neededÂ
Posted By: Grady | Posted on: Mar 7, 2021 - 10:10am
Total Posts: 157 | Joined: Oct 2, 2018 - 8:04am
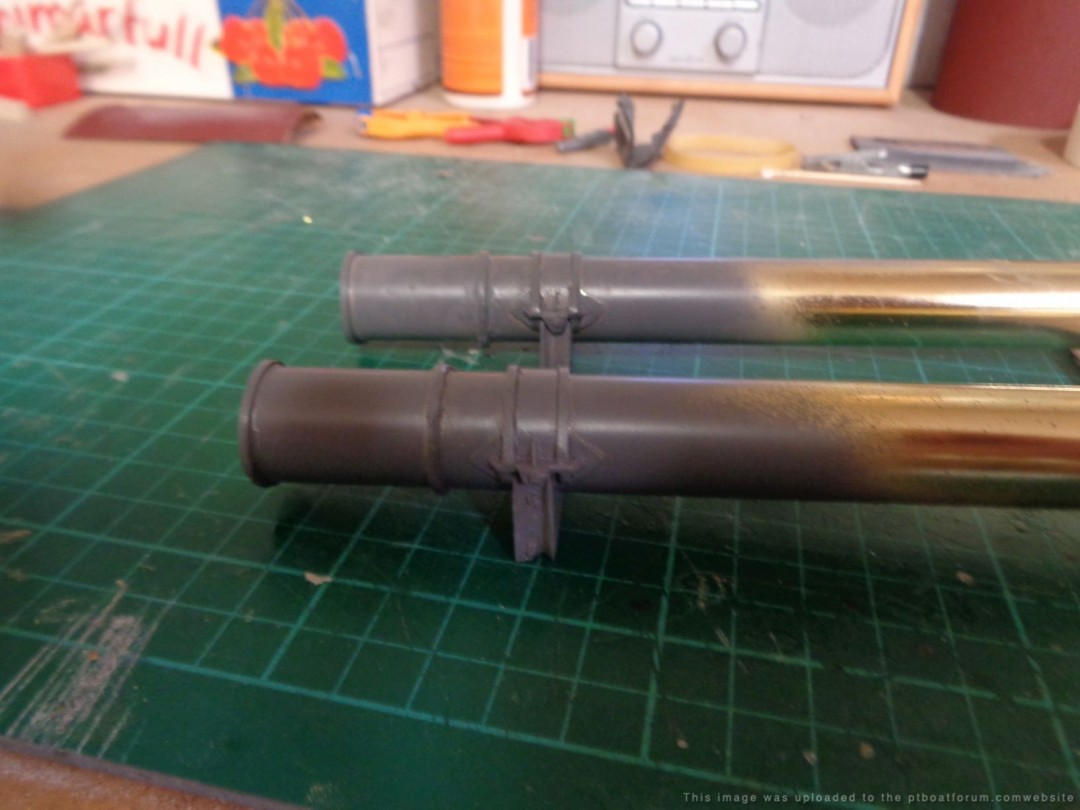
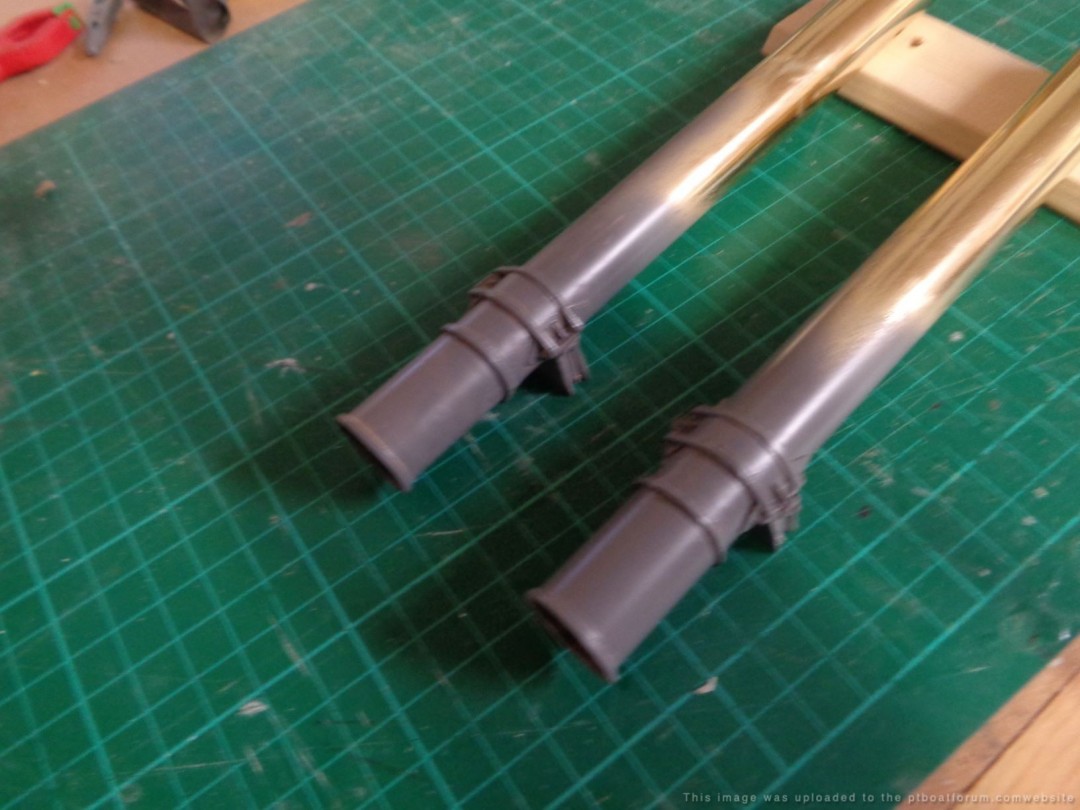
Fabricated the throttle control bars, the mufflers are molded from resin. just need to realign a bracket then
I think its time to paint the hull and deck next.
Posted By: Grady | Posted on: Mar 14, 2021 - 4:54am
Total Posts: 157 | Joined: Oct 2, 2018 - 8:04am
Canvas spray shield attached to the aft gun tub. Tub not attached yet , so alignment is off . Also like to thank Jeff D and Frank for there help and great photos regarding the building of the display scene.
Posted By: Grady | Posted on: Apr 1, 2021 - 4:21am
Total Posts: 157 | Joined: Oct 2, 2018 - 8:04am
Coming out very nicely
Posted By: Frank J Andruss Sr | Posted on: Apr 1, 2021 - 8:57am
Total Posts: 3497 | Joined: Oct 9, 2006 - 6:09am
Looking at Grady's incredibly detailed PT-105 and the incredible amount of drawings and photos that are being supplied by members is just unbelievable! I know a lot of you are here because you had Fathers or Grandfathers who were on PT boats during the war. I am sure there are a few like me, that first heard about PT boats because of JFK and you probably built the Revell 109 straight out of the box like me. A few years later, I decided to build another Revell 109, but this time into a barge buster. The only photo I had was from my copy of the book PT109, which I was given two copy's of. On the front inside cover was a late model with all the added guns up on the plane. I could not tell what kind of armament they were, so I guessed maybe they were .50 Cals, and fixed two out of the scrap box mounted on peace's of sprue. A couple of decades latter, I found out how wrong I was, with the different books that came out, So I did a little better job on the Lindbergh 109. I just can't believe all the drawings and photos coming out of the wood work! And again, we can't complement you enough Grady on you magnificent 105, I do look forward to each new mini masterpiece!
Posted By: Stearman | Posted on: Apr 1, 2021 - 8:24pm
Total Posts: 150 | Joined: Nov 1, 2017 - 9:38pm
Thank you very much for the kind words, being a simple ship builder, you spend a great deal of time questioning your work. Being from a military family, I am a retired veteran, my father was WW2 veteran, I hold a special place for the Greatest generation. Being from the âunconventionalâ side of the military I was fascinated by the PTs & crews, professionally proud, but their usual surroundings were for the lack of better words (not being Navy) not the pressed, shined, spotless tablecloth environment. Like submariners they were small close nit crews. When I started this build the only thing, I knew about PTs was fast wood boats with guns. But there was something special here that I wanted to learn more about, as Jeff D told me âonce your bitten, youâre hookedâ The folks on this site, along with Jeff and Franks site have be really great, without there support and advise I would not my bow from my aâaft. I am nowhere near being excepted to the PTNUTS Club, but I am working on it. I will say Iâm now all in doing my part to help preserve the history of the PTs and the special men who survived on them, plus the support crews who kept them in the fight. Again thanks
Posted By: Grady | Posted on: Apr 2, 2021 - 2:49am
Total Posts: 157 | Joined: Oct 2, 2018 - 8:04am
Mike, you've been bitten so hard I'm afraid you're gonna bleed out. If you're not in the PTNUTS Club then I don't know who is! Which boat are you going to build next? >:D
Posted By: Jeff D | Posted on: Apr 2, 2021 - 7:40am
Total Posts: 2200 | Joined: Dec 21, 2006 - 1:30am
Jeff is right, I have been smitten since 1963. Like you, my Dad was a WWII vet like his friends and my Uncles. My dad was 9th Air Force C-47. Mostly Army Airforces, plus Infantry, and my best friend growing up, Uncle Bo, as he liked to be called, who was Navy, USS Enterprise, all 4 years. So yes, I am also fascinated by WWII airplanes and Aircraft carriers. I was lucky to work on and fly or fly in a lot of WWII aircraft in the 80s and first half of the 90s. Like I tell people, best decade of my life, didn't make a lot of money, but the memories are priceless!
Posted By: Stearman | Posted on: Apr 2, 2021 - 10:12pm
Total Posts: 150 | Joined: Nov 1, 2017 - 9:38pm
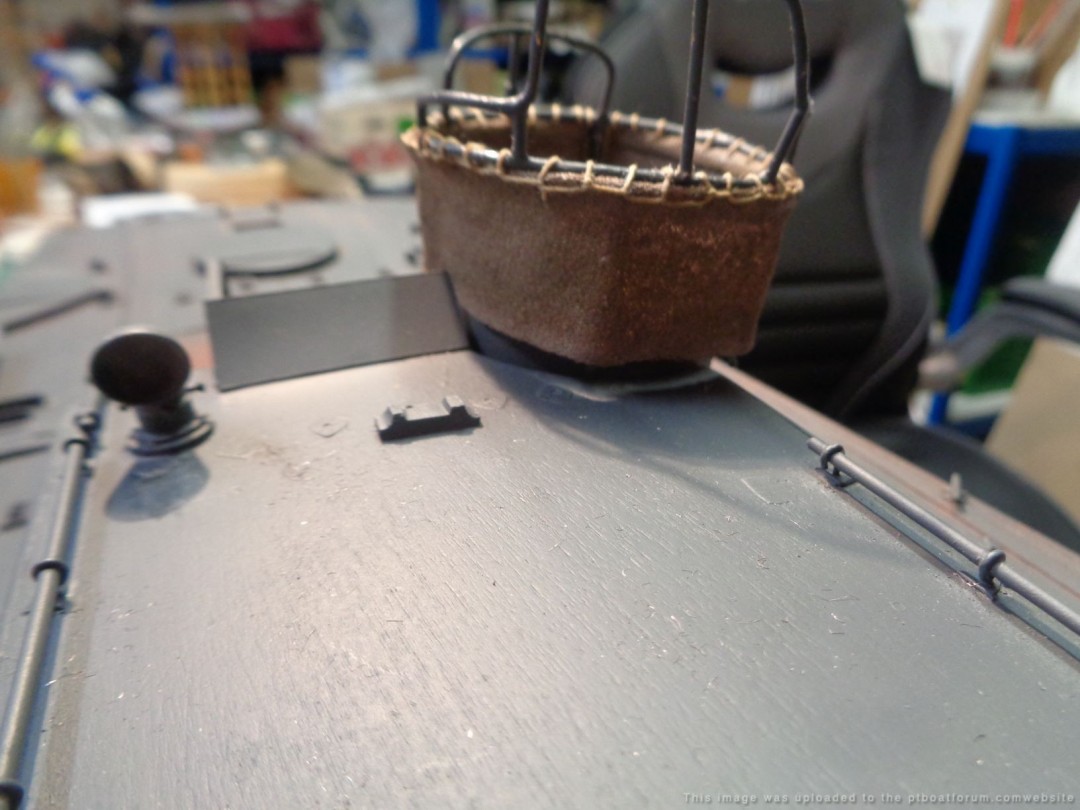
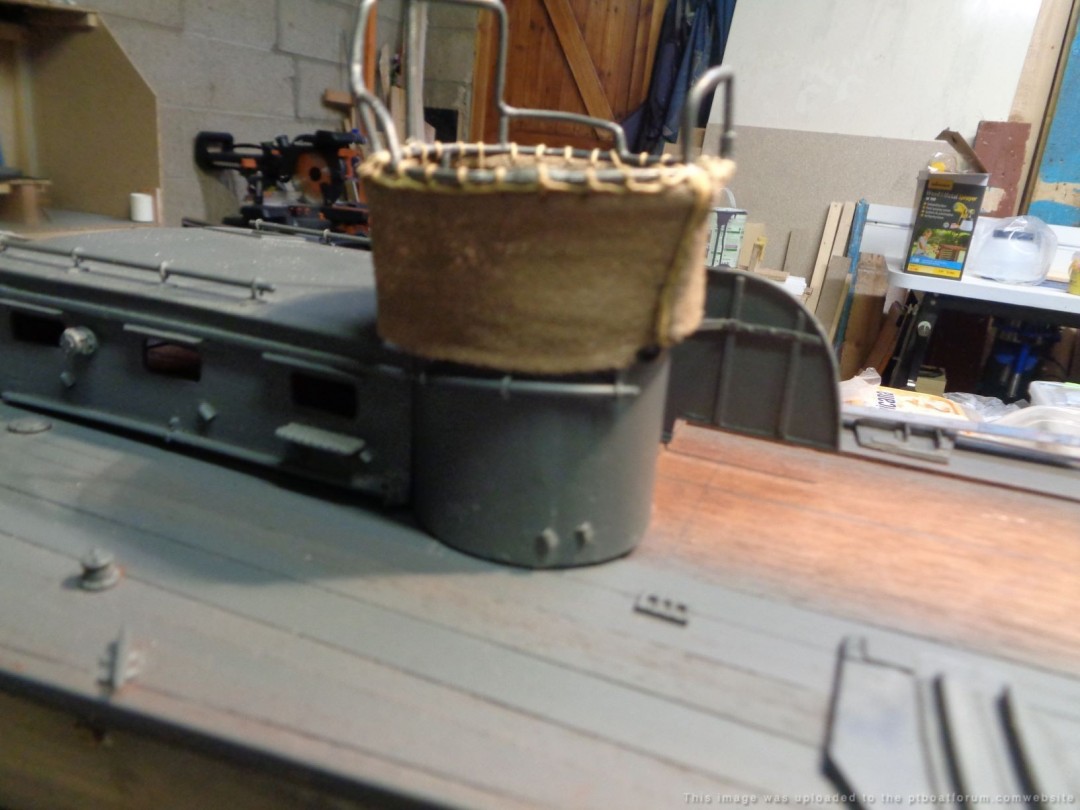
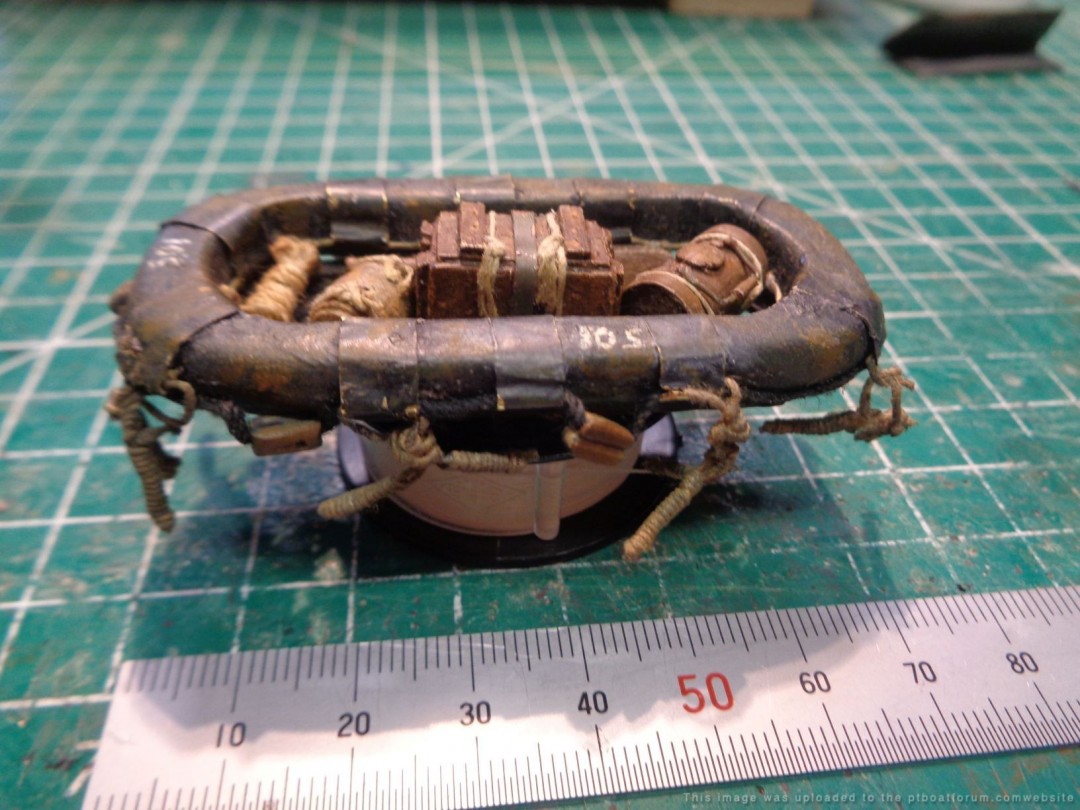
My best interpretation of the life raft I Weathered the canvas and survival equipment containers, my thoughts where if stowed topside the tropical exposure would have an effect. All corrections/suggestion appreciated.
Posted By: Grady | Posted on: Apr 25, 2021 - 1:57am
Total Posts: 157 | Joined: Oct 2, 2018 - 8:04am
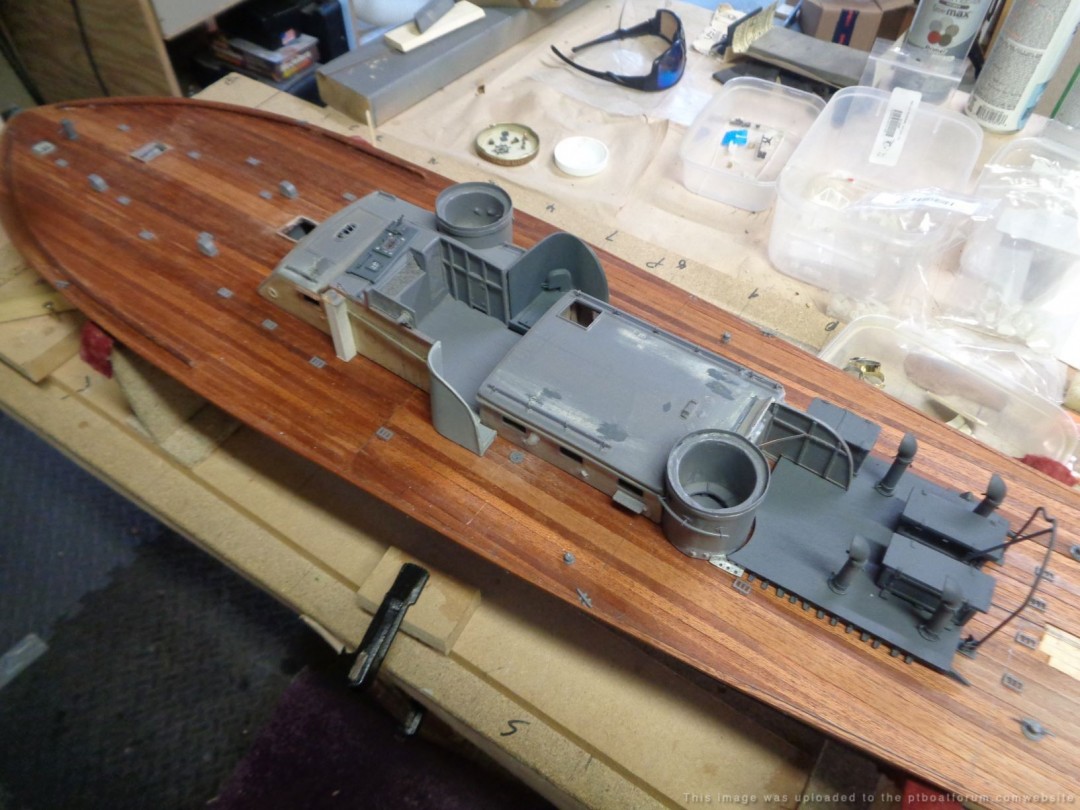
Once again Test fitting the superstructure , always looking for flaws , the hull color will lighten up, by mixing in some battleship grey, still thinking about the deck & topside weathering & chipping
Posted By: Grady | Posted on: May 4, 2021 - 3:07am
Total Posts: 157 | Joined: Oct 2, 2018 - 8:04am
Mike,
Lovely work, keep it up. I am looking forward to seeing this finished. You certainly should be commended for your scratchbuilding skills, braver than i would be. It looks pretty big now, hope you have enough space for the dock which you will end up buildingđ
One small thing, is the aft gun platform glued down yet?
Best Regards,
Stu.
Posted By: Stuart Hurley | Posted on: May 9, 2021 - 4:20am
Total Posts: 255 | Joined: Mar 19, 2013 - 3:32am
Thanks Stu, coming from someone of your skills that's a nice complement , No the aft platform is not glued,, I'm thinking I missed something????? yes at 1:30 scale its caused lots of problems finding scale figures and the like, Ill find a way to fit it all in, the challenge of the build right, and space is always a problem when finished, going to lower the scale for my next boat, learn by living with as they say. However I'm starting a WW1 mule drawn field ambulance my grandfather drove in the US WW! Siberian AEF , its 1:16 scale so we will see
again thanks for the words, everyone here has been great with there support
Mike
Posted By: Grady | Posted on: May 9, 2021 - 4:41am
Total Posts: 157 | Joined: Oct 2, 2018 - 8:04am
Mike,
Thanks.
Sounds interesting, best of luck with the ambulance project.
The aft gun platform (when fitted- PT103 didn't have it) sat a little further forward and actually slightly overlapped the centre decklights on their inner corners. Italeri missed this in their kit and also have the tube mounts in the wrong place. I just wish i could find photo evidence to back this up. I had to move loads of features due to dimensional error build up moving aft. Just a small observation for which i feel awkward but i know you want to get it correct and appreciate the attention to detail you are showing. Love the .50 cals and their trigger mechanisms.[:-cheers-:]
Best Regards,
Stu.
Posted By: Stuart Hurley | Posted on: May 9, 2021 - 5:19am
Total Posts: 255 | Joined: Mar 19, 2013 - 3:32am
So the 20 MM no deck mount platform , move a bit forward , does the gun pedestal bolt to the deck ? the tubes mounts, I measured them from the Elco plans, not a math guy so the scale conversions could be off a bit, how do they look to you ??
Posted By: Grady | Posted on: May 9, 2021 - 7:29am
Total Posts: 157 | Joined: Oct 2, 2018 - 8:04am
Mike,
What i meant was, you need the platform fitted but it moves forward to partially cover the inner corners of the centre deadlights. This is shown on the elco drawing general arrangement. The pedestal mounts to the platform as standard. Tube mounts are fine where they are, dont touch them.
Best Regards,
Stu.
Posted By: Stuart Hurley | Posted on: May 9, 2021 - 8:15am
Total Posts: 255 | Joined: Mar 19, 2013 - 3:32am
thanks Stu got it simple fix , man I thought I was going to have to rework the tubes, That would have been an ugly site. Again thanks
Posted By: Grady | Posted on: May 9, 2021 - 9:05am
Total Posts: 157 | Joined: Oct 2, 2018 - 8:04am
Stu, moved the base forward slightly covering the edges of the light frames, what I forgot to do was test fit with depression rail in place , all makes sense now. Mike
Posted By: Grady | Posted on: May 10, 2021 - 3:54am
Total Posts: 157 | Joined: Oct 2, 2018 - 8:04am
Mike,
Look forward to seeing her done.
All the best.
Best Regards,
Stu.
Posted By: Stuart Hurley | Posted on: May 10, 2021 - 4:34am
Total Posts: 255 | Joined: Mar 19, 2013 - 3:32am
adding some early details to prevent breakage fitting other items later in the process
Posted By: Grady | Posted on: May 23, 2021 - 4:49am
Total Posts: 157 | Joined: Oct 2, 2018 - 8:04am
Added the spent cartage tubes under the gun mounts
Posted By: Grady | Posted on: May 27, 2021 - 2:47am
Total Posts: 157 | Joined: Oct 2, 2018 - 8:04am
Mike,
Nice detail, what did you make them out of?
Best Regards,
Stu.
Posted By: Stuart Hurley | Posted on: May 27, 2021 - 1:27pm
Total Posts: 255 | Joined: Mar 19, 2013 - 3:32am
The ELCO plans said a flexible tube, which made sense because of up and down movement of the carriage. Used a section of bendable straw with pipe cleaners inside for stability.
Posted By: Grady | Posted on: May 28, 2021 - 2:14am
Total Posts: 157 | Joined: Oct 2, 2018 - 8:04am
Made the Bridge Fluorescent light using the ELCO plans. Several adjustments had to be made to get the scale close, working this small its mainly what looks right rather than perfect scale.
Posted By: Grady | Posted on: Jun 17, 2021 - 4:18am
Total Posts: 157 | Joined: Oct 2, 2018 - 8:04am
Well, it most certainly does look absolutely right! Have your eyes permanently crossed at this point?
Posted By: Stearman | Posted on: Jun 17, 2021 - 9:36pm
Total Posts: 150 | Joined: Nov 1, 2017 - 9:38pm
About finished with the cockpit area,
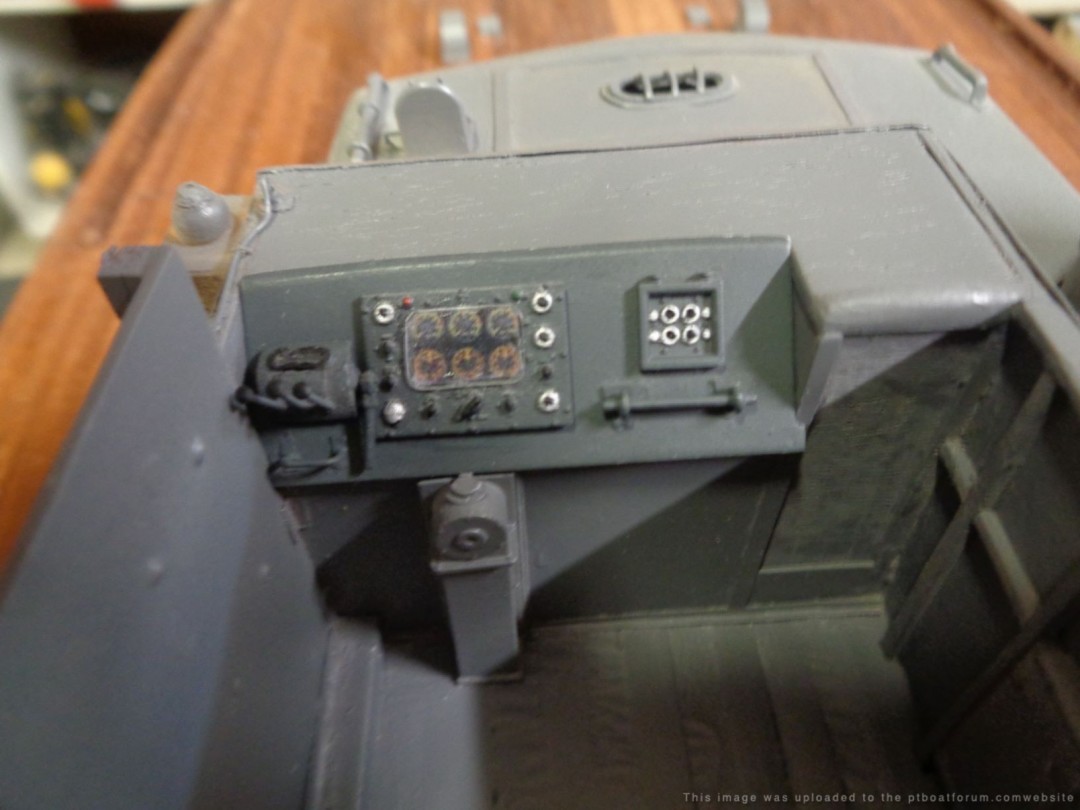
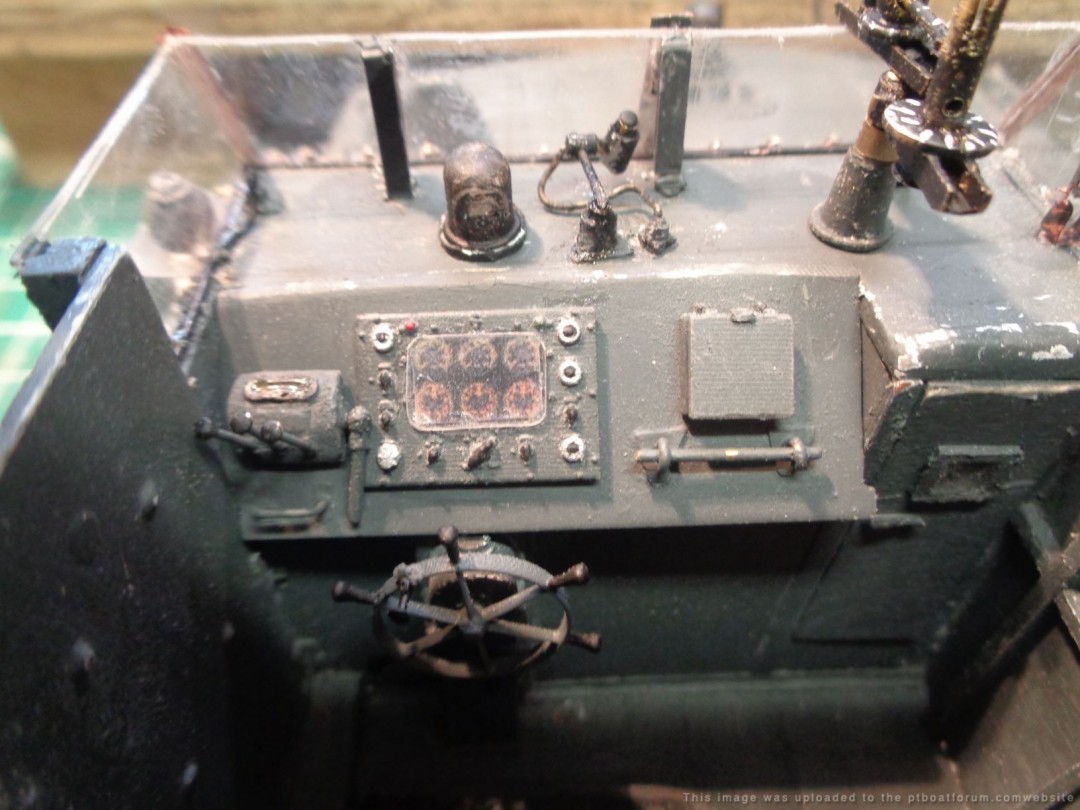
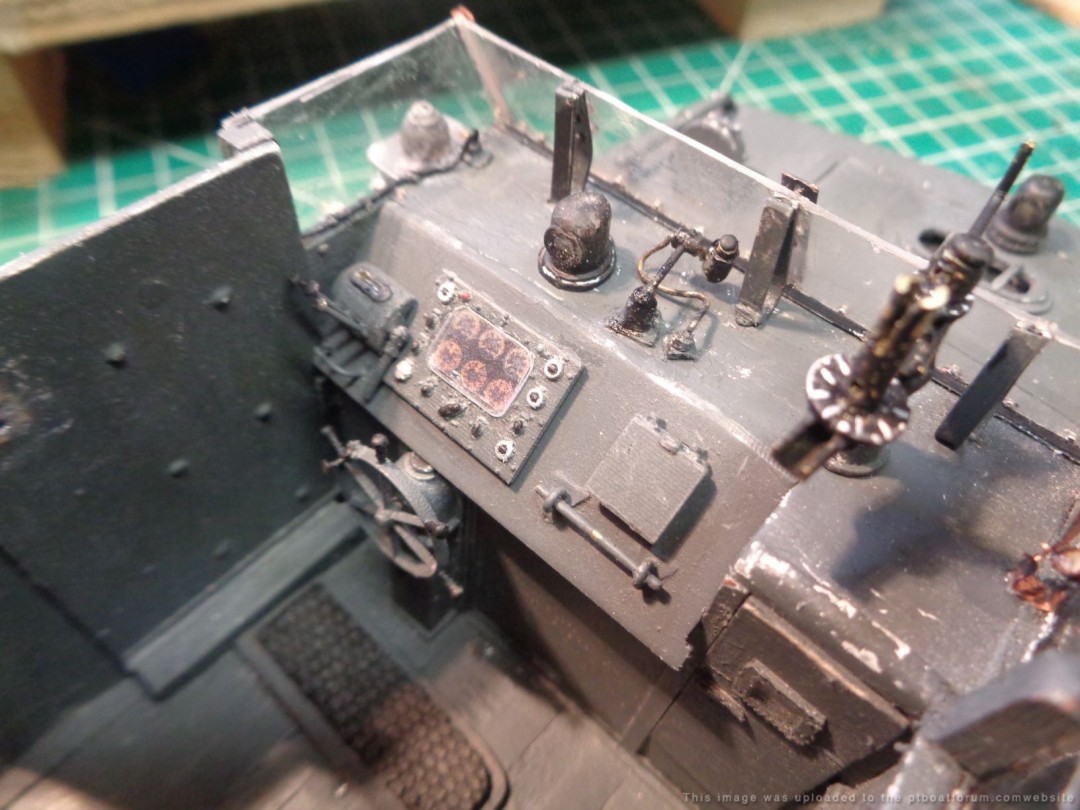
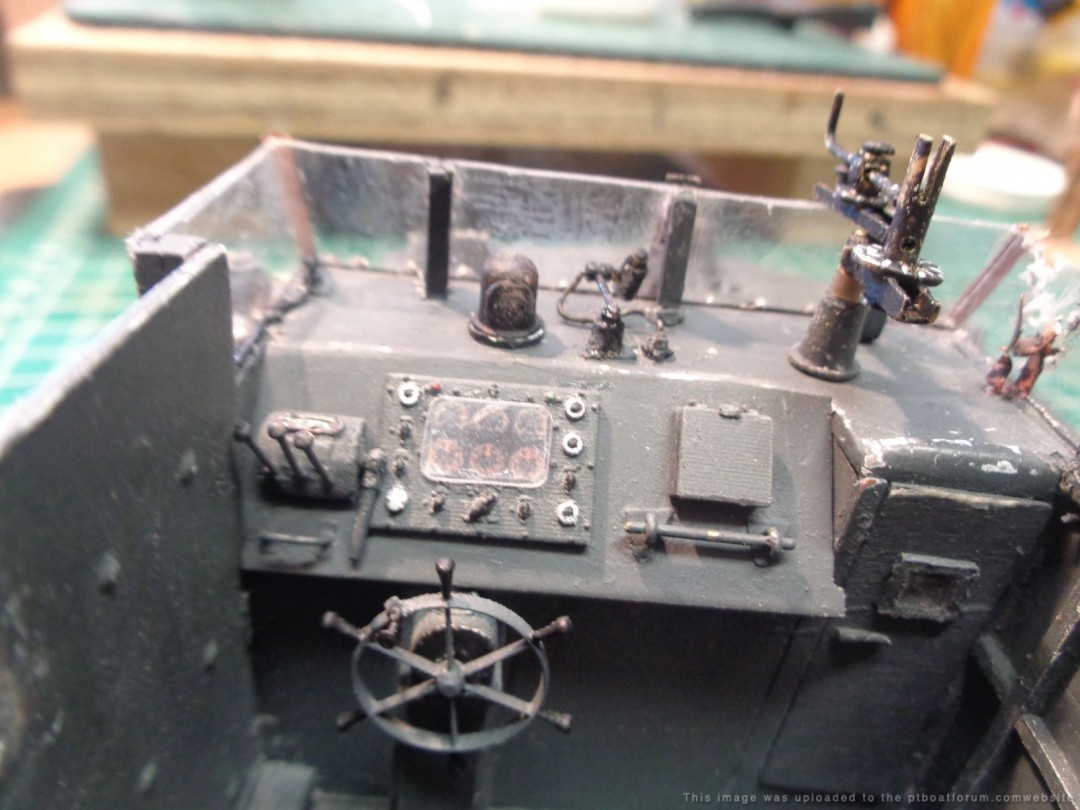
the windshield, a real pain, metal, plastic, drilling hole for pins, paint & canopy glue do not want to work well toughter, without looking like a 5-year-old tossed it all toughter. after 4 attempts I was at the end of my rope, but it was almost there, when Murphy showed up, a very slight slip of the hand & I took a chunk out of the std screen. Not wanting to start over for shot # 5 I turned the error into battle damage, which I have not shown clearly in the pics as it still needs a bit of work. The windshield weathering became easy after that. Installed the control panel and added the fluorescent light, compass, and torpedo director, then weathered the entire area. Again, there are many different ways to approach this build, all have their own merits, my vision here is to depict a boat that has seen action and exposure to the tropical elements of the pacific.
Posted By: Grady | Posted on: Jun 22, 2021 - 5:55am
Total Posts: 157 | Joined: Oct 2, 2018 - 8:04am
Just amazing attention to detail...
Will
Posted By: Will Day | Posted on: Jun 23, 2021 - 11:29am
Total Posts: 1955 | Joined: Oct 8, 2006 - 4:19pm
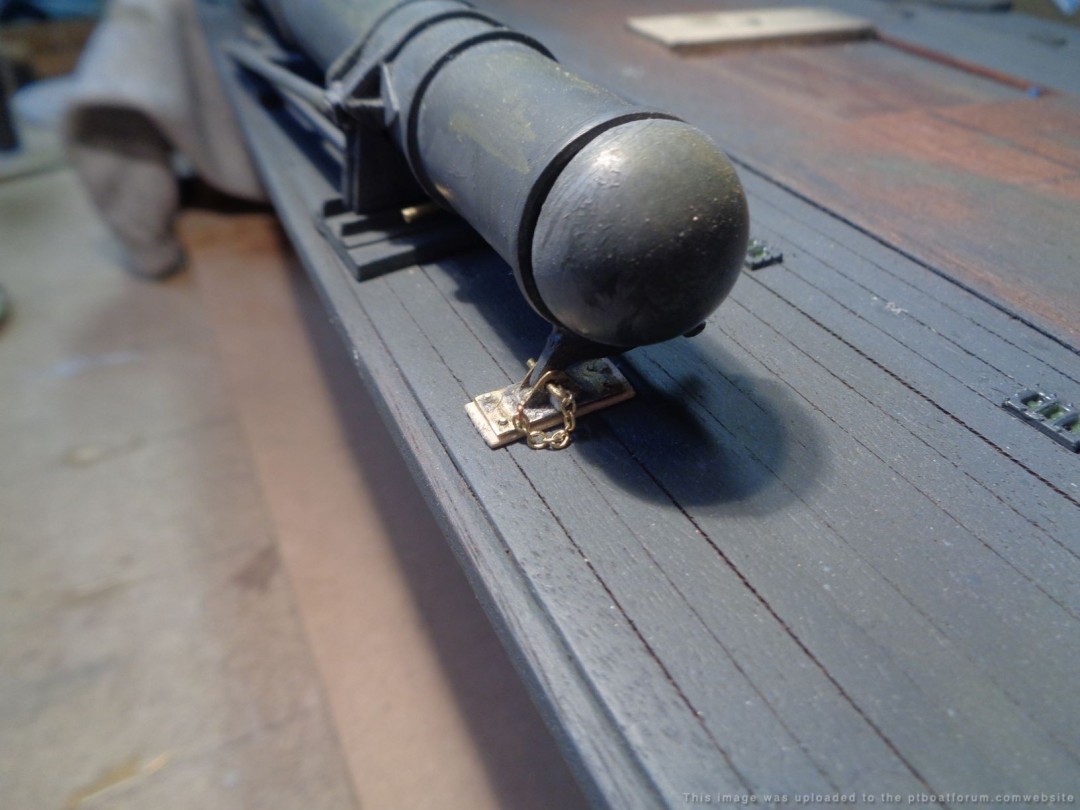
Attached torpedo tubes , training gear, TP Tube locks, and tube wiring plugs
Posted By: Grady | Posted on: Jun 28, 2021 - 9:48am
Total Posts: 157 | Joined: Oct 2, 2018 - 8:04am
This is such an amazing build Grady. I'm following along and will be using as a guide for when I do up the 105 boat using Revell's new PT-100 kit in 1/72.
On a side note, have you determined where the bow mounted single .50 cal was located?
Posted By: DWonders | Posted on: Jul 7, 2021 - 3:15pm
Total Posts: 5 | Joined: Jun 10, 2021 - 11:16am
This is such an amazing build Grady. I'm following along and will be using as a guide for when I do up the 105 boat using Revell's new PT-109 kit in 1/72.
On a side note, have you determined where the bow mounted single .50 cal was located?
Posted By: DWonders | Posted on: Jul 7, 2021 - 3:40pm
Total Posts: 5 | Joined: Jun 10, 2021 - 11:16am
Hi DW, welcome to the forum!
I don't have an image showing the 105 with a bow mounted .50 although most if not all are from when she was still stateside in 1942. Do you have a photo or reference that mentions it?
Posted By: Jeff D | Posted on: Jul 8, 2021 - 7:02am
Total Posts: 2200 | Joined: Dec 21, 2006 - 1:30am
Dick Keresey makes mention of the single 50 mounted on the bow of the 105 , page 111, he stated the 50 was jury-rigged and he hoped his gunner did not get to enthusiastic because it did not have a stop on it and could easily swivel far enough to rake the bridge. I have found no pictures of the 105 bow mounted 50, best guess is slightly off center to starboard behind the forward hatch, as it opened toward forward.
Mike
Posted By: Grady | Posted on: Jul 8, 2021 - 8:17am
Total Posts: 157 | Joined: Oct 2, 2018 - 8:04am
Thanks Mike. I'm currently finishing up reading the PT-105 book which I thought also mentioned that the most elevation they could get on the bow .50 was 60 degrees because it was on a short pipe. I'd have to go back and try to find the page number. I have seen some pics of other early RON 5 boats that also had the jury rigged .50's on the bow.
Keep up the fantastic work on your 105.
Don
Posted By: DWonders | Posted on: Jul 8, 2021 - 10:56am
Total Posts: 5 | Joined: Jun 10, 2021 - 11:16am
That works, and given the lack of a photo showing it, a photo of another boat in the same RON with the bow .50 is a decent guesstimate as to where it should be. Good work guys!
Posted By: Jeff D | Posted on: Jul 9, 2021 - 5:47am
Total Posts: 2200 | Joined: Dec 21, 2006 - 1:30am
Somewhere on the Photo Gallery there is a photo of a mid or late--war PT 105 and another 80' Elco, with one of the boats (I think the 105) elevated in a portable dry dock.
The foredeck of the 105 might show a bow-mounted .50 caliber, I can't remember for sure.
If I can find it in my Pictures file, I'll try to have Dick post it.
Posted By: Drew Cook | Posted on: Jul 10, 2021 - 10:23am
Total Posts: 1306 | Joined: Oct 19, 2006 - 10:44am
So I did a search through all my pubs and what I thought was other RON 5 boats with bow mounted .50's were actually RON 8 boats and then only silhouettes of the boats. I guess that is probably the best I can guess. I hope you are able to find something Grady. Looking forward to more updates on your build.
Posted By: DWonders | Posted on: Jul 13, 2021 - 8:38pm
Total Posts: 5 | Joined: Jun 10, 2021 - 11:16am
came across this one on this website. Is this the one you are talking about. It is not very clear....
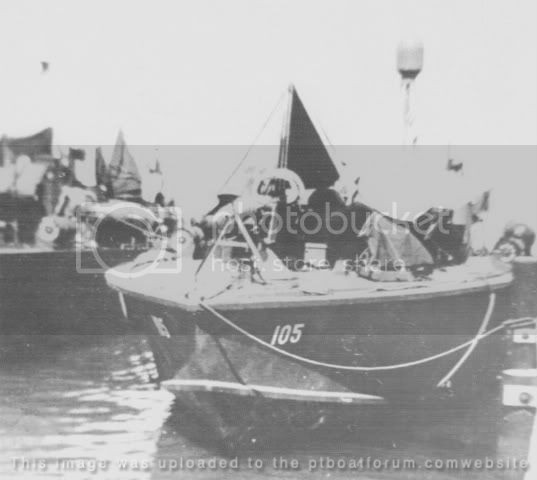
Posted By: Rock55 | Posted on: Jul 14, 2021 - 12:04am
Total Posts: 22 | Joined: May 23, 2019 - 7:30am
First time seeing this one, judgeing from the paint scheme and the addition of the number on the hull ( not sure when the practice started) its from later in the war but after Dick Keresey turned over command of the 105 to John Iles Taking close up look it certainly looks like a weapons mount, but it looks to be forward the hatch and almost on top of the towing bit, ok Iâm not a Navy guy but I know weapons platforms , to me a fifty that far forward would really be unstable as the deck space narrows, however like you said the pic is blurry , so itâs a guess, but thatâs what I like about learning the PT world researching the guess, then building them right. Again, good find it all helps
Mike
Posted By: Grady | Posted on: Jul 14, 2021 - 2:16am
Total Posts: 157 | Joined: Oct 2, 2018 - 8:04am
Thanks Rock, I don't remember ever seeing that one before. Looks like a 37mm on a cone based mount with an A shaped barrel support front and center. Maybe the bow .50 was before the 37mm's became more widely available unless it's under what appears to be a tarp on the port side.
Posted By: Jeff D | Posted on: Jul 14, 2021 - 8:07am
Total Posts: 2200 | Joined: Dec 21, 2006 - 1:30am
Jeff your eyes are much better than mine , totally missed the weapon type, only homed in on the mount, as usual the voice and eyes of experience speak .
Posted By: Grady | Posted on: Jul 15, 2021 - 2:34am
Total Posts: 157 | Joined: Oct 2, 2018 - 8:04am
I agree, Jeff. Looks like a 37mm with a barrel support to me.
Will
Posted By: Will Day | Posted on: Jul 15, 2021 - 12:40pm
Total Posts: 1955 | Joined: Oct 8, 2006 - 4:19pm
Thanks Mike, all the years of staring at PT photos pays off sometimes. Didn't seem to help when I thought that game screenshot was a shot of a real boat though. :D
Good work guys, anyone in the future researching the 105 that finds this thread will know that she carried a .50 and / or a 37mm on her bow at some point in her career.
I checked out photos of other RON 5 boats. Here's an image of PT 106 (post RON 5) with what looks like a similar mount, not a cone but triangular plates. The other RON 24 boats have several different types of mounts for the bow 37mm:
This shot of the 108 shows what might be a .50 mounted just forward of the chart house:
Posted By: Jeff D | Posted on: Jul 16, 2021 - 6:39am
Total Posts: 2200 | Joined: Dec 21, 2006 - 1:30am
Some closeups:

Posted By: Jeff D | Posted on: Jul 16, 2021 - 11:06am
Total Posts: 2200 | Joined: Dec 21, 2006 - 1:30am
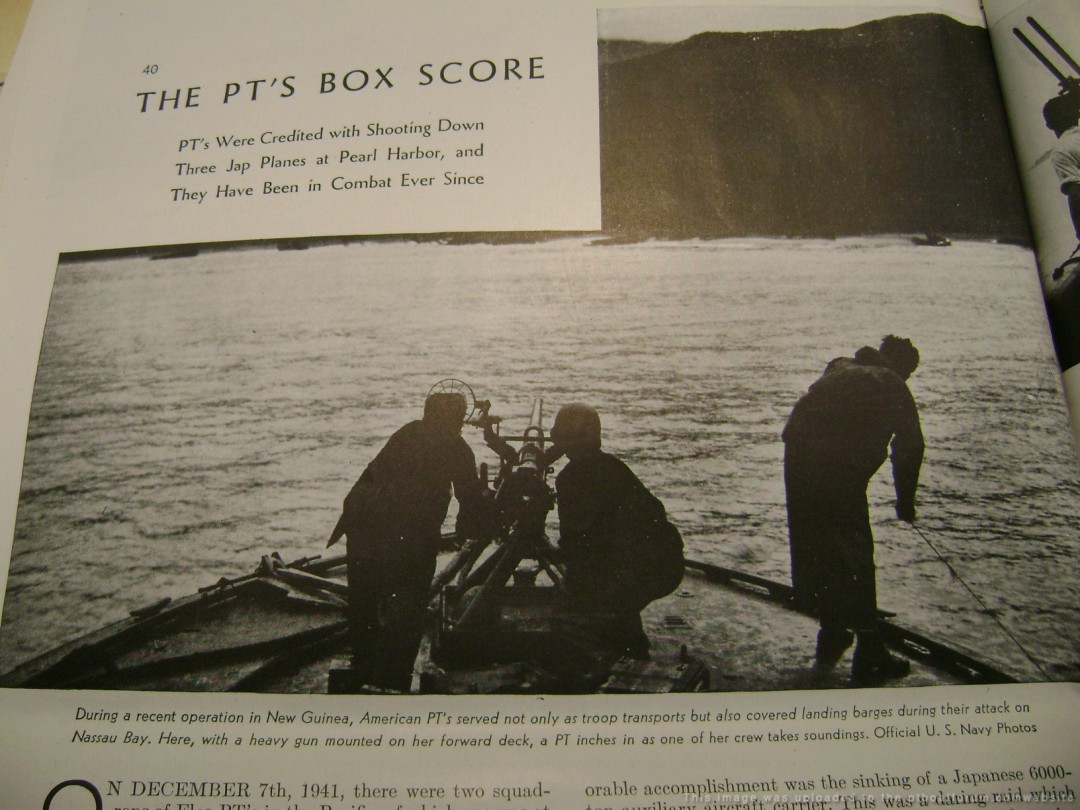
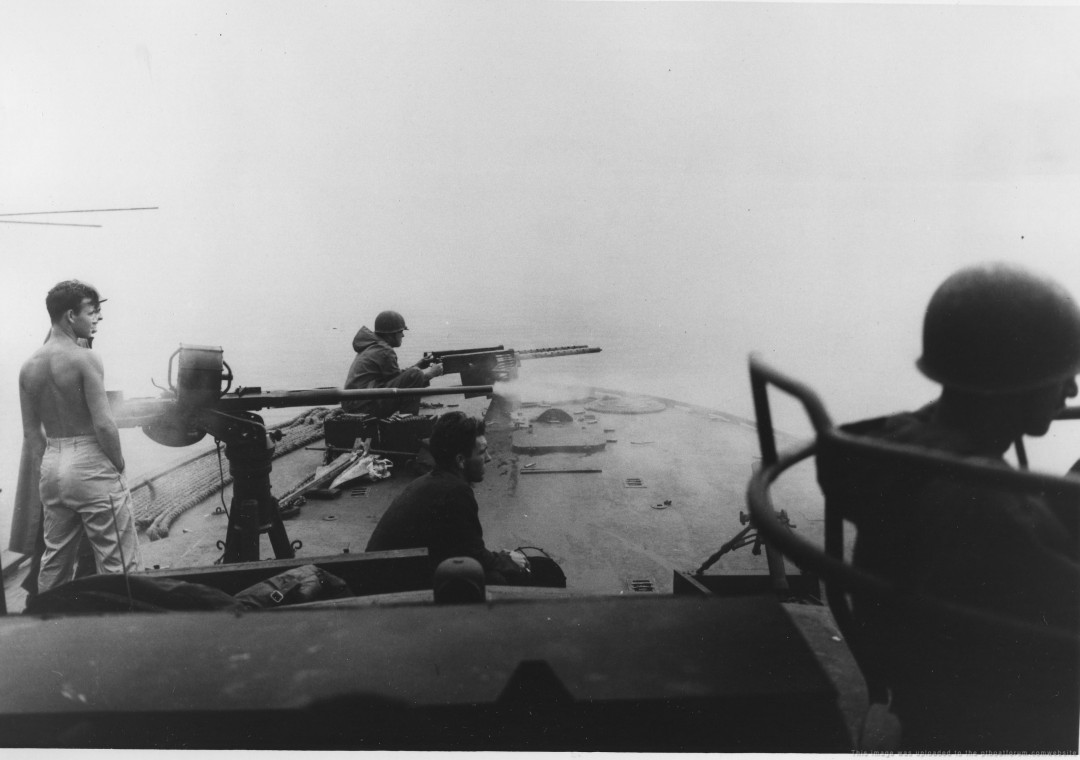
good looking pics Jeff, probably not new to you guys but I found these
a good look at the 50 mount, plus what I believe is a M18 recoilless rifle mounted forward. That would bust a barge .
Posted By: Grady | Posted on: Jul 19, 2021 - 9:53am
Total Posts: 157 | Joined: Oct 2, 2018 - 8:04am
That is not a recoiless rifle it is a 37mm Army Anti Tank Gun single shot type with the wheels and splinter shield removed. Just FYI
Jerry Gilmartin
PT658 Crewman
Portland OR
Posted By: Jerry Gilmartin | Posted on: Jul 19, 2021 - 11:19am
Total Posts: 1473 | Joined: Oct 8, 2006 - 11:16pm
Thanks Jerry, the M18 was my best guess
Posted By: Grady | Posted on: Jul 20, 2021 - 1:55am
Total Posts: 157 | Joined: Oct 2, 2018 - 8:04am
I wonder what caliber the M18 RR was? 75mm maybe? Just curious. Was the M18 RR developed and in use in 1944?
Jerry Gilmartin
PT658 Crewman
Portland OR
Posted By: Jerry Gilmartin | Posted on: Jul 20, 2021 - 3:57pm
Total Posts: 1473 | Joined: Oct 8, 2006 - 11:16pm
57 mm used in 1945, fun note as late as 1984 the weapon, was still being produced under license in Brazil
Posted By: Grady | Posted on: Jul 21, 2021 - 2:45am
Total Posts: 157 | Joined: Oct 2, 2018 - 8:04am
Grady beat me to the reply; a surprisingly long-lived weapon. That's possibly due to its moving from its original anti-tank use to more of an anti-personnel weapon. As a category I wouldn't think recoilless rifles would be particularly good in the close quarters of a PT boat due to their back blast.
Randy McConnell (Randall J. McConnell III)
Posted By: PRJM3 | Posted on: Jul 21, 2021 - 10:54am
Total Posts: 95 | Joined: May 25, 2009 - 2:47pm
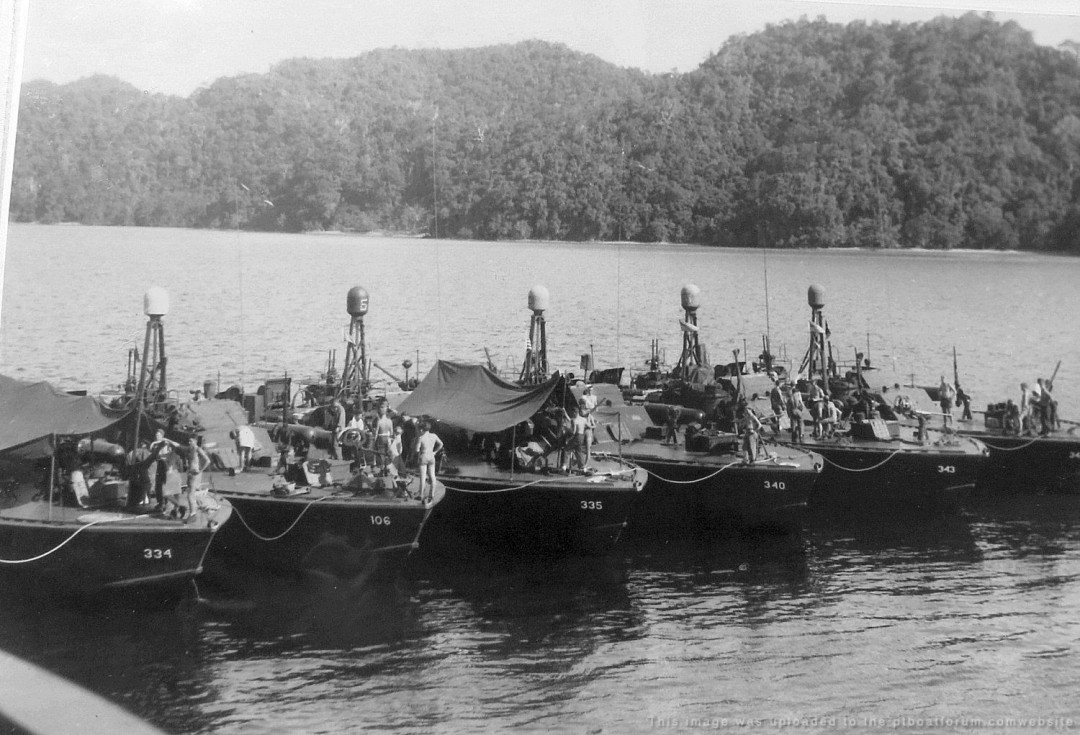
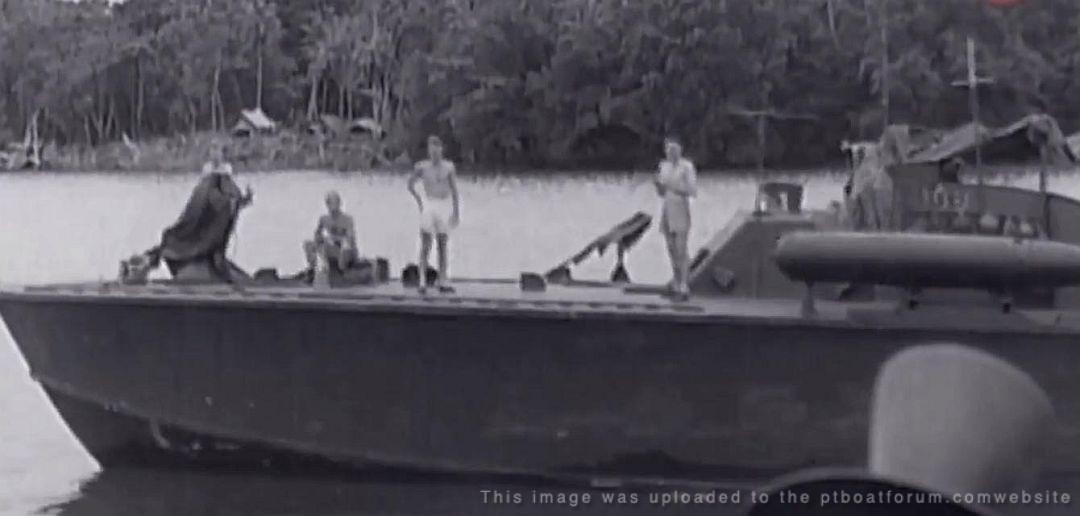
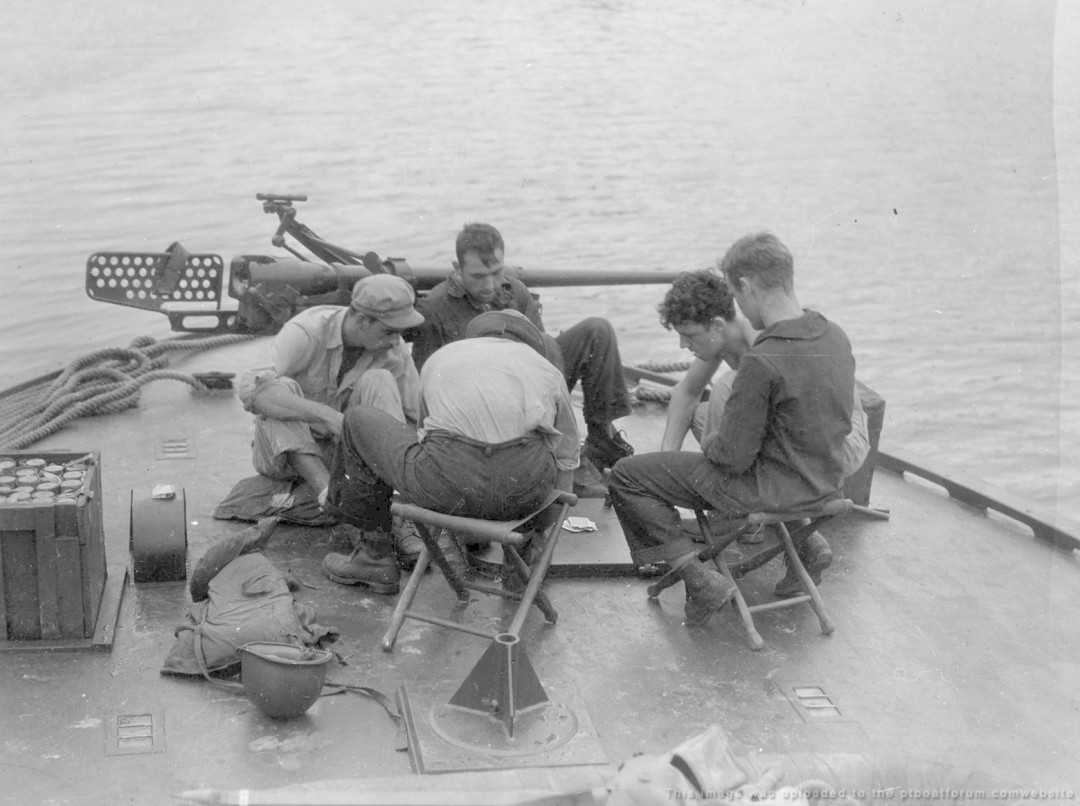
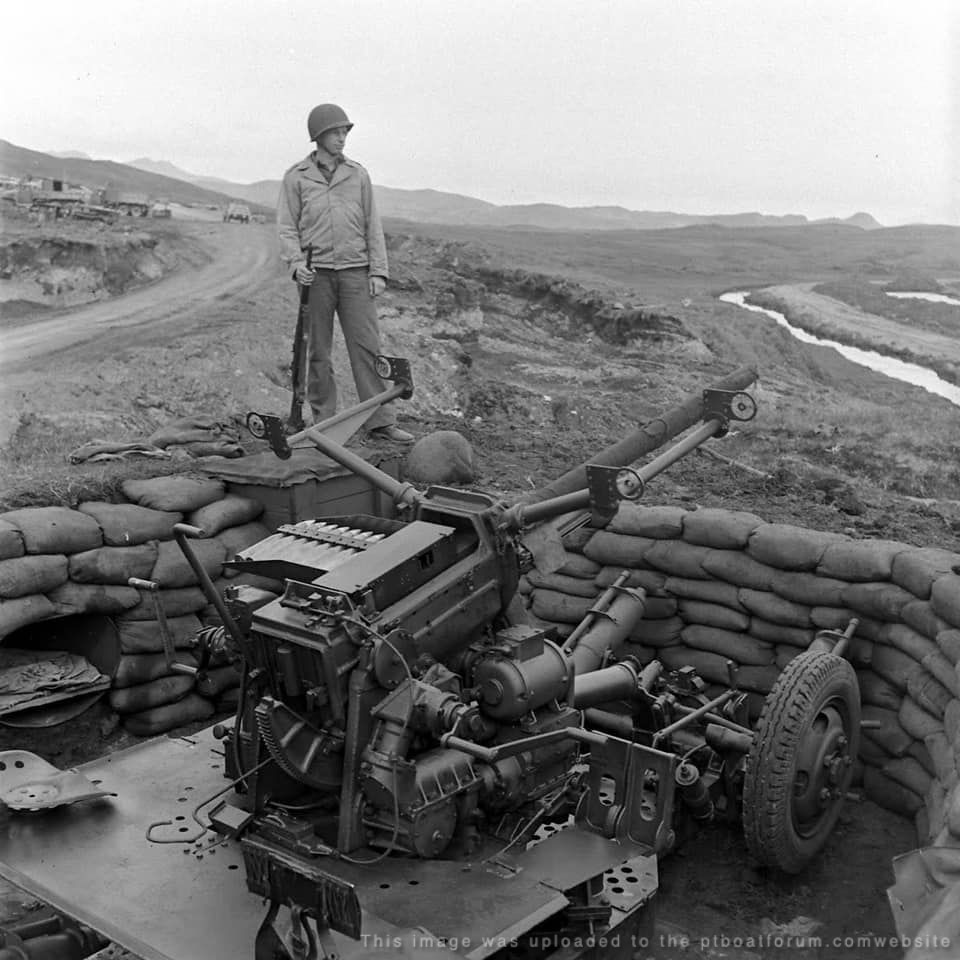
Hey Grady, I found these photos in the National Archives a few years ago (2016?) that might show the old single shot anti tank gun 37mm and a home made twin 50 cal mount on the bow of a PT103 class Elco boat.
Jerry Gilmartin
PT658 Crewman
Portland OR
Posted By: Jerry Gilmartin | Posted on: Jul 21, 2021 - 1:30pm
Total Posts: 1473 | Joined: Oct 8, 2006 - 11:16pm
PT-103 sight has some great information on the 37mm Army guns. Apparently they were not found or stolen, they were procured from the 25th Infantry Division, who also sent men to mount them. 8-10 boats were suppose to get them, but I only know of PT109, 103 and 108 for sure getting one. Also, the Oldsmobile 37mm cannons were not salvaged either. That makes sense, since even in a belly landing, the prop on a P-39 is going to take a lot of shock which will then transmit it to the cannon, hard to see the barrel not being tweaked. By the time PT Boats started to use the 37mm, the P-39 were rapidly being fazed out of combat, so there were probably many cannons in the ordinance department! I have never seen the first photo of the Army mount, thanks.
Posted By: Stearman | Posted on: Jul 21, 2021 - 8:23pm
Total Posts: 150 | Joined: Nov 1, 2017 - 9:38pm
Thanks guys for all the pics looking at everything it looks like a short mount was common ? Any thoughts or recommendations the type I should build , standing or sitting profile type??
Posted By: Grady | Posted on: Jul 22, 2021 - 10:30am
Total Posts: 157 | Joined: Oct 2, 2018 - 8:04am
Thanks guys, great stuff!
I don't recall ever seeing that 37mm anti-tank mount before Jerry, thank you.
I'd go with a short mount Mike, it would help the gunner keep a low profile. You'll have to decide on a mount type and whether to use straight ammo boxes like in the photo you posted or the curved type as used in the turret mounts.
The single shot anti-tank gun lashed and chained to the bow of the 109 when she was rammed, and in the photo Mike Grady posted (Morobe 1943), is an M3.
The 37mm commonly seen on the early boats is an M4. The later boats had an M9 factory mounted and was a fairly larger gun than the M4 although similar in appearance.
I have this one noted as a M1A2 AA gun mounted on a few RON 19 boats:
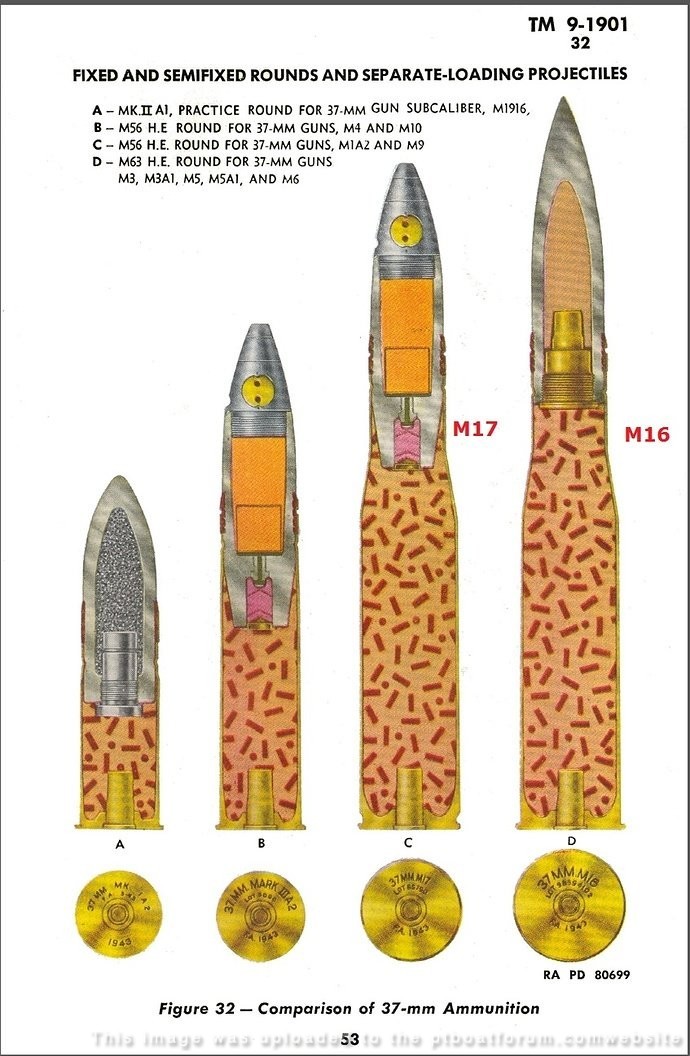
This photo shows the different 37mm ammo and gives an idea of their range and hitting power. The M9 looks to be a substantial upgrade from the M4:
Posted By: Jeff D | Posted on: Jul 24, 2021 - 10:34am
Total Posts: 2200 | Joined: Dec 21, 2006 - 1:30am
Thanks Jeff , I will go with the short mount, and frame mounted ammo box cradle
currently working on palm trees for Todd City , I see them in my sleep, the process seems endless being authentic, and a hopeful perfectionist is gong to be the end of me , the right result is worth it, but its a slowwwwwwwwwww process
Mike
Posted By: Grady | Posted on: Jul 25, 2021 - 4:58am
Total Posts: 157 | Joined: Oct 2, 2018 - 8:04am
Completed the bow .50 Cal with short mount plus some ammo boxes , work is getting there slow but steady
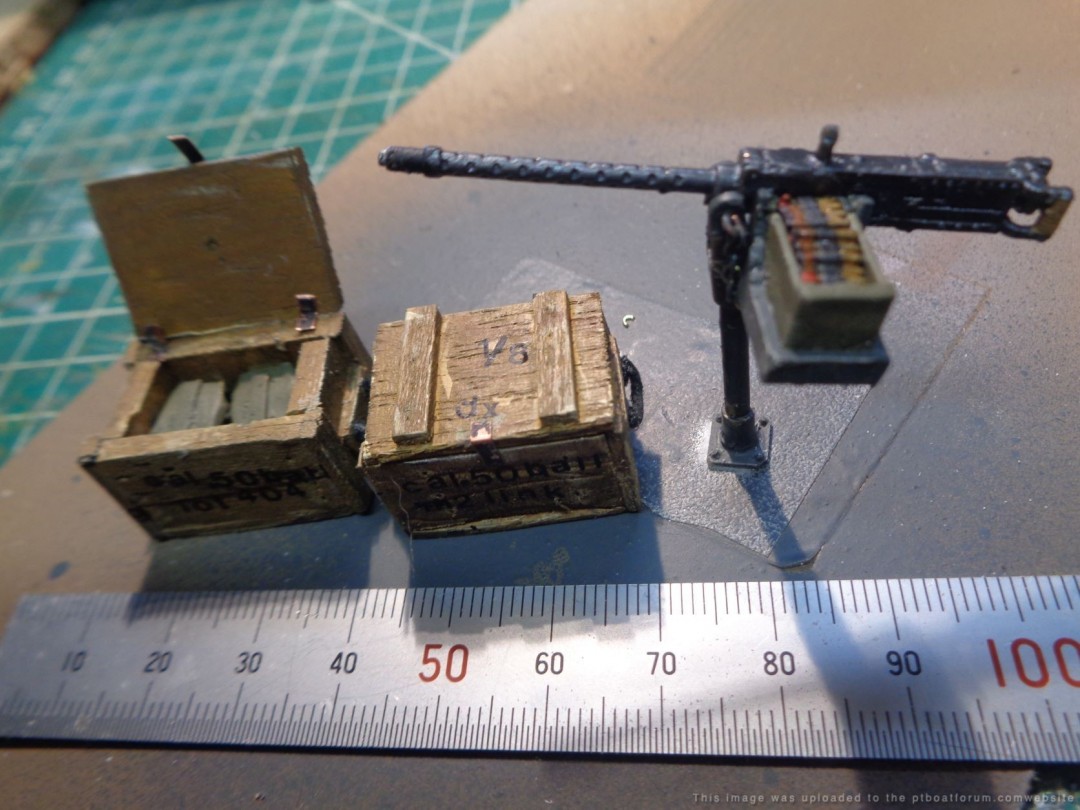
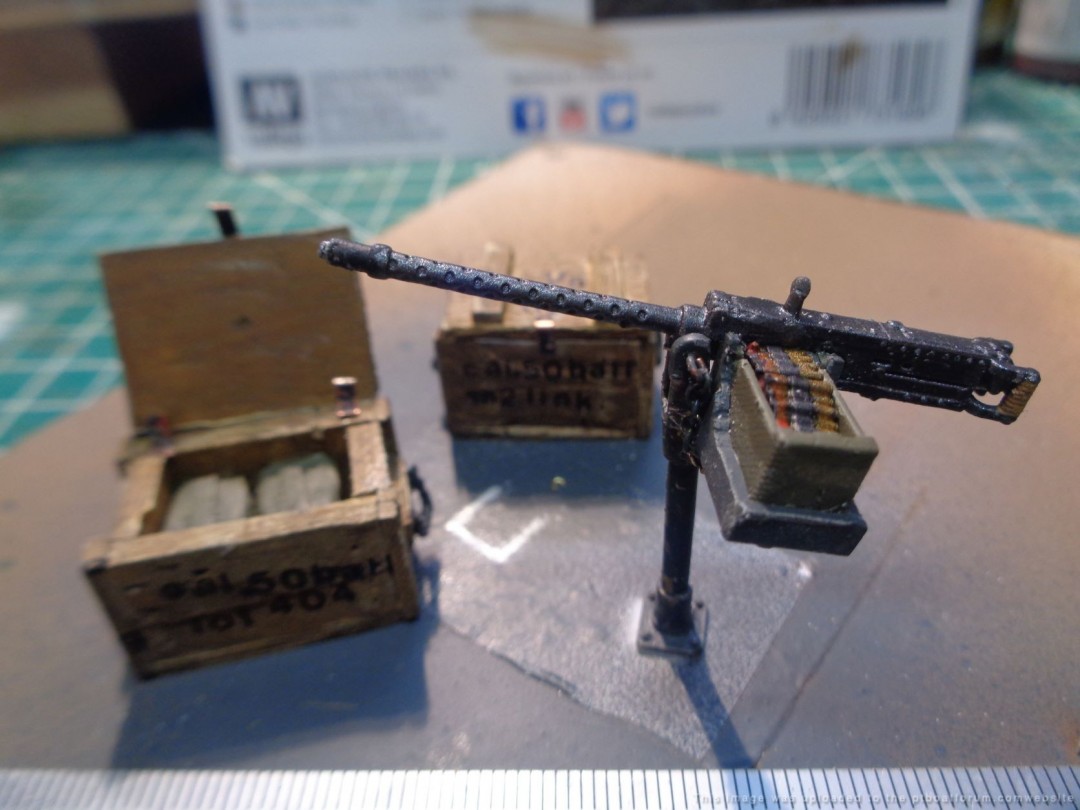
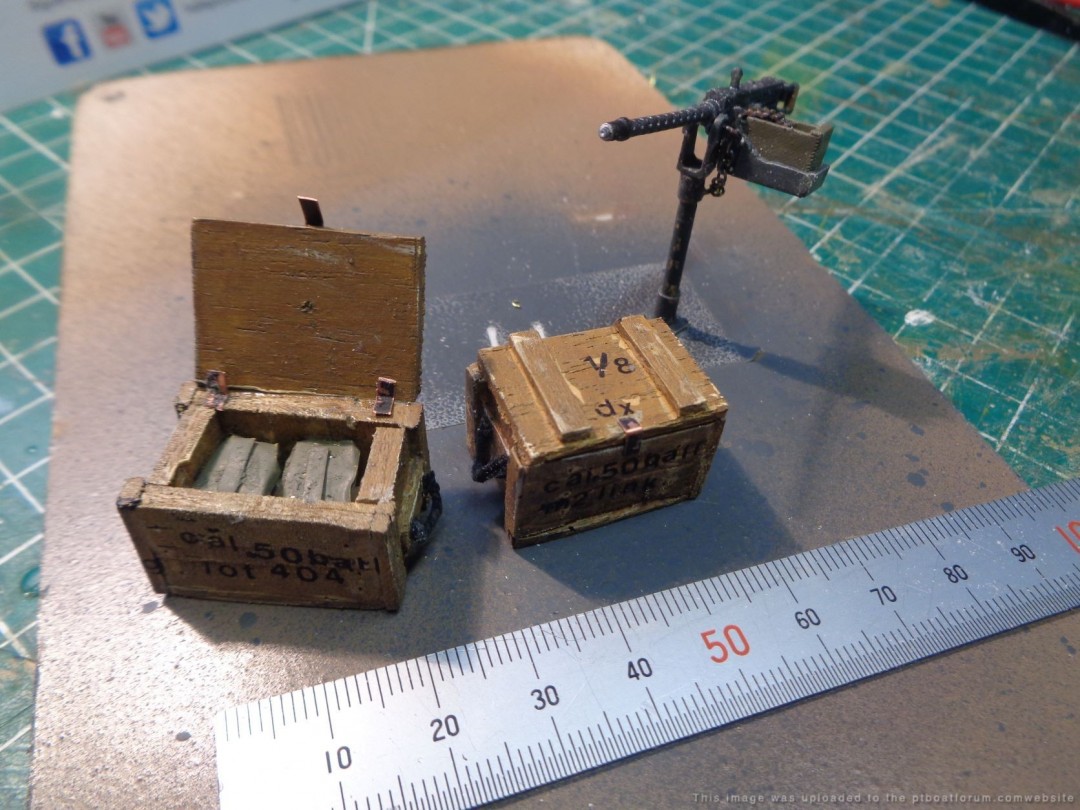
Posted By: Grady | Posted on: Aug 22, 2021 - 10:20am
Total Posts: 157 | Joined: Oct 2, 2018 - 8:04am
Gunners Mate first crewman posted , completion is getting closer
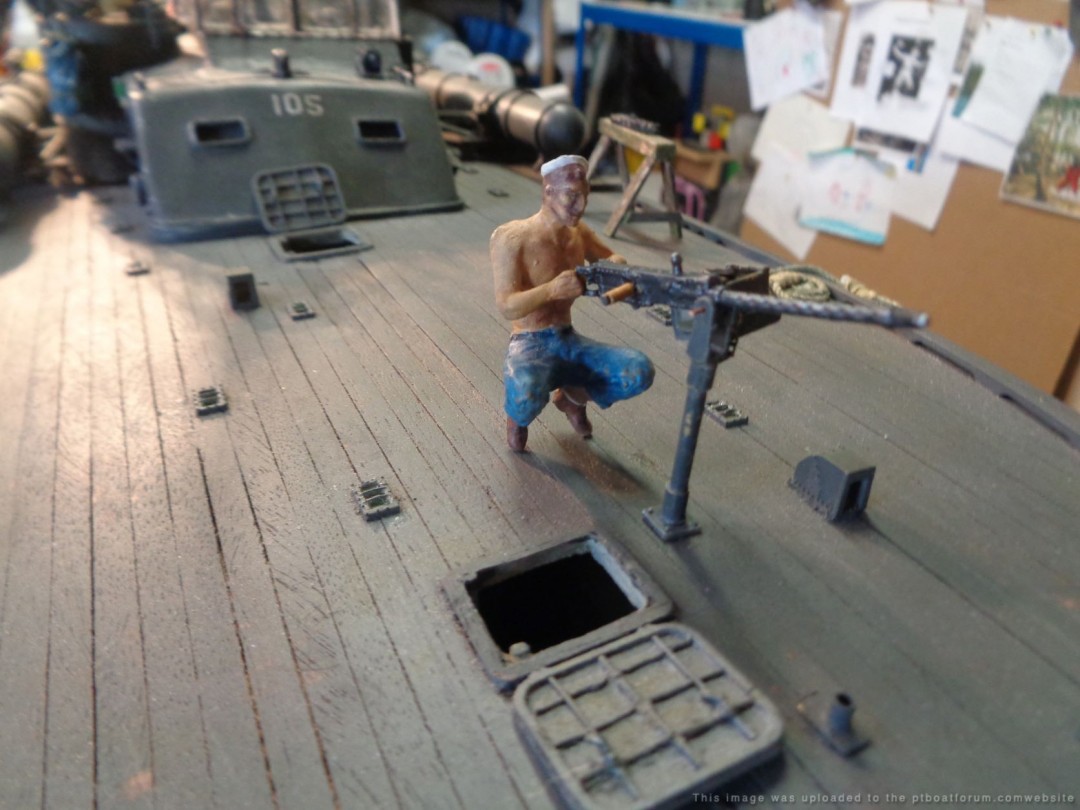
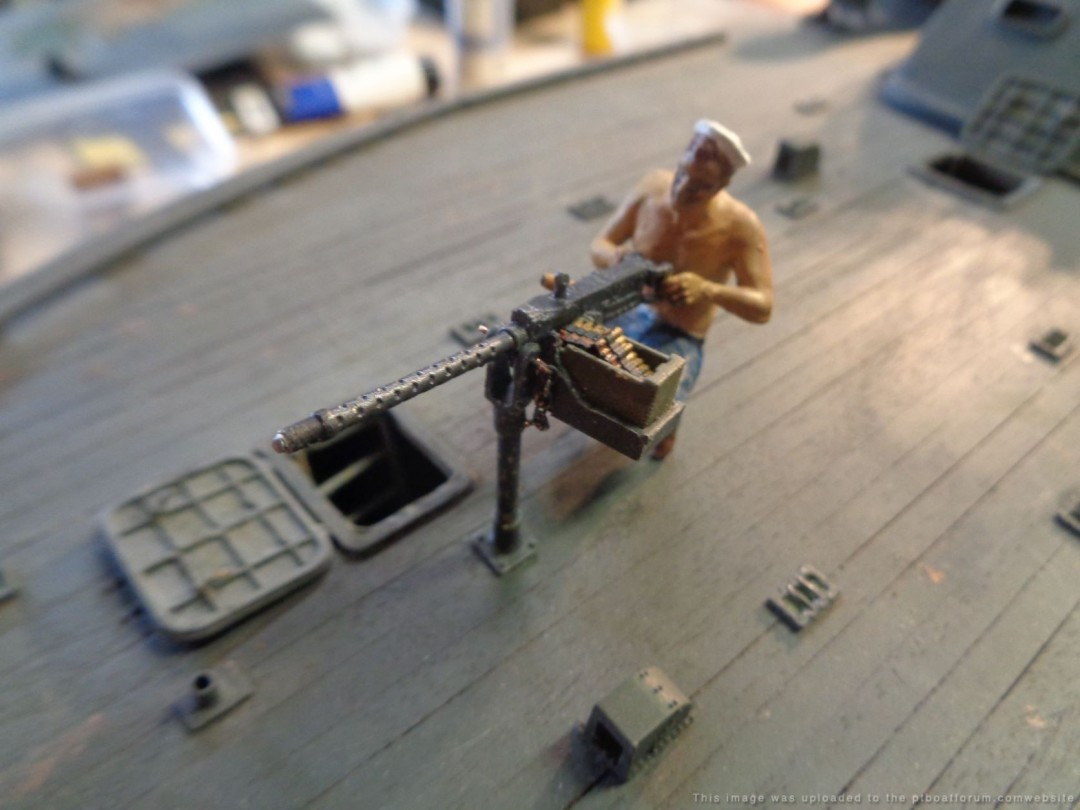
Posted By: Grady | Posted on: Aug 28, 2021 - 10:58am
Total Posts: 157 | Joined: Oct 2, 2018 - 8:04am
Nice Mike, you sure know how to get things done!
Posted By: Jeff D | Posted on: Aug 28, 2021 - 5:43pm
Total Posts: 2200 | Joined: Dec 21, 2006 - 1:30am
Thanks Jeff, I'm learning
Posted By: Grady | Posted on: Aug 29, 2021 - 2:50am
Total Posts: 157 | Joined: Oct 2, 2018 - 8:04am
few more of the crew ready for posting
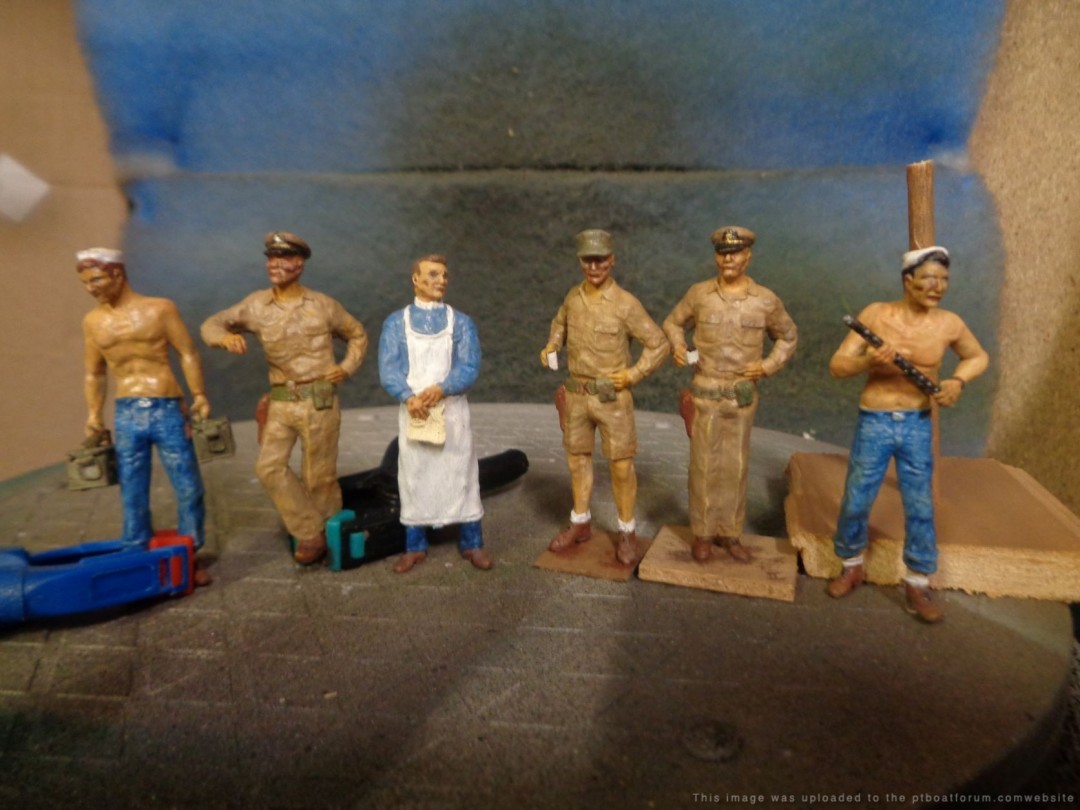
Posted By: Grady | Posted on: Sep 2, 2021 - 5:45am
Total Posts: 157 | Joined: Oct 2, 2018 - 8:04am
Just shy of 2 years work, this my first attempt at the PT , I still have to trim out the edges , frame the box and build the case . My goal here was to depict a day in the life of the 105-boat moored at Todd City for minor repairs and resupply. Thanks to everyone for all your comments and support. I would especially like to thank Frank Andruss Sr, Ted Walther, Dave Maples, Stuart Hurley, Will Day , Jerry Gilmartin and to Jeff D for allowing me the privilege of joining the ELCONUTS , and most of all to men who servered on theses wonderful boats .
Mike
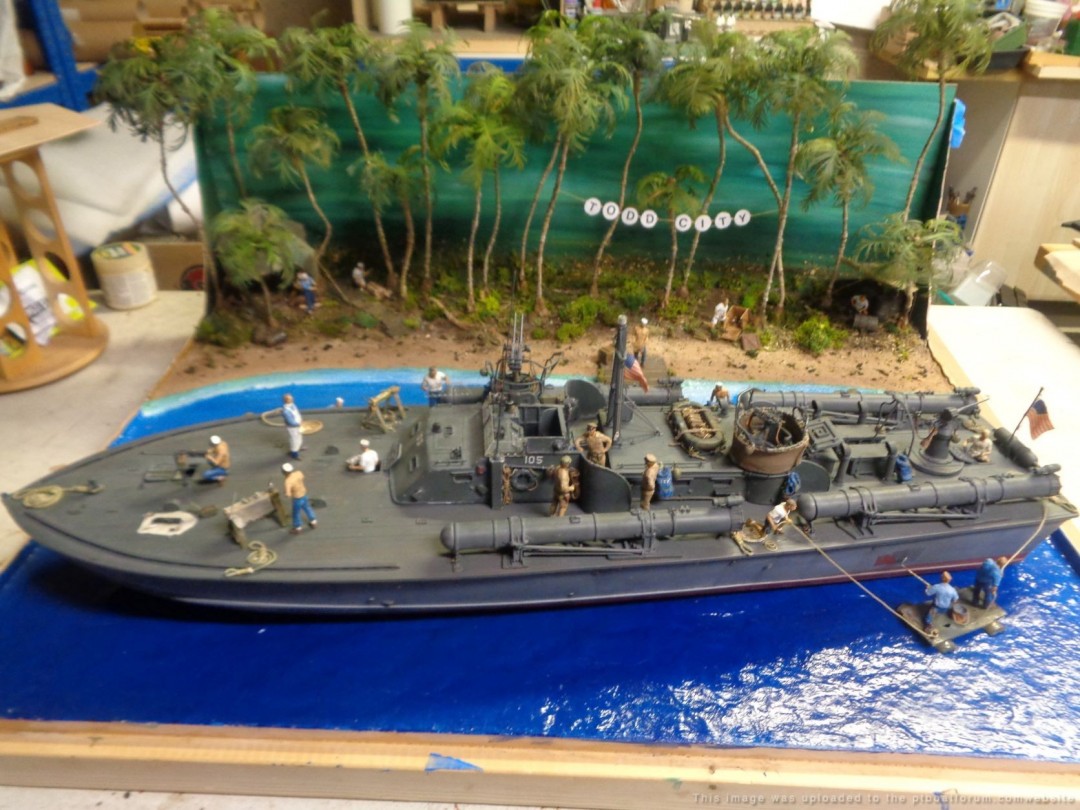
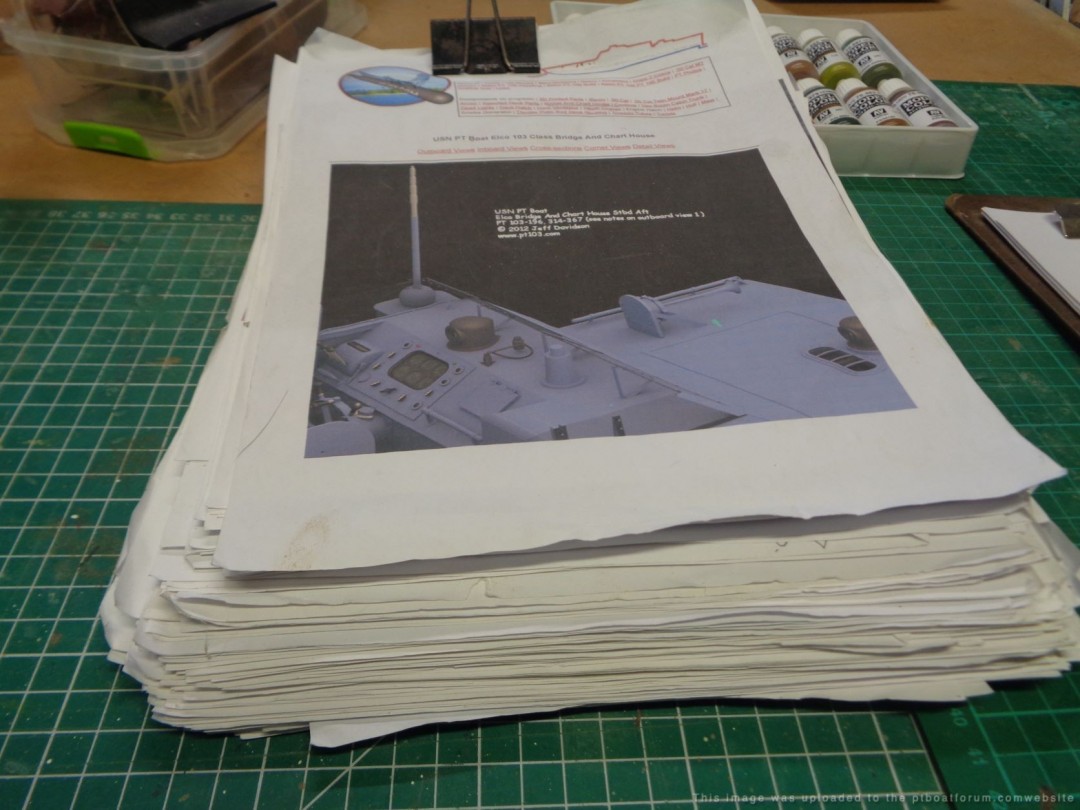
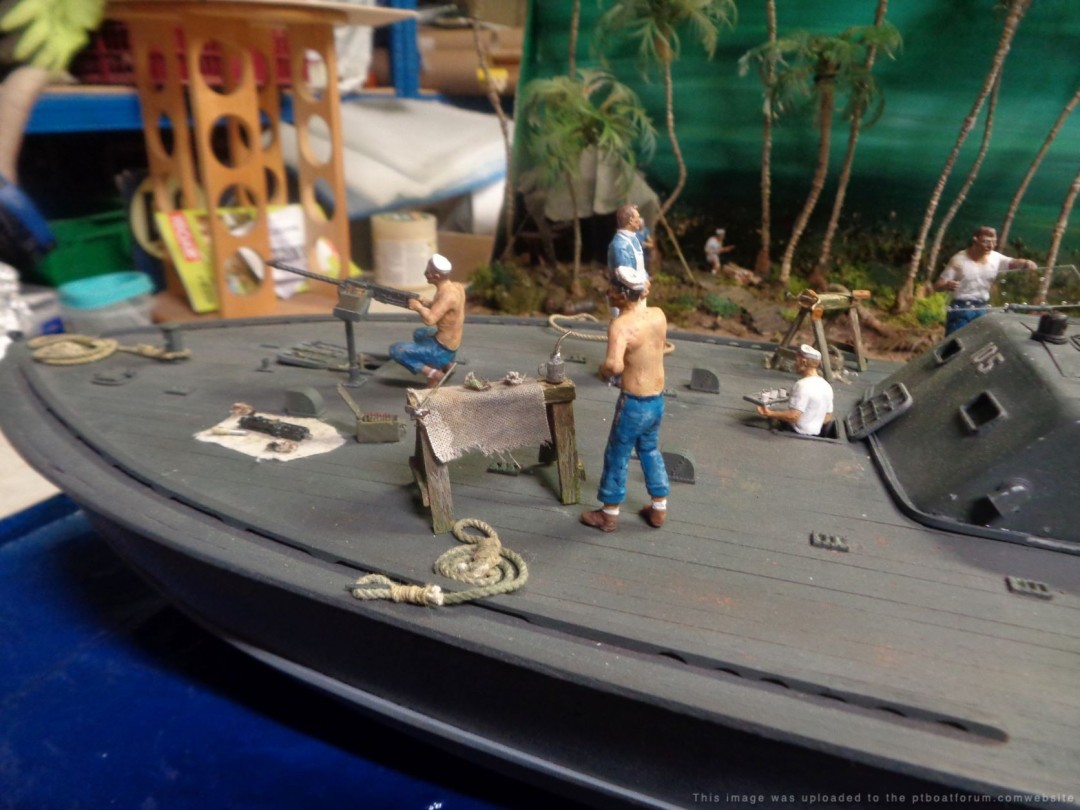

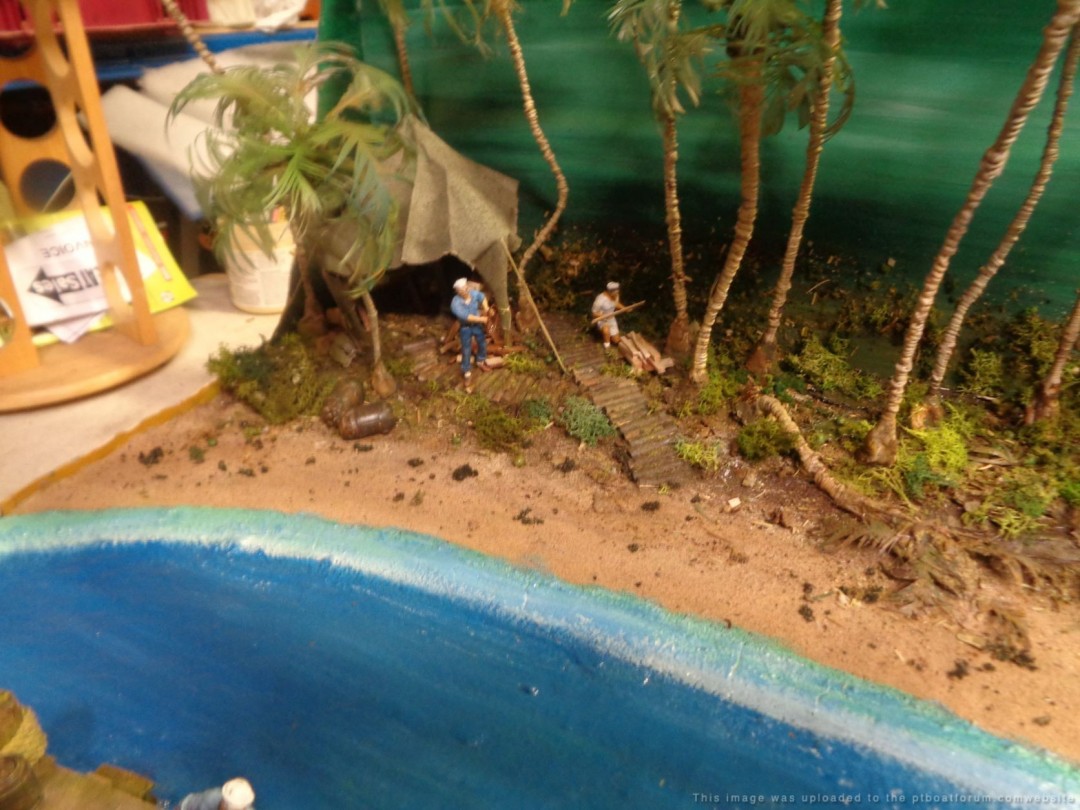
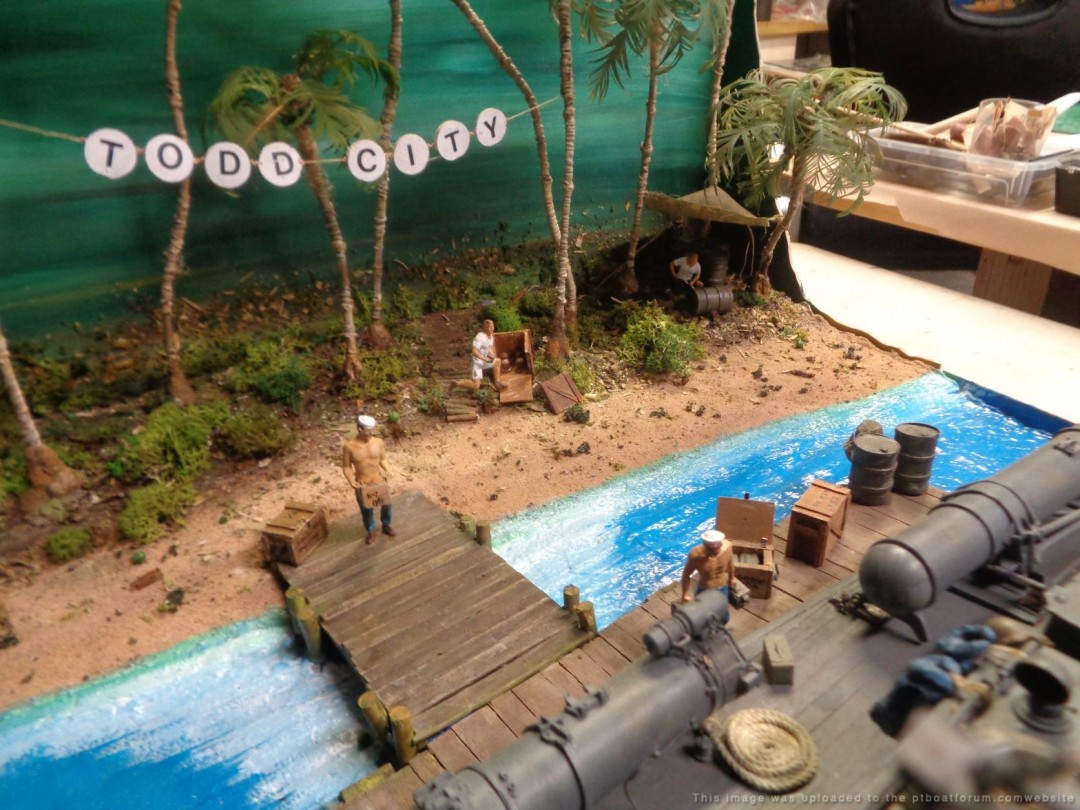
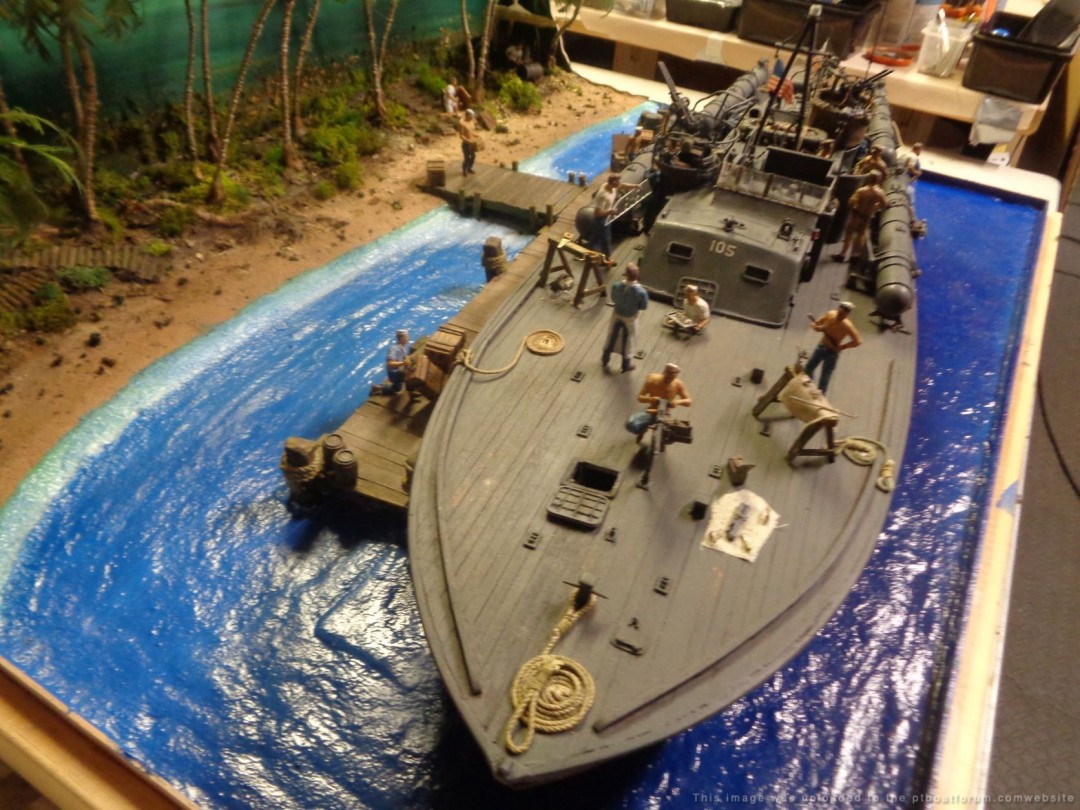
Posted By: Grady | Posted on: Sep 26, 2021 - 3:53am
Total Posts: 157 | Joined: Oct 2, 2018 - 8:04am
Beautiful model and diorama. I thoroughly enjoyed following your build and have taken some inspiration from your efforts. Thanks for sharing your work. Well Done!!!
Posted By: Rock55 | Posted on: Sep 26, 2021 - 11:55am
Total Posts: 22 | Joined: May 23, 2019 - 7:30am
That came out well Mike! Lots of interesting action going on. Good job on the palm trees, I know they took a long time but I think they were worth it. [:-cheers-:]
Posted By: Jeff D | Posted on: Sep 26, 2021 - 2:41pm
Total Posts: 2200 | Joined: Dec 21, 2006 - 1:30am
I am not sure there are words to describe you master piece! You have most certainly more then earned all the praise given to you here! Best of luck on your next adventure.
Posted By: Stearman | Posted on: Sep 26, 2021 - 8:07pm
Total Posts: 150 | Joined: Nov 1, 2017 - 9:38pm
FANTASTIC JOB!! THE DETAIL IS GREAT AND REALISTIC. IT BELONGS IN A MUSEUM. HMMM. FALLS RIVER MASS.?? I CAN'T IMAGINE HAVING SUCH SKILL. AGAIN GREAT JOB!
Scott Campbell 2nd gen,PT 248
Ron 20
Posted By: Scott C | Posted on: Sep 27, 2021 - 9:33am
Total Posts: 108 | Joined: Nov 20, 2019 - 4:34pm
Great job, Grady!
Posted By: Drew Cook | Posted on: Sep 28, 2021 - 9:42am
Total Posts: 1306 | Joined: Oct 19, 2006 - 10:44am
Looks fantastic Grady.
Posted By: Frank J Andruss Sr | Posted on: Sep 29, 2021 - 5:15am
Total Posts: 3497 | Joined: Oct 9, 2006 - 6:09am
What a journey it's been! Very nice job! Thanks for sharing your work on this project over the past several years.
Dave
David Waples
Posted By: David Waples | Posted on: Sep 29, 2021 - 9:47am
Total Posts: 1679 | Joined: Jan 2, 2007 - 9:55pm
Mike,
It was certainly worth the wait. Superb work, well done and thanks for sharing.
How many printer cartridges did you get through in that pile of research? đ
Best Regards,
Stu.
Posted By: Stuart Hurley | Posted on: Oct 1, 2021 - 1:55pm
Total Posts: 255 | Joined: Mar 19, 2013 - 3:32am
Thank you all for the generous comments. I entered this build with zero understanding or working knowledge of the PT world. Again, without the expert help from this site I would have not gotten very far. My building style relies greatly on pictures, & plans to attempt to duplicate what I see, so yes, I go thru a lot of ink, I print everything no matter how minor, as you can always find a small detail lurking in the photo or drawing. I work off the paper in front of me, I donât get the same feel looking at a PC screen old fashion I guess, but it works for me. As Jeff D says Iâm hooked and there is no going back. Iâm currently working on a WW1 Army mule drawn field ambulance, that my grandfather drove in the Siberian AEF in 1919. But also starting to line up my next PT build not sure what type & what theatre yet, but the learning will continue, any suggestions on what direction for the next type of build is always welcome.
Mike
Posted By: Grady | Posted on: Oct 2, 2021 - 3:00am
Total Posts: 157 | Joined: Oct 2, 2018 - 8:04am
Where you are working on your Grandfathers ambulance in Siberia AEF which is about as obscure as you can get, Since I would say that well over 90% of Americans never knew we had troops their! You might consider a 78' Higgins PT Boat up in the Aleutian islands, circa 1942? Might be right up your ally!
Posted By: Stearman | Posted on: Oct 2, 2021 - 8:44pm
Total Posts: 150 | Joined: Nov 1, 2017 - 9:38pm
I will throw in my less informed opinion. The 78ft Higgins would be a good choice because of its widespread use by both USN and RN. The same could be said of the 77ft Elco which is a very attractive boat to look at and has history from the beginning of the war to the end. Once again a very fine model and diorama you should be extremely proud of.
Posted By: Rock55 | Posted on: Oct 2, 2021 - 11:35pm
Total Posts: 22 | Joined: May 23, 2019 - 7:30am
All itâs been awhile, other projects to finish
Stearman finished my grandfatherâs 19814-1916 Ambulance from AEF Siberia 1919 It was featured In the Roads to the great war http://roadstothegreatwar-ww1.blogspot.com/2022/04/remembering-veteran-wagoner-harvey-k.html
Believe I will be looking into the PT boats of the Allied Costal Force next any thoughts appreciated
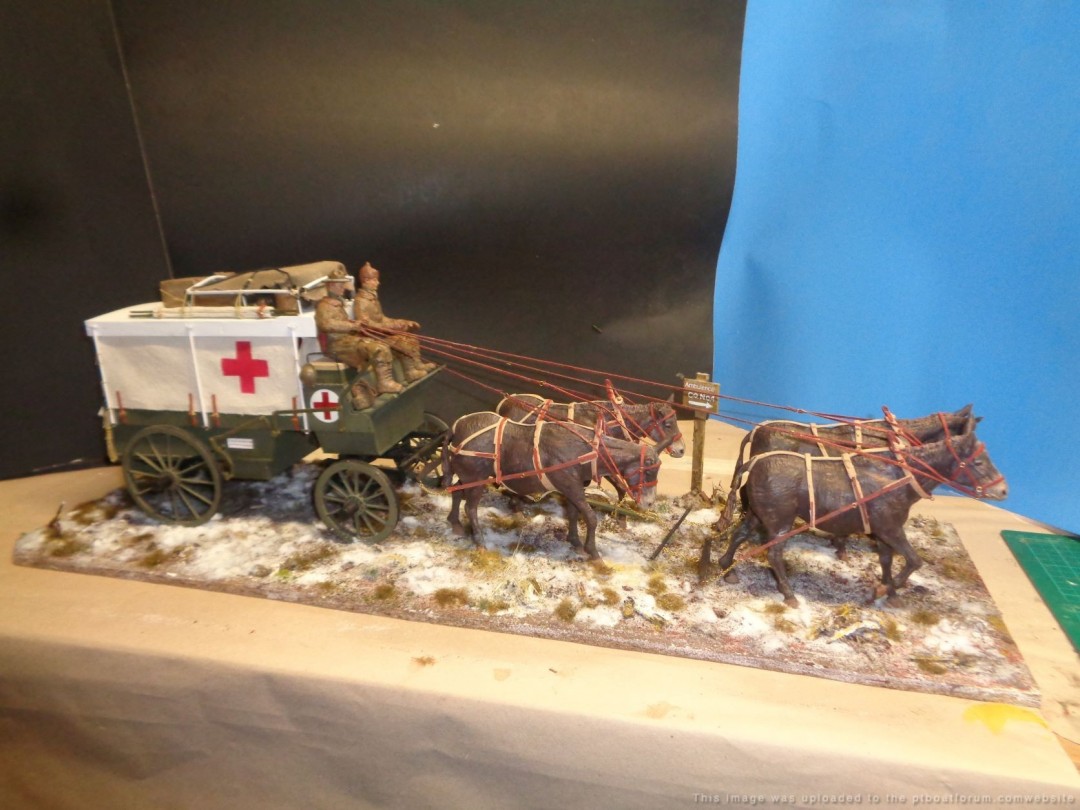
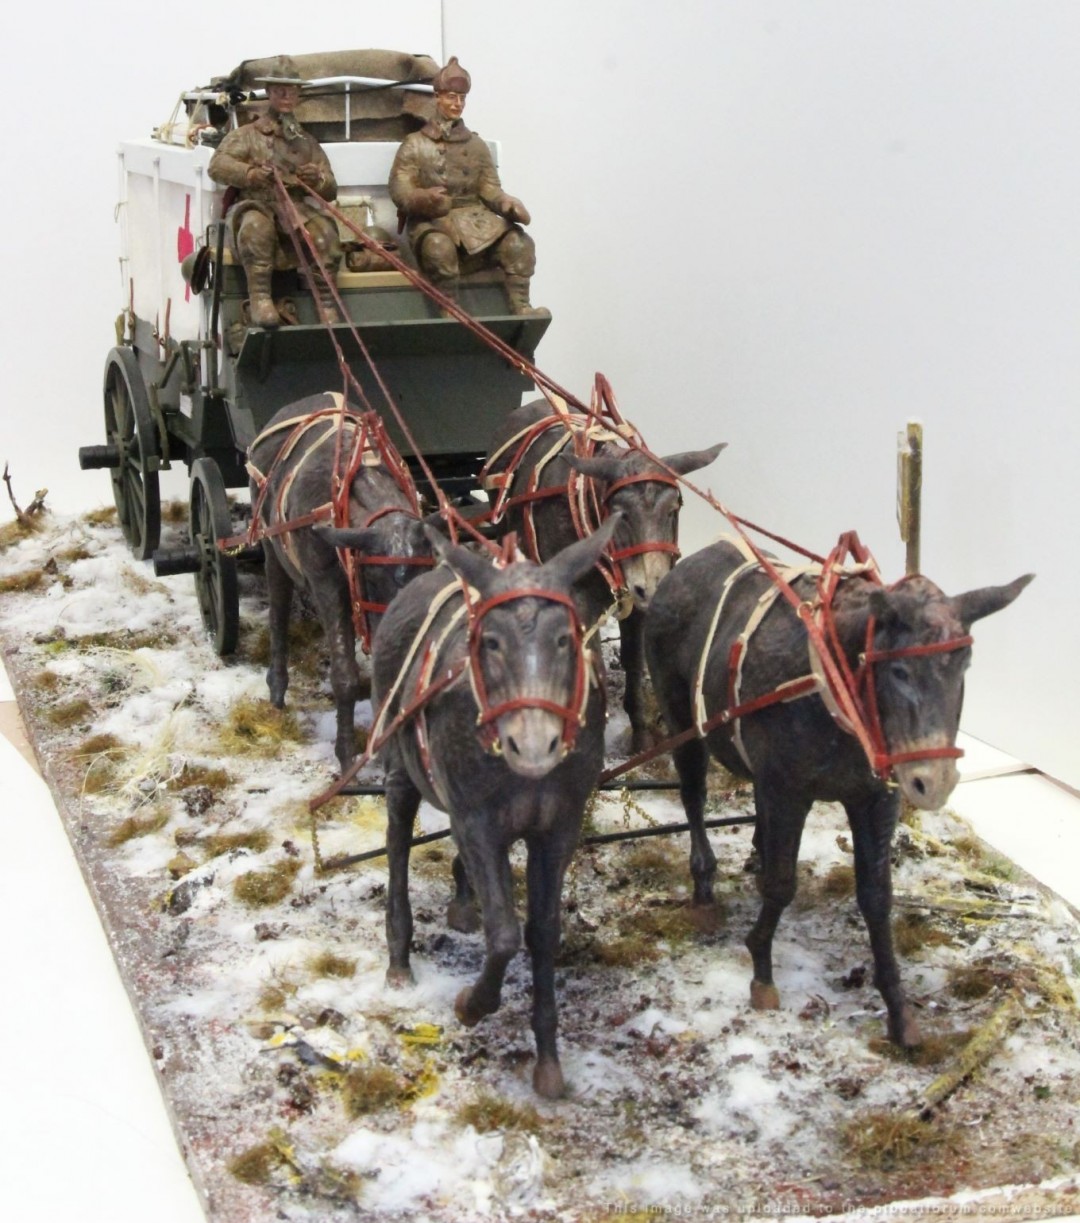

Posted By: Grady | Posted on: Jul 10, 2022 - 7:30am
Total Posts: 157 | Joined: Oct 2, 2018 - 8:04am
Grady, That's a fantastic model and a great tribute to your grandfather. In the head-on view (second picture) I was very taken with the way the mule seems to be looking towards the camera. Is that Tobe or June? The whole scene is very realistic, and I felt cold looking at it even though it was 101 degrees here today. I can imagine how difficult four mules would be to manage. When we would attend the Denver Stock Show, a week-long event, we would always go on the last day so we could watch the draft horse pulling competition. Even more impressive than the weight the horses could pull was the teamwork demonstrated by the two horses and the teamster on the ground alongside them. Truly a lost skill!
Keeping the history of veterans of the Great War alive is even more difficult than the efforts the members of this forum make for PT boats. My grandfather was in the Army during the First World War, but I know nothing about his service and don't believe he went overseas. I do have his shaving kit with his name engraved on the case, which is the same as my name. That stays in a display case with ID bracelets worn by my Dad (PT 361) and my father-in-law (USMC) during WWII.
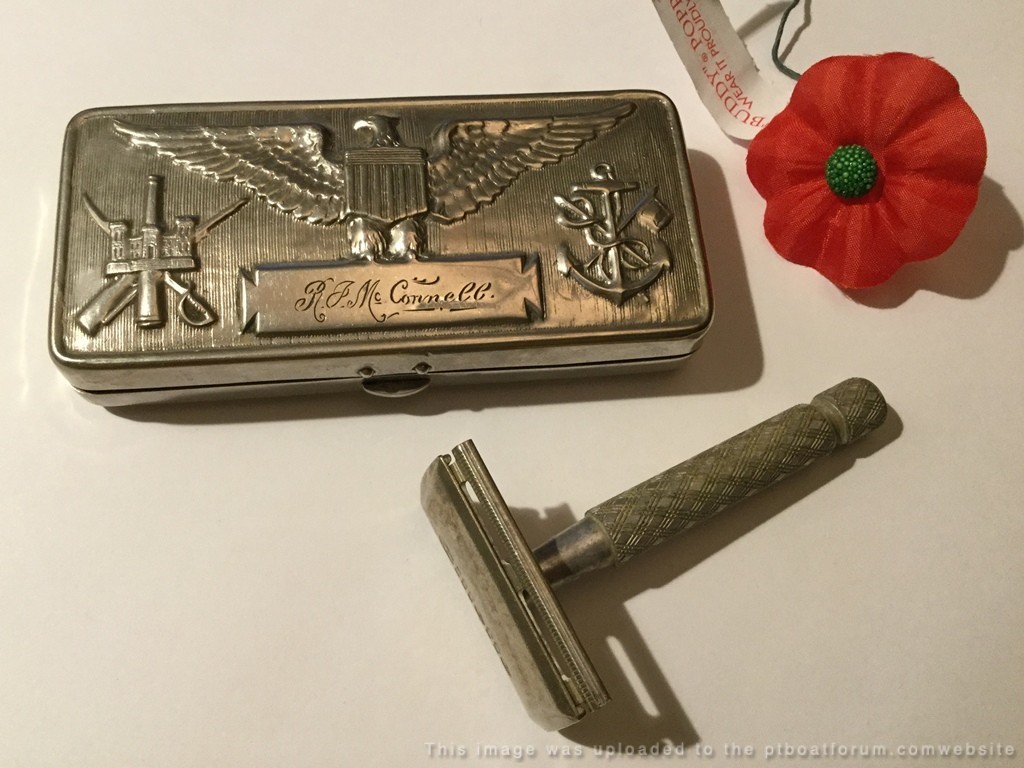
Randy McConnell (Randall J. McConnell III)
Posted By: PRJM3 | Posted on: Jul 10, 2022 - 9:12pm
Total Posts: 95 | Joined: May 25, 2009 - 2:47pm
That is really great, the expression on your Grandfather and especially on the lead mule! The story is great to! I come from a long line of horse people, my Dad was in ROTC cavalry but dropped out, ended up in the 9th AAF. I have a photo of him with his two quarter horses wearing his dress AAF uniform. My Grandfather on my mothers side raised champion stud Clydesdales! Sadly all were gone from the farms by the time I arrived. A friend of mine has a neighbor with four horses for rodeo work. When I walked up to the fence, I yelled at them, "hay, come here," they did! I told my stunned friend, "it's in the blood!" Again, I love that diorama!
Posted By: Stearman | Posted on: Jul 10, 2022 - 9:35pm
Total Posts: 150 | Joined: Nov 1, 2017 - 9:38pm
That is really well done Grady and a great tribute to your Grandfather. I almost wouldn't be surprised if one of the mules looked at me and winked!
Nice shaving kit Randy. My grandfather was in the Army for WW1 also, he came here from Poland and enlisted as soon as he could. He got mustard gassed which eventually killed him while I was a youngster in the early 60's. I too don't know much about his service but have some of his medals including a purple heart. And a boy scout knife which apparently was repurposed for use by the Army judging by the markings on it.
Posted By: Jeff D | Posted on: Jul 15, 2022 - 1:08pm
Total Posts: 2200 | Joined: Dec 21, 2006 - 1:30am
Thanks guys , the build meant a lot to me. First time doing animals and rigging , was really out of my knowledge window , kind like my PT boat building , but it seemed to work out in the end
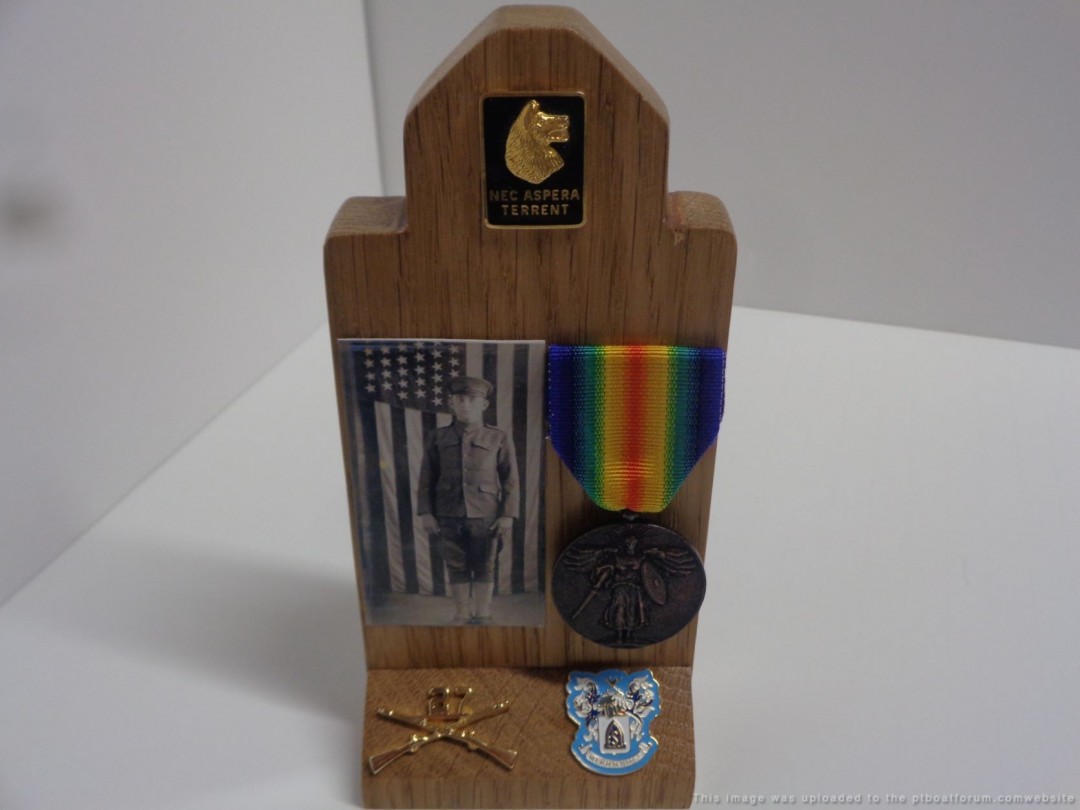
Posted By: Grady | Posted on: Jul 16, 2022 - 8:16am
Total Posts: 157 | Joined: Oct 2, 2018 - 8:04am