The PT Boat Forum
http://www.ptboatforum.com/cgi-bin/MB2/netboard.cgi
ģ Forum Category: PT Boats of WWII
http://www.ptboatforum.com/cgi-bin/MB2/netboard.cgi?cid=101&fct=showf
ģ Forum Name: PT Boats - General
http://www.ptboatforum.com/cgi-bin/MB2/netboard.cgi?fct=gotoforum&cid=101&fid=102
ģ Topic:
Italeri 1/35 PT109 The Final Days
http://www.ptboatforum.com/cgi-bin/MB2/netboardr.cgi?cid=101&fid=102&tid=3693
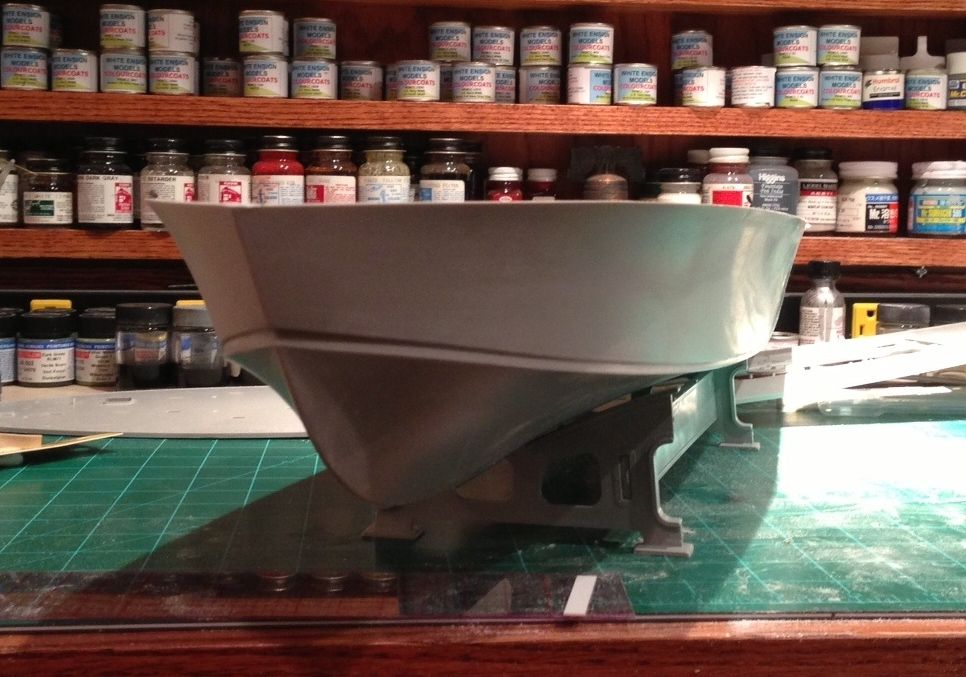
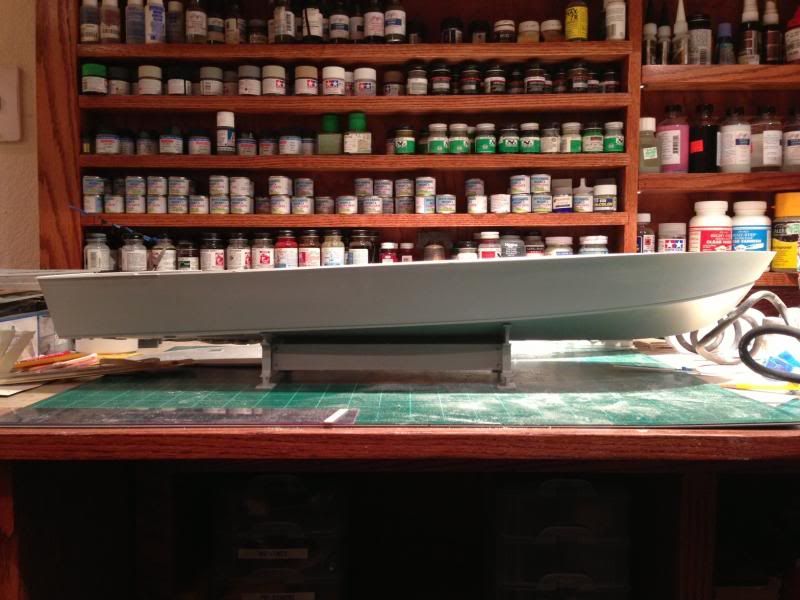
Long time lurker here. Picked up this beautiful kit a few months back, and have been doing lots of research since. My goal is to build the 109 as she may have looked in her final days. And not only that, but she's going to be a waterline as well.
Jeff Davidson's amazing build of an early 109 has been a big help/inspiration on my build so far. And all the information by other members here have been a huge help.
Sorry ahead of time for such a pic intensive first post.
[Image]http://i896.photobucket.com/albums/ac163/BobaFettSlave_1/DSC_0357_zps0792a019.jpg[/Image]
So far the changes I've managed to get done are replacing the barrels on the 50's and the 20mm. Shimming up the bow and stern to get the subtle "S" curve. I've moved the Depth Charges back to replicate whats seen in another period photo of another boat, to address what the crew may have done after the torpedo incident. Moved the 20mm pedistal back to slightly cover the dead-lights. Slightly changed the angle on the rear 50's tub. And lastly moved the forward torpedo tubes up so that the rear mounts roughly line up with the forward of the cart house.
Still lots of work left, but we're slowly getting there.
[Image]http://i896.photobucket.com/albums/ac163/BobaFettSlave_1/DSC_0354_zpsa822acbe.jpg[/Image]
[Image]http://i896.photobucket.com/albums/ac163/BobaFettSlave_1/DSC_0364_zps8a4bcde8.jpg[/Image]
[Image]http://i896.photobucket.com/albums/ac163/BobaFettSlave_1/DSC_0356_zps22646f21.jpg[/Image]
EDIT: Hmmmm. Seems I'm not familiar with how to upload photos on this type of forum. Anyone got any hints?
Posted By: Ultimate Shield | Posted on: Oct 5, 2014 - 12:14am
Total Posts: | Joined: Unregistered
Coming along nicely. Thanks for sharing your work.
Dave
David Waples
Posted By: David Waples | Posted on: Oct 5, 2014 - 8:58pm
Total Posts: 1679 | Joined: Jan 2, 2007 - 9:55pm
It looks nice US, glad you added the "S" on the sheer. It adds a lot to the graceful lines of the boat. And thanks, I'm glad my site was helpful to you!
You're right, there's an amazing group of PT historians here. I learn something new virtually every day.
Posted By: Jeff D | Posted on: Oct 6, 2014 - 8:05am
Total Posts: 2200 | Joined: Dec 21, 2006 - 1:30am
By the way, it was Stu Hurley's build that you are probably referring to. I'm not capable of such excellent work, at least not in the physical world!
Posted By: Jeff D | Posted on: Oct 6, 2014 - 8:23am
Total Posts: 2200 | Joined: Dec 21, 2006 - 1:30am
Hi,
Looking forward to watching the build come together. How are you going to tackle the water? My current 195 project is also going to be a waterline.
Best Regards,
Stu.
Posted By: Stuart Hurley | Posted on: Oct 6, 2014 - 11:39am
Total Posts: 255 | Joined: Mar 19, 2013 - 3:32am
May I ask a question about this "S" curve? Where exactly on the model is this S curve off? How is it best corrected?
Posted By: Jimmy | Posted on: Oct 6, 2014 - 5:35pm
Total Posts: 2 | Joined: May 3, 2022 - 11:08am
Hi Jimmy,
it's not much of an "S" really. What we're talking about is the the shape of the top of the hull. The hull tapers down at the bow and has a shallow flip up on the stern.
I did this by drawing a line at the bow starting where I wanted it and continued up to a point about half way between the bow and the Chart House. Don't go crazy. It's fairly subtle. I then sanded it down maintaining a nice flowing curve. On the stern about 10 scale feet from the transom I added some Evergreen plastic to add the flip on the tail. I had to remove the trim molded into the top of the hull and add it back in later with some Evergreen plastic. I also gave the stern a slight crown by adding some Evergreen plastic and sanding a slight crown into it. When the hull is attached it forms a slight crown. I'm not there yet but it's a good idea to add some support in the center of the hull . Careful because this can have an affect on how the deck fixtures (Chart House and Day Cabin) fit.
I'm calling on Stu to come to my rescue and show what he did but you can see his work on Jeff's PT-103 web site. Stu has some nice photos that show how he did this. Here's a photo of the actual boat and what I did to replicate it.
David Waples
Posted By: David Waples | Posted on: Oct 6, 2014 - 6:56pm
Total Posts: 1679 | Joined: Jan 2, 2007 - 9:55pm
Hi,
Anything you do to the hull causes problems with the fit of the deck and other items.
If you look at my build photos, I just sanded the bow down a little and had to remove the lip under the deck to allow the hull to join. You then have too much overhang so have to reduce the deck edge slightly. Be careful the deck screw doesn't break through the stem due to the reduced height. Dave's method of adding height to the hull edges might be better here.The flip up at the stern is easier as you just have to add some strip to jack the deck up a little. The crown is O.K. at the stern, IMHO, but a little flat at the foredeck. If you jack up the deck at the stern, you need to raise exhaust system by the same amount to preserve the distance between the pushrods and the deck edge.
I tried several methods of introducing crown starting with pillars of sprue glued under the deck. I ended up with propping it up with a cardboard tube (toilet roll) suitably shaped and wedged in. The fit of the charthouse is affected so be careful. It is adviseable to fit strengthening pillars under the deck around the hole for the cabins as you will be constantly breaking the deck joint during the build otherwise. This also helps when glueing the cabins as it removes the flex.
Or you could just leave it alone[:-bigeyes2-:]
Best Regards,
Stu.
Posted By: Stuart Hurley | Posted on: Oct 7, 2014 - 12:33am
Total Posts: 255 | Joined: Mar 19, 2013 - 3:32am
Thanks guys.
It certainly does add character to the boat, especially at the bow. I went through my books after posting the question last night and had to take a straight edge out to the side views in order to see the curves. And yes, my first thought was this is going to effect the fit of deck mounted items.
"you can see his work on Jeff's PT-103 web site. Stu has some nice photos that show how he did this"
Can you point me to Jeff's web site and Stu's photos?
Posted By: Jimmy | Posted on: Oct 7, 2014 - 6:21am
Total Posts: 2 | Joined: May 3, 2022 - 11:08am
Hi Jimmy, my site is here: [url]http://www.pt103.com/[/url]
You can see the sheer (where the sides meet the deck) curve in this image: [url]http://www.pt103.com/images/PT_Boat_Elco_103_Class_Hull_Profile_Stitched.jpg[/url]
The sheer is parallel with the water line for a short distance at the bow according to an Elco offsets table. The deck and coamings along the chart house, day room cabin trunk, and engine hatch are straight although the sheer curves a bit due to the steady deck camber and the hull narrowing. Then the sheer curves back up.
Posted By: Jeff D | Posted on: Oct 7, 2014 - 7:13am
Total Posts: 2200 | Joined: Dec 21, 2006 - 1:30am
Thank you Jeff. I'll check it out.
Posted By: Jimmy | Posted on: Oct 7, 2014 - 9:35am
Total Posts: 2 | Joined: May 3, 2022 - 11:08am
Hi Ultimate Shield,
You might want to rethink the location of the depth charges. Seems from your photo that they are both too far forward, and too far inboard. You need to relocate them closer to the deck edge and closer to the forward torpedoes. If they rolled off from their current location, they would slam into the deck instead of clearing the edge.Please check out actual photos of the 109 in this thread as they show correct location of the depth charges.
http://www.ptboatforum.com/cgi-bin/MB2/netboardr.cgi?fid=102&cid=101&tid=3214&st=10&nd=20&pg=1&sc=20
Mike
Posted By: Michael Vorrasi | Posted on: Oct 7, 2014 - 10:52am
Total Posts: 72 | Joined: Jul 1, 2013 - 11:46am
It's hard to tell from the photos but I would guess closer to the Chart House. Back from the deck edge is the right idea. How close is open to speculation. It was not uncommon to have them located in from the edge and yes, they would roll across the deck a little before going off the side. The photo does not clearly show where the toe rail ends but if I were guessing (and I am) I would think it would be gone just forward of where the depth charges would roll back.
I'm also of the no mast camp. There's just no indication that it was there. From previous photos I've seen of this boat it was gone before Kennedy took command. I have to tell you that I love those A frame masts. Nobody would like to see it more than me. I just don't think it's there.
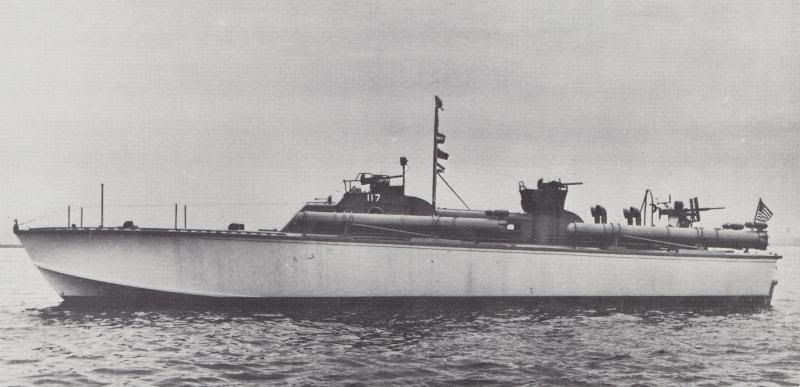
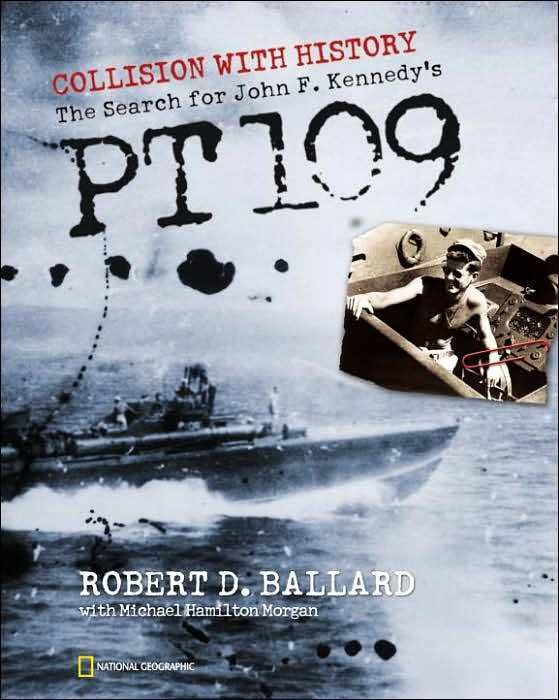
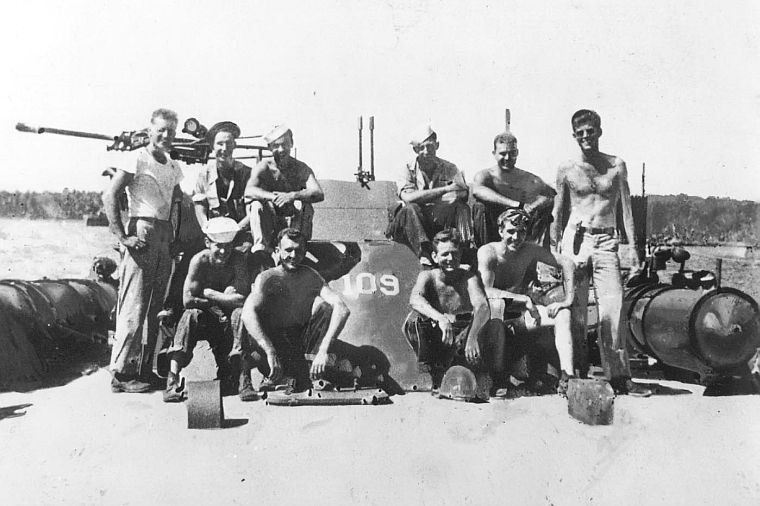
Best reference photo I've seen is this one. It's pretty clear that those depth charges are set back a ways. As close as it is to the torpedo tubes it has to be. Photo is from the jacket cover of Dr. Ballard's book. I believe it comes from the Kennedy Library but not positive.
Dave
David Waples
Posted By: David Waples | Posted on: Oct 7, 2014 - 7:33pm
Total Posts: 1679 | Joined: Jan 2, 2007 - 9:55pm
Hey Ultimate Shield,
Mike and Dave are correct. Shoot me your email, and I'll send you a couple of PT 109 depth charge placement photos and an excellent speculative -- and I believe correct -- diagram by Dave Waples.
Mine is: rac701@msn.com
Posted By: Drew Cook | Posted on: Oct 8, 2014 - 8:08am
Total Posts: 1306 | Joined: Oct 19, 2006 - 10:44am
Thanks for the input guys. Really do appreciate it
Concerning the Depth charges.
I placed them farther back to mimic a photo in this thread after reading about what the crew might have done after the torpedo/depth charge incident.
[url]http://www.ptboatforum.com/cgi-bin/MB2/netboardr.cgi?fid=102&cid=101&tid=2913&pg=15&sc=20&x=0[/url]
Here's a few better photos of my current positioning of the charges. Other than being set back, they're in the same forward position that Italeri had them in. I'm not opposed to moving them closer to the cart house, as I'm thinking of making all new toe rails anyway, but lmk what you think he


-Dana
Posted By: Ultimate Shield | Posted on: Oct 9, 2014 - 1:47pm
Total Posts: | Joined: Unregistered
Just my opinion, but, from studying the existing photos of the 109 under JFK...
They're too far forward -- they should be as close to the forward tubes as to allow the torpedos to just clear them with the tubes cranked out for launching, as shown in Dave Waples drawing (the rearmost placement) in his post of November 15, 2012.
And they're way too far from the edge of the deck. I think they should be at the edge of the foot rails, as in Dave's drawing.
Posted By: Drew Cook | Posted on: Oct 9, 2014 - 5:01pm
Total Posts: 1306 | Joined: Oct 19, 2006 - 10:44am
Hi,
Just my opinion also,
I agree they need to be further back, just over one depth charge length from the tube and with the base of the rack just inside the toe rail. I don't think your tube locking plates are quite near enough to the deck edge. They should overlap the margin plank by about 1.5mm, so the 'cranked out' angle may not be enough as it is for clearance. Try viewing your model from the same angle as the photo and experiment with the placement. Looks like the tubes are cranked in in the photo above.
Best Regards,
Stu.
Posted By: Stuart Hurley | Posted on: Oct 10, 2014 - 4:12am
Total Posts: 255 | Joined: Mar 19, 2013 - 3:32am
What Stu said...
Posted By: Drew Cook | Posted on: Oct 10, 2014 - 1:27pm
Total Posts: 1306 | Joined: Oct 19, 2006 - 10:44am
Hi,
Try this one "pacificwrecks.com PT 132" one photo is worth a thousand words, although not the 109 it may help a little.
Ta.
D.buck
Posted By: David Buck | Posted on: Oct 10, 2014 - 3:43pm
Total Posts: 332 | Joined: May 4, 2008 - 2:59am
Ok, so here's the repositioned depth charges. Set them just forward of the cart house and just behind the toe rail.


Also, here is how I went about tackling the subtle "S" curve for the bow. Starting from the forward 3rd of the cart house, just under the front of the torpedo head, I added small strips of .010" styrene and slowly built up to .020" strips to the aroximate high point, then went back to .010" strips right up until about the center of the most forward hatch. Then I did just the smallest amount of sanding to the most forward point of the bow (enough that it didn't cause problems. It doesn't sound like much, but I think it did a OK job given the limited ability to modify this area, and it should pop out more once the deck is permanently attached to the hull.

Oh and I forgot to answer your question about how I was planning to do the water effect. I've never actually done one, so this will be a first for me. But I am very fond of the water effects of modelers like Kostas Katseas. Even though the largest scale I've seen his technique done in is 1/350, I;m confident it's possible to do with larger scales as well. In fact, I have seen an incredible 1/72 Revel U-boat done in Very heavy seas that even had water coming out of the hull vents. (though I can't seem to find it now, really wish I could find it)
The real purpose of the waterline is to be practice for the 1:200 Bismarck I have going. I've put so much damn time into the thing, I don't want it to be brought down in the end with a poor water effect.
Posted By: Ultimate Shield | Posted on: Oct 15, 2014 - 9:00pm
Total Posts: | Joined: Unregistered
Hi,
Good work. Looks like you have it now.
I agree the water will be make or break.
I have found that the bigger the scale, you can't get away with painted plaster or the like. It needs to have depth. Look forward to the rest of the build with interest.
Best Regards,
Stu.
Posted By: Stuart Hurley | Posted on: Oct 16, 2014 - 4:16am
Total Posts: 255 | Joined: Mar 19, 2013 - 3:32am
I echo Stu's comments. Thanks for sharing your work. I'm looking forward to seeing it come together.
Dave
David Waples
Posted By: David Waples | Posted on: Oct 16, 2014 - 5:29am
Total Posts: 1679 | Joined: Jan 2, 2007 - 9:55pm
That looks like it matches the book cover nicely US, well done. Well done on the hull mods too.
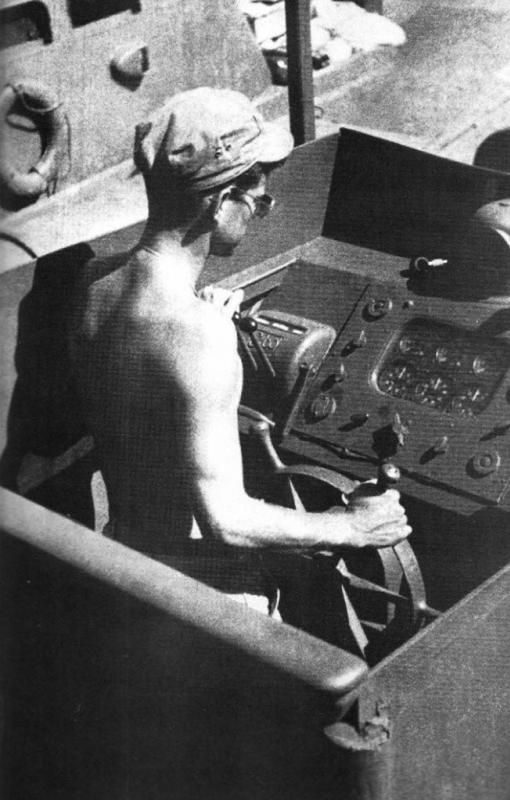
You might know this already but the "JFK at the helm" shots show both searchlight brackets missing. That's not to say they weren't replaced by the time of her sinking of course. Another photo shows the 109 without a mast around May-June 1943.
Posted By: Jeff D | Posted on: Oct 16, 2014 - 1:09pm
Total Posts: 2200 | Joined: Dec 21, 2006 - 1:30am
[URL=http://s183.photobucket.com/user/willday6/media/PT-191PENNINGTON05_zpsbbe2a5e7.jpg.html][IMAGE]http://i183.photobucket.com/albums/x164/willday6/PT-191PENNINGTON05_zpsbbe2a5e7.jpg[/IMAGE][/URL]
Pennington's 191 dio has some of the best water I have seen....
Will
Posted By: Will Day | Posted on: Oct 16, 2014 - 2:10pm
Total Posts: 1955 | Joined: Oct 8, 2006 - 4:19pm
Yes I have to agree the clarity of the water as he depicts it in the shallows is great. It appears that this is a South Pacific location he has portrayed, just wondering if those are rocks he has visible for effect?
Most islands I have visited in the South Pacific the shore line is pulverised coral very little number of large rocks if any.
Just my 2cents worth,
D.buck
Posted By: David Buck | Posted on: Oct 16, 2014 - 3:05pm
Total Posts: 332 | Joined: May 4, 2008 - 2:59am
Hi US, have a look at Gene Kicklands site PT King "miscellaneous Views" page 1+2 might give you some ideas to help protect the deck.
Ta,
D.buck
Posted By: David Buck | Posted on: Oct 16, 2014 - 4:41pm
Total Posts: 332 | Joined: May 4, 2008 - 2:59am
Hi Jeff D,
Thanks!
Do you have a link to the photo showing the cart house without the mast? Through what reading I've done I was under the impression that the mast simply wasn't visible deployed/up in any photos under JFK, and that it wasn't clear if it was totally removed or simply lying down.
I'm still familiarizing myself with the Elco equipment, what are these searchlight brackets?
Dave Buck
Are you referring to the photo showing some kind of extended track for the depth charges?
Also, whats the deal with the windshield on the 109? was it replaced with shielding or simply painted over?
That is indeed some gorgeous water effect. I'm wanting to do the boat at speed, so I think my water effect will ultimately be less green in color. But the look of depth, especially where the water meets the hull, is a must for sure
Posted By: Ultimate Shield | Posted on: Oct 16, 2014 - 5:17pm
Total Posts: | Joined: Unregistered
Hi US,
If you are looking at the photo with about 30 blokes in the photo and I believe the Boats No.is 147 then that"s the one.
Funny thing once you get away from the Islands then the water turns a deep rich blue not green, believe it or not the headers blue colour Dick has used for the PT Boats of WW11 PT Boats-General is very close to the ocean colour, of course when you stir the water up around a boats hull then the green can be seen around the boat but soon disappears once the boat has moved on. All to do with depth I believe.
Try Scuba Diving in it then it really knocks your socks off!
D.buck
Posted By: David Buck | Posted on: Oct 16, 2014 - 7:47pm
Total Posts: 332 | Joined: May 4, 2008 - 2:59am
Typically the windscreens were simply painted over.
Notice the wavy look of the windscreen between supports. Very typical of the clear windscreens.
Similar boat to the 109.

Can't know for sure but I'm guessing painted.
Dave
David Waples
Posted By: David Waples | Posted on: Oct 16, 2014 - 8:52pm
Total Posts: 1679 | Joined: Jan 2, 2007 - 9:55pm
The searchlight brackets were mounted to the armor plate US:
[image]http://www.pt103.com/images/PT_Boat_Elco_103_Class_Armor_Perspective_Aft_Stbd.jpg[/image]
Somebody else will be posting the 109 photo soon but it was clear to me that it wasn't there. It makes sense, raised it would have attracted attention, down it could trip feet, and the veterans here tell us they never used the anchor light at the top. Remove 2 pivot bolts and it, with its useless weight, is gone. That being said, I really like the look of a boat with a raised early mast for some reason.
Posted By: Jeff D | Posted on: Oct 17, 2014 - 3:44am
Total Posts: 2200 | Joined: Dec 21, 2006 - 1:30am
Thanks Jeff and Dave
Ah, I see what you mean now.
And I agree about the look of the early PT mast, one of my favorite bits. I was hoping to still have it there, just in the stowed position. It may be possible to actually have it just sitting there as a removable detail. Another reason for my thinking it might still be there was its simply hard to see in the stowed position and the lack of a life raft on the 109. The mast being in the way would have made at least a half assed excuse for not having one on top the cart house, at least in my mind. Wonder why she ultimately went out without one if there was free space available on the roof.
Given the lack of both searchlights to signal one another and masts to raise flags, how did these guys easily ID one another at night as friendly's without a high chance of blowing one another out of the water accidentally?
Posted By: Ultimate Shield | Posted on: Oct 17, 2014 - 4:17am
Total Posts: | Joined: Unregistered
Hey, it's your model! Not many outside of us nit-pickers will know about the mast. Good idea about making it removable, especially if you plan to enter it into a contest.
The boats also carried a hand held Aldis light for signalling. I've no clue as to how often they signalled each other though, I'm just a mechanic.
Posted By: Jeff D | Posted on: Oct 17, 2014 - 5:23am
Total Posts: 2200 | Joined: Dec 21, 2006 - 1:30am
I don't know if you have the Ballard book with the dust jacket but it's a little more clear than printing on the computer. I just don't see it and even in this picture it seems like you should be able to see a fixture that large.
My opinion is that it was useless and in the way so they took it off. The 109 wasn't the only boat that did that. t remember asking Mr. Keresey, skipper of PT-105 about this and he just didn't remember or think too much about the mast. He told me it could have been folded down. He did keep it on his boat until the radar mast was added.
I think we all want to see that mast. It's a defining fixture of these early 80' Elco's. It just doesn't seem to be there.
Dave
David Waples
Posted By: David Waples | Posted on: Oct 17, 2014 - 5:29am
Total Posts: 1679 | Joined: Jan 2, 2007 - 9:55pm
once you get away from the Islands then the water turns a deep rich blue not green,
This is very true, but if the South Pacific's anything like Southeast Asia, it depends on the weather. A lot. Green-grey from the surface when overcast.
Posted By: zeusbheld | Posted on: Oct 17, 2014 - 5:31am
Total Posts: 61 | Joined: Aug 12, 2014 - 9:54pm
[URL=http://s183.photobucket.com/user/willday6/media/PT-191PENNINGTON05_zpsbbe2a5e7.jpg.html][IMAGE]http://i183.photobucket.com/albums/x164/willday6/PT-191PENNINGTON05_zpsbbe2a5e7.jpg[/IMAGE][/URL]
Pennington's 191 dio has some of the best water I have seen....
Will
How did he do that water?
Jeff
Posted By: JBG327 | Posted on: Oct 17, 2014 - 11:53am
Total Posts: 74 | Joined: Sep 29, 2012 - 2:40pm
I agree...that's probably the best-modeled depiction of a boat in shallow water -- or any water -- I've ever seen...
Reminds me of looking over the side of one of my Dad's work boats at the dock at the old Yacht Haven on St. Thomas...could see clear to the bottom just five or six feet below, when there was no surge and the water was clear...
Posted By: Drew Cook | Posted on: Oct 17, 2014 - 1:47pm
Total Posts: 1306 | Joined: Oct 19, 2006 - 10:44am
Beats me how he did it. I think that must be a clear rod coming out of the hull. There are about twenty photos, I think on the DETAIL AND SCALE site.
Will
Posted By: Will Day | Posted on: Oct 17, 2014 - 4:26pm
Total Posts: 1955 | Joined: Oct 8, 2006 - 4:19pm
When you look at the rest of the photos, you almost wonder if it could somehow be real water (except for the hull activity).
Will
Posted By: Will Day | Posted on: Oct 17, 2014 - 4:30pm
Total Posts: 1955 | Joined: Oct 8, 2006 - 4:19pm
That is probably the best looking water I have seen.
Here is another from the Viet Nam era that is also very convincing:
[url]http://cs.finescale.com/fsm/modeling_subjects/f/7/t/156055.aspx?sort=ASC&pi240=1[/url]
Nice job lads!
Posted By: Jimmy | Posted on: Oct 17, 2014 - 5:27pm
Total Posts: 2 | Joined: May 3, 2022 - 11:08am
@ Drew: The complete set of photos are on Rory Pennington's FB site under "Timeline Photos".
Will
Posted By: Will Day | Posted on: Oct 17, 2014 - 5:54pm
Total Posts: 1955 | Joined: Oct 8, 2006 - 4:19pm


