The PT Boat Forum
http://www.ptboatforum.com/cgi-bin/MB2/netboard.cgi
ģ Forum Category: PT Boats of WWII
http://www.ptboatforum.com/cgi-bin/MB2/netboard.cgi?cid=101&fct=showf
ģ Forum Name: PT Boats - General
http://www.ptboatforum.com/cgi-bin/MB2/netboard.cgi?fct=gotoforum&cid=101&fid=102
ģ Topic:
PT490 1/35th Italieri conversion build
http://www.ptboatforum.com/cgi-bin/MB2/netboardr.cgi?cid=101&fid=102&tid=3232
Hi all, a PT modelling newb here
I'm currently building the Italieri 1/35th PT-596 kit but building it as a slightly earlier variant. I'd planned a pretty much OOB build but things got rather out of hand
I must admit I didn't realise there were so many differences till the razor saw was out and blood had been spilt. Just got to work out how to post pics so bear with me if it goes awry.
David Waples has been a big help already helping me decide which boat to do and offer advice.
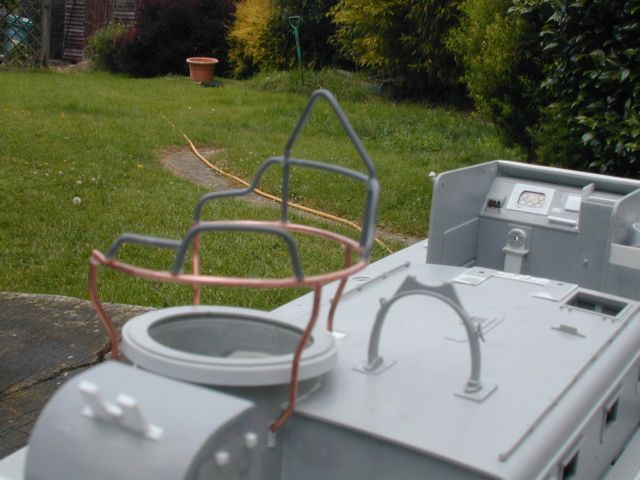
[URL=http://s35.photobucket.com/user/kornbeef/media/PT-490/PT49003_zps1c4bab75.jpg.html][IMG]http://i35.photobucket.com/albums/d190/kornbeef/PT-490/PT49003_zps1c4bab75.jpg[/IMG][/URL]
Just the first attempt to post a pic, it's the Bronco 40MM and the first of the mods to the engine room top deck (please forgive any mis-naming of parts, I normally do WW1 A/c in 1/32 scale recently.
I've other pics but want to ensure this works first.(any help would be appreciated here too)
Of course I'll be begging information and some far more expert knowledge than mine on my way.
Current biggest head ache is what's actually in the wheelhouse area. It would appear there is no armour behind the wheel area from what pics I've scrounged but I'd like a clearer idea of what else in the way of equipment ect is missing from the kit.
Keith
Never to old to learn something
Doesn't stop me forgetting the obvious though
Posted By: Kornbeef | Posted on: Jun 27, 2013 - 4:50am
Total Posts: | Joined: Unregistered
Hi Keith,
Welcome! First let me help you with posting the image. Using the sharing method you selected you need to make the following changes...
1. Delete the string up to [IMG]
2. Change the [IMG] at the beginning of the string to [IMAGE]. Just type it in.
3. At the end of the string change [/IMG] to [/IMAGE]
4. Delete the [/URL] from the end of the string.
That's the hard way... the easier way from photobucket is to use the HTML coding from the sharing options. No editing is required. It's just a very long string of code. That's what I've been using lately.
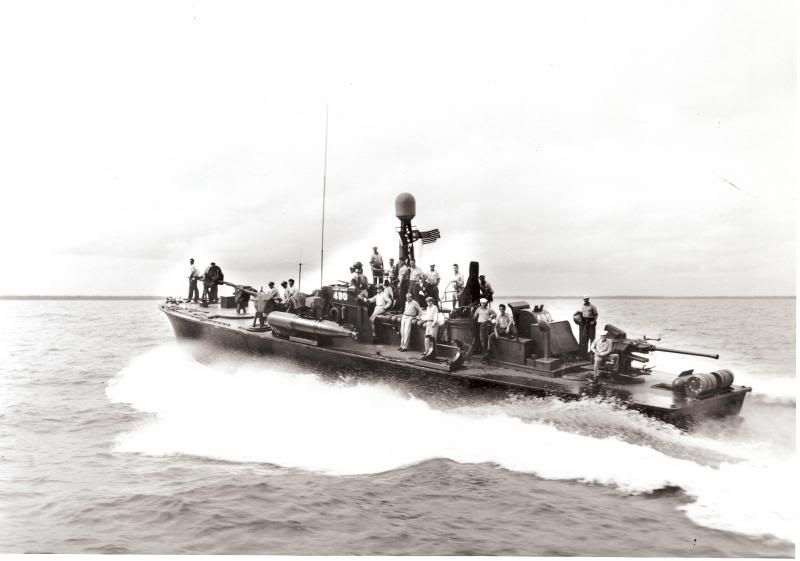
Back to the 40mm. The Bronco kit looks very nice. Did you decide on the 490 boat? I couldn't remember??? The only thing that comes to mind looking at her is that I don't know if you need the round pad under the 40mm mount. The photos I've seen have the base mounted directly to the deck or to a rectangular pad which seems to be different on different boats. Unless you have some photo references that show otherwise I would go with a recantular pad.
Here's your photo after I made the corrections.
Dave
[IMAGE]http://i35.photobucket.com/albums/d190/kornbeef/PT-490/PT49003_zps1c4bab75.jpg[/IMAGE]
David Waples
Posted By: David Waples | Posted on: Jun 27, 2013 - 4:58am
Total Posts: 1679 | Joined: Jan 2, 2007 - 9:55pm
Hi David, Yes I went for the 490, maybe not the easiest option looking back but that's me.
The Bofors mounting is something of a mystery yes. On that pic you sent of her at sea to me theres a deffinate circular base but the whole gun assembly seems lower. I'm sort of at a quandary of how its mounted other than that. The standard mounting with the kit and accessory set seem way too tall but it may be perspective issues.
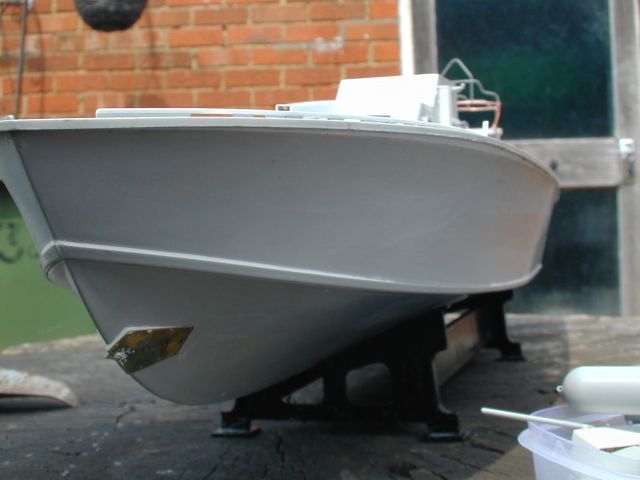
What I did notice was the height difference of the decking over the engine room, it actually appears to taper down towards the rear possibly because the stern kicks up. Mine doe but it starts after that point....grrr. Now having split the hull from the deck twice already I decided to not notice so much.
Honestly there are a lot of differences between the 596 kit and the mid range boats and modding the 109 kit up would likely have been easier apart from the torpedo arrangement of course, not that that appears right anyway from what I see.
It's fun... spent 2 days fiddling with the spray shield for the rear turret before I noticed 490 hasn't one.... expletives ensued I can say. laughs.
I knew there was an issue with how to post pics so TY so much for your swift response and I'll post further pics correctly I hope, 1 at a time at first... I don't yet have edit abilities so my Faux pas has to stand for now.
Cheers Keith
Never to old to learn something
Doesn't stop me forgetting the obvious though
Posted By: Kornbeef | Posted on: Jun 27, 2013 - 5:59am
Total Posts: | Joined: Unregistered
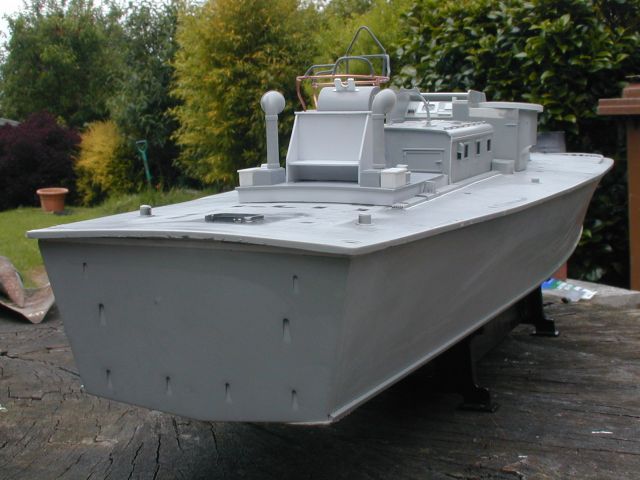
Okay, here is another attempt to post.
One shot if this works I'll post more later.
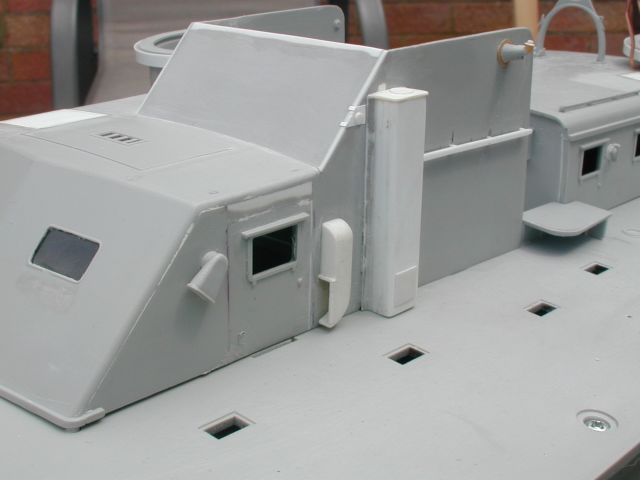
So nothing is firmly fixed, all are sub assemblies still. Due to the mods to the side windows I see the chartroom walls need bracing a little.
Keith
Never to old to learn something
Doesn't stop me forgetting the obvious though
Posted By: Kornbeef | Posted on: Jun 27, 2013 - 6:26am
Total Posts: | Joined: Unregistered
You might want to get in touch with Ed Casacia. He did the 495 not too long ago.
Ray
Posted By: Ray Wilbur | Posted on: Jun 27, 2013 - 9:03am
Total Posts: | Joined: Unregistered
Ed's build of 495 was one that inspired me,
Here's the pic that I've used to attempt to interperate 490 to the best if my limited knowledge.
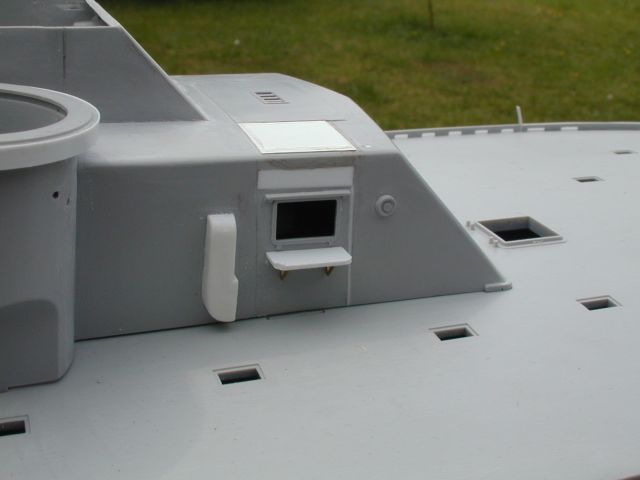
I'd spent 2 days working on the spray shields for the rear turret before realising she didn't have them fitted at this point at least. Also that the guard rail appears to have a section removed. The Engine decking is taller on this too compared to the kit. Lots of small details can be gleaned, not so good for the AMS afflicted like me. LOL
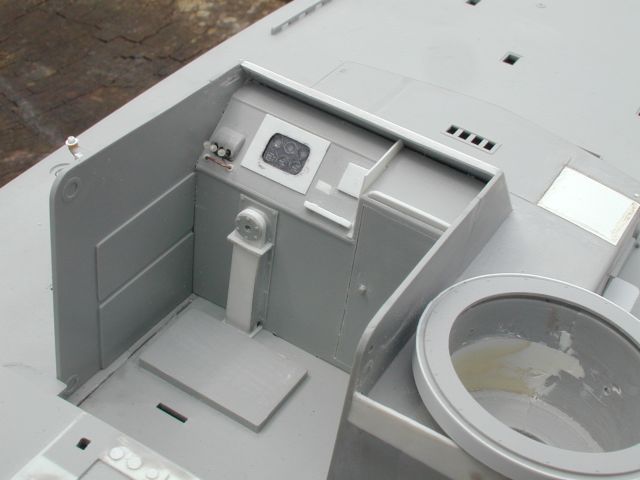
The Wheel house and chart room.
All very much WIP and if anyone see's any glaring errors or has advice please shout up.
Looking at the 190 kit David and others are working on I now realise perhaps that would have been a better place to start. I'm having to scratch a lot of things that appear to be in that kit.
So a few of the mods I've done so far,
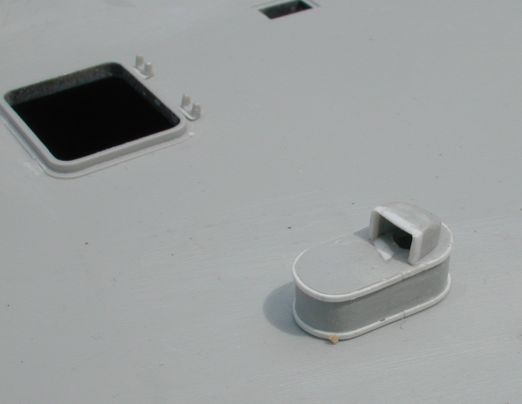
Lowering the side charthouse windows, opening the charthouse front windows (that was fun...) scratching the antenna base and the lamp mount on the left of the wheelhouse, adding ventilation intakes etc and modding the controls. I'm sure the charthouse door needs the window added but. I'd really appreciate some detail of what else is installed within the open wheelhouse. I see junction boxes cables etc but not in enough clarity to scratch them.
The lip of the wheel house is all wrong and has taken some thought, I've a upper panel to add once I get the instrumentation and controls done.
Main Hull and details
I'm suspicious that the large door on the rear of the day room may be wrong but I can't upto now verify that. I changed the mast mounting area, I've leant the dayroom forwards added the better detailed mast rest from the accessory set.
one or two shots of bits I'm attempting to detail a little more. Dissecting the mast to add the openings was fun. I need to finish the upper part and add some bolt details and cable routes once I'm closer to working out what runs where.
So that's where she is right now. lots of other small detailed bits in progress, jumping around this build like a spring hare.
Any critique or advice is always more than welcome.
Thanks Keith
Never to old to learn something
Doesn't stop me forgetting the obvious though
Posted By: Kornbeef | Posted on: Jun 27, 2013 - 1:03pm
Total Posts: | Joined: Unregistered
Keith,
Could you please drop me an email at jgbeas@comcast.net as I have a question on how you did something that I am starting to work on and would like the benefit of your experience.
Thanks
Jerry Beasley
Posted By: Jerry Beasley | Posted on: Jun 27, 2013 - 1:28pm
Total Posts: 89 | Joined: Jan 9, 2008 - 4:27pm
Jerry, email sent. yell if you don't get it.
Keith
Never to old to learn something
Doesn't stop me forgetting the obvious though
Posted By: Kornbeef | Posted on: Jun 27, 2013 - 3:14pm
Total Posts: | Joined: Unregistered
Really nice work. You are doing a great job. It looks like you are doing a better job than I did on the 495 boat. I'm looking forward to following your progress. If I can be of any assistance, please let me know. Here is a link to some Ron 33 photos I collected.
[url]http://s1110.photobucket.com/user/ducati650/library/PT%20Squadron%2033[/url]
Posted By: ducati650 | Posted on: Jun 27, 2013 - 3:15pm
Total Posts: 450 | Joined: Feb 19, 2007 - 10:01am
Hi all... it's me. had my PC rebuilt and lost my password and to compound it I'd changed email provider too so made things difficult to retrieve my PW...
Anyway I've made progress. Getting the PT-109 kit for Xmas has sort of slowed it down though.
I got out between rainbursts and shot a few pics. Hopefully soon more will follow... PT-1XX has drawn my attention away from this build but what I'm learning there is being incorporated into this build too. A lot of parts will be re-remodified as I go.
[image]http://i35.photobucket.com/albums/d190/kornbeef/PT-490/PT49017_zpscc6aa64e.jpg[/image]
Just rough scratched interiors for the open deck hatches. I really have to thank so many guys here on the PT Boat forum & Jeff Davidsons excellent build & website at PT103.com for being so helpful with this and countless other AMS related issues I have. 
[image]http://i35.photobucket.com/albums/d190/kornbeef/PT-490/PT49016_zps1fedefe6.jpg[/IMaGe]
The ammo locker. Hard to find evidence of this and I used a LOT of guess work. Documentation said it existed. photographically I only found one shot that suggested it did hidden away behind someones legs.
[IMaGe]http://i35.photobucket.com/albums/d190/kornbeef/PT-490/PT49016_zps1fedefe6.jpg[/IMaGe]
the 5th rendition of the engine room hatch and air intake. Finding copies of the Elco drawings for this was just to much for AMS to leave it alone. Still hatches and catches to add and the tiny details.
[Image]http://i35.photobucket.com/albums/d190/kornbeef/PT-490/PT49016_zps1fedefe6.jpg[/image]
The hatch for the above & one of thwe four Torpedo racks halfway through my attempt at detailing them up. All things said I think these are probably the poorest represented part of the Italeri kit. A bugger to correct to if you have Fat finger syndrome.
Keith
Posted By: Kornbeef01 | Posted on: Jan 28, 2014 - 1:37am
Total Posts: | Joined: Unregistered
ugh sorry guys forgot about the image links thig... My bad.
Posted By: Kornbeef01 | Posted on: Jan 28, 2014 - 1:38am
Total Posts: | Joined: Unregistered
Nice Kieth, it is coming along most excellently. I'm glad you're making good use of my renderings, Stu Hurley's build, and the Elco drawings Dick Washichek had scanned and allowed me to post. I see the 1XX build is coming along well too.
Although I'll have to get out my jewelers loupe to be certain, the bolt count looks right. If not too much trouble, you might want to straighten out the chart house ammo locker though, it wasn't tilted 3 degrees like the turret, the top and bottom are parallel to the water line.
You AMS modelers are amazing to me. I certainly couldn't match the work you do. Or the interest in all things PT you generate.
Kieth's album link: [url]http://s35.photobucket.com/user/kornbeef/library/PT-490?sort=9&page=1[/url]. The casting of Vampirella is awesome, even unpainted it made my juices flow!
Posted By: Jeff D | Posted on: Jan 28, 2014 - 4:22am
Total Posts: 2200 | Joined: Dec 21, 2006 - 1:30am
Keith;
Your work is looking good Keith, Do you have anymore photos of that B-17G you can load into photoshop? I see I am going to have to step up my game with my PT 599 and PT600 models.
Take care,
TED
Posted By: TED WALTHER | Posted on: Jan 28, 2014 - 5:32pm
Total Posts: 3059 | Joined: Oct 16, 2006 - 7:42am
Keith,
They both look to be coming along nicely.
Watch out for the tube pad locations on your 103 class, (they are too far aft in the kit) and the decklight positions, although most boats had them painted over so you could just fill them and place the etched frames in the correct locations. The front lip on the charthouse also needs removing and replacing with an L shaped bracket. One other small detail, I am pretty sure the capping of the bridge wings did not extend over the inside face. They were only on the outside. I don't mean to criticise just trying to help, as you obviously care about the little details, judging by your work on the Albatross DV 
How bad are the roll off racks in the 596 kit? is it worth me buying the kit for them, or just scratch building them for my 195?
If it's not too late can you reduce the camber on the deck at the stern of your 490? the basic kit is pretty much O.K in this respect. On my build I just added a straight piece there under the deck to kick it up a little.
Best Regards,
Stu.
Posted By: Stuart Hurley | Posted on: Jan 29, 2014 - 2:32am
Total Posts: 255 | Joined: Mar 19, 2013 - 3:32am
Hi Keith,
Going by the photo on the first page the 40mm has a round deck support as you have built but the support for the gun itself is an 8" -10" round strut bolted in the centre of the deck support. The height of this strut is set so that the rear platform of the 40mm is just above the height of the engine room hatch curvature.
Hope this helps.
Yours,
D.buck
Posted By: David Buck | Posted on: Jan 29, 2014 - 3:52am
Total Posts: 332 | Joined: May 4, 2008 - 2:59am
Hey thanks guys, always encouraging to get feedback and advice. Any advice is always welcome. better now than when she's painted. I must do a separate blog for the early boat though.
Ted
The old B17 is a hanger queen from years ago sitting in the loft.. I took those snaps to help someone on Aeroscale who wanted to show damage. To be honest I can't remember how far I got with her now (I have 2 kits and was intending building one use the other for parts and make 3d profiles out the fuselage mounted in a picture frame... Hasn't happened. Laughs
Jeff
I will sort that ammo locker out, It will scream at me now till I do so. Your website has been so informative and inspiring. Solved a lot of head scratching just by reading as well as using the images as reference.
Stuart
Yes I caught the tube mounting pads theyre moved forwards to match what reference I found, the rear ones brought inline with the section on the control rod shrouding. The fronts were guestimated from drawings and photo's. I haven't took the brave pills to tackle the decklights yet. I'm gleaning a lot from your informative build I have to admit.
The 596 racks would require an incredible amount of work. moulded each torpedo rack arm (for want of a better word) is in two parts, one is thicker than the other both are well overscale in thickness. The claw and the hook that close around the torpedo are moulded integrally. None of the lip around the edge is portrayed either. The base is quite basic and the wooden bar across the front is wrong for most boats too. All in all rather simple and fanciful in interpretation. seeing your work on 109 I can't imagine you would be happy with them. The amount of work thinning, chopping and adding to them makes them probably as easy to scratch. I would have but the thought of making 16 sides put me off.
David
That 40 mount has been a point of much discussion and been arranged 3 times and removed. Finally after hijacking another thread here I found a pick if PT's being dismantled at Saumar and lo and behold 2 have the low mount peeking out from amongst the heaps of salvaged paraphernalia on the sadly doomed boats deck It's remarkably similar to the top of the carriage as supplied by Bronco so I've installed it and the gun sits close to how it looks in the pic of 490 at sea earlier in the blog. http://i35.photobucket.com/albums/d190/kornbeef/PT-490/120511401_zps8df245bc.jpg
Thanks for the comments guys and once again don't hesitate to point out any mistakes, I welcome it actually.
Cheers Keith
Posted By: Kornbeef01 | Posted on: Jan 29, 2014 - 11:33am
Total Posts: | Joined: Unregistered
Welcome back Keith! The build is looking very good. I hope you're having fun with it.
My friend Jerry is working on the Bronco 40mm Bofors. They really did a nice job with that one! I'm tempted to pick one up myself! I'm glad to hear it worked out for you.
Keep it coming!
Dave
David Waples
Posted By: David Waples | Posted on: Jan 29, 2014 - 7:37pm
Total Posts: 1679 | Joined: Jan 2, 2007 - 9:55pm


