| Author |
Topic: 80' ELCO engine room hatches |
|
Bob Steinbrunn

Advanced Member

|


 Posted on: Jan 19, 2017 - 8:22am Posted on: Jan 19, 2017 - 8:22am
|
After perusing a gazillion photos and blueprints during the course of my 1/48 scale 80' ELCO, PT 187, it appears to me that there were three iterations of the engine room hatch on these boats.
The early boats - as represented in the BlueJacket Ship Crafters kit - have the small hatch (#1).
Later boats have a larger hatch which looks like a giant airscoop and the entrance door overlaps the hatch framework on either side (#2). This is the one I'm scratch-building.
Yet a third hatch variation seems to coincide with the installation of the 40mm Bofors. This hatch is much wider than #2 and the entrance door is narrow and does not overlap the hatch framework.
Is this supposition correct?
I've had to scratchbuild #2 hatch from .020" sheet styrene and Dick's DVD with blueprints of this was instrumental in allowing an accurate representation to be built. So, thanks, Dick!
Cheers!
--Bob |
Total Posts: 134 | Joined:
Jan 23, 2016 - 9:16am | IP
Logged
|
|
Jeff D

Moderator

|
Posted on: Jan 19, 2017 - 9:07am
|
Ah yes, 2006 the bad old days before Dick put out his DVD. A better reference would be the drawings Dick kindly let me put up on this page: http://www.pt103.com/Italeri_PT109_Kit.html#enginehatch
Basic measurements of the 1st hatchway style (PT 103-186 according to the drawings) I did for the guy making a full scale model:
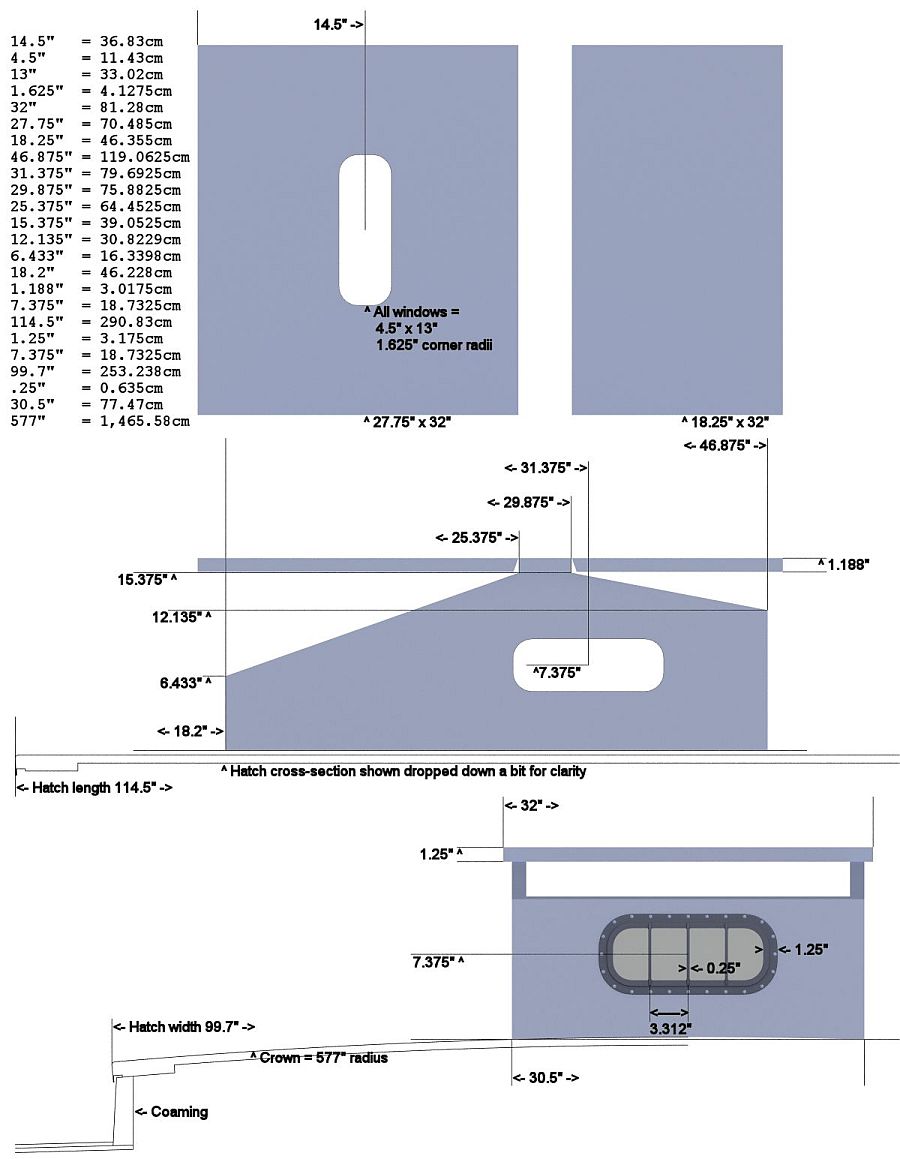
I've noticed some of the larger hatchways on earlier boats also.
|
Total Posts: 2200 | Joined:
Dec 21, 2006 - 1:30am | IP
Logged
|
|
Bob Steinbrunn
Advanced Member
|
Posted on: Jan 30, 2017 - 10:14am
|
Thanks Jeff. As always, your CAD drawings and information are most illuminating, to say nothing of astonishing.
I've had to scratch-build the second engine hatch (narrow) out of various thicknesses of sheet and strip styrene in order to depict the correct one for PT 187. Any possibility you have a drawing of this? I used the blueprints from Dick's DVD to make this in 1/48, and it was a big help to have a pair of proportional dividers.
Cheers!
--Bob |
Total Posts: 134 | Joined:
Jan 23, 2016 - 9:16am | IP
Logged
|
|
Jeff D
Moderator
|
Posted on: Jan 30, 2017 - 4:31pm
|
Nice work Bob! That's going to be a helluva model. 
If you're asking if I have a dimensional drawing of the later hatchways like the one above, no.
|
Total Posts: 2200 | Joined:
Dec 21, 2006 - 1:30am | IP
Logged
|
|
David Waples
TOP BOSS

|
Posted on: Jan 31, 2017 - 7:00pm
|
Hi Bob,
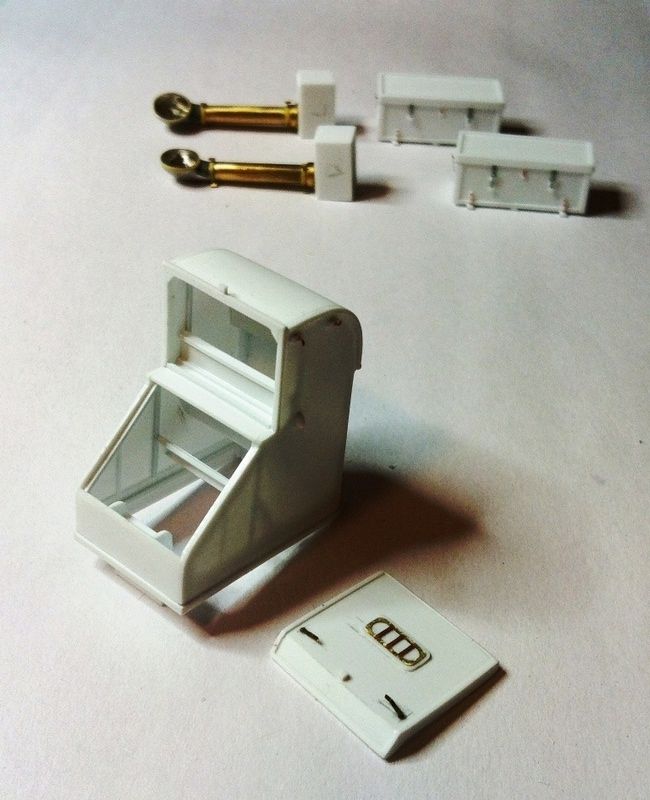
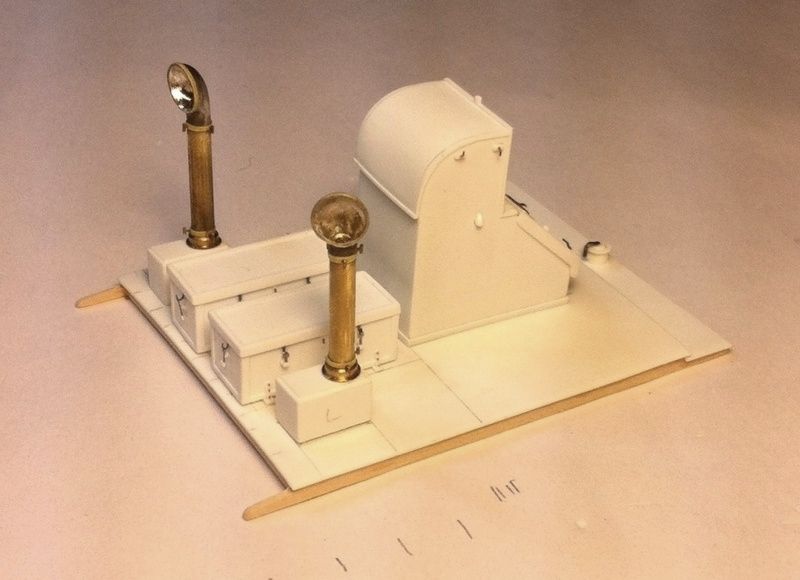
I've been wondering about your build. Glad to see it continues to move forward. What caught my eye were the cowl vents in brass. Can you share with us how you made those? They look terrific!
Dave
David Waples |
Total Posts: 1679 | Joined:
Jan 2, 2007 - 9:55pm | IP
Logged
|
|
Bob Steinbrunn
Advanced Member
|
Posted on: Feb 1, 2017 - 10:44am
|
Hi David,
I'd be glad to. The britannia pewter cowl vents as given in the BlueJacket Ship Crafters 1/48 kit were molded somewhat off-center and had an oblong cross section. I cut the cowls off the intake pipes, hollowed them out with a round bur in a Dremel, then drilled the intake holes. Brass tubing was then fashioned as new intake pipes, then detailed with thin sliced masking tape and bits of photoetch fret to make the flanges and locking thumbscrews. Dick's DVD was essential in viewing all these items so I could duplicate them as best I could.
Cheers!
--Bob |
Total Posts: 134 | Joined:
Jan 23, 2016 - 9:16am | IP
Logged
|
|
|