| Author |
Topic: Curious error in the kit |
|
alross2

TOP BOSS
|


 Posted on: Dec 3, 2012 - 7:11pm Posted on: Dec 3, 2012 - 7:11pm
|
OK, I'll start with I really, really like this kit. 
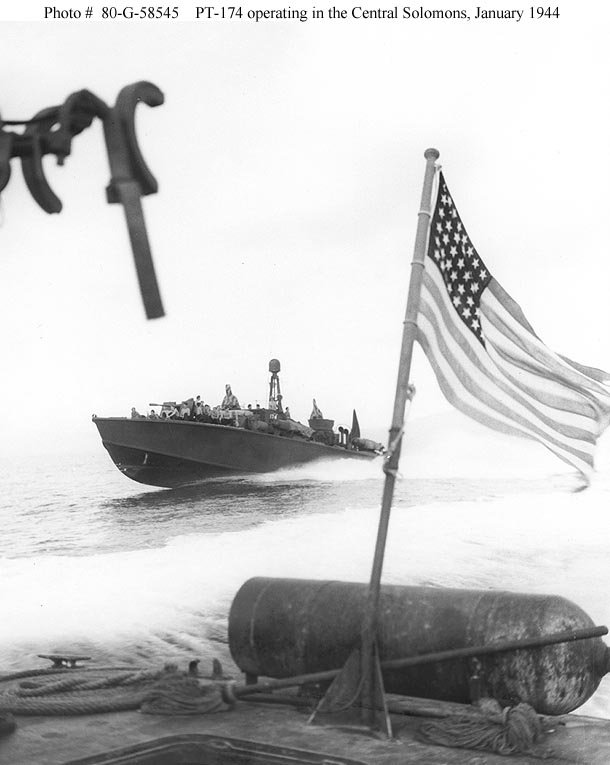
But, for some reason, Italeri chose to put a raised rim with what appear to be simulated rivets around the deck edge.  It doesn't appear in the Type Sections drawings or the plan views, nor is it visible in the photos at which I looked. It doesn't appear in the Type Sections drawings or the plan views, nor is it visible in the photos at which I looked.
Check out this one of 103:
The deck edge is perfectly flush with the top of the deck. I think what they did was misinterpret the rabbet in the covering board.
Al
|
Total Posts: 993 | Joined:
Oct 30, 2006 - 8:19pm | IP
Logged
|
|
Will Day
TOP BOSS

|
Posted on: Dec 3, 2012 - 9:31pm
|
In addition, that's a nice CU of how the hulls got dinged up just from normal use......
Will |
Total Posts: 1955 | Joined:
Oct 8, 2006 - 4:19pm | IP
Logged
|
|
Jeff D
Moderator

|
Posted on: Dec 4, 2012 - 2:02am
|
That's odd. Does their 596 model have the same rim / rivets?
Another oops is the sternlight. Included is the one for PTs 565-624 which looks like a mini anchor light sitting on a shelf. It should be an easy enough fix.
|
Total Posts: 2200 | Joined:
Dec 21, 2006 - 1:30am | IP
Logged
|
|
David Waples
TOP BOSS

|
Posted on: Dec 4, 2012 - 4:56am
|
Hi Al,
I'm glad you like the kit but it does have a few issues. I wrote a full review for model warships.com and am waiting to post anything additional until it appears there first. But the rim detail is something I commented on. Also at the stern there's some unusual frame scribing. The 596 kit is designed the same way. Although they completely remade the deck they used the same assembly technique using screws and screw covers for assembly. From talking with Massimo they're not satisfied with it but didn't know what else to do. I know when I build her I will remove all of that rim riveting and rescribe the stern planking.
You'll also notice that the bow curves down as it should but the stern does not have the upward flare that it should. If you set it down on something perfectly flat you'll see that the hull top is perfectly flat except for the bow. An easy fix with some styrene on about the last 10 scale feet of the hull should fix that along with some correction of the trim to match the new contour of the deck (if that makes sense). Or... you could just not worry about it. :-)
The other big issue is the armor on the port side of the helm. Unless you want to model the boat with the armor removed, and some of them were as we've seen in photos, you'll need to cover the framing with some thin plastic stock or brass and delete the small piece of photoetch Italeri provided. They're aware of the error now and have said they will fix it in future releases.
Dave
David Waples |
Total Posts: 1679 | Joined:
Jan 2, 2007 - 9:55pm | IP
Logged
|
|
Jeff D
Moderator
|
Posted on: Dec 4, 2012 - 5:25am
|
I look forward to your review David.I'm glad that for the most part it is a faithful rendition. If you and Al like it, you know its good.
Here's a shot of what the sternlight looked like on the 103-196 & 314-367 + boats, it's the slightly larger diameter section about half way up from the base:
|
Total Posts: 2200 | Joined:
Dec 21, 2006 - 1:30am | IP
Logged
|
|
David Waples
TOP BOSS
|
Posted on: Dec 4, 2012 - 5:59am
|
The correct stern flagstaff and light is included in the kit. I'm not sure why they threw in the newer style. As mentioned before there are also two cockpit options with different style doors. I have to tell you I will probably be tempted to make that flagstaff out of brass tubing. and maybe incorporate a wood flagstaff as in the photo. Our glimpse of the 109 shows the flag back there since there is no mast on the 109. We've seen this on other Elco's with no mast. Thanks for the picture Jeff!
Dave
David Waples |
Total Posts: 1679 | Joined:
Jan 2, 2007 - 9:55pm | IP
Logged
|
|
| |
TED WALTHER |
TOP BOSS

|
Posted on: Dec 4, 2012 - 6:31am
|
You Guys are great!
By the time mine gets here, all the kinks will be set straight, Thanks!
Al, thanks for reposting the PT 103 "Robert Mongomery" photo, as it shows the deck edge very nicely.
Take care,
TED
|
Total Posts: 3059 | Joined:
Oct 16, 2006 - 7:42am | IP
Logged
|
|
PeterTareBuilder
TOP BOSS

|
Posted on: Dec 4, 2012 - 12:24pm
|
Quote:
I look forward to your review David.I'm glad that for the most part it is a faithful rendition. If you and Al like it, you know its good.
Here's a shot of what the sternlight looked like on the 103-196 & 314-367 + boats, it's the slightly larger diameter section about half way up from the base:
|
|
Are those mops in font of the smoke generator the ones used to paint the boat? VBEG ;<)
A very nice sharp and clear photo.
Thanks and cheers
"Give me a faster PT boat for I'd like to get out of harm's way!" |
Total Posts: 494 | Joined:
Jun 24, 2008 - 5:59pm | IP
Logged
|
|
Jeff D
Moderator
|
Posted on: Dec 5, 2012 - 5:59am
|
One thing I noticed on the photo etch was the bridge windshield parts are all one piece. Do the instructions call for cutting it apart? The only pieces on the outside should be the corner angles and center strip. It should be a real easy fix if not. Here's a render of it, the black strips are actually rubber strips under the plexiglass and not framing:
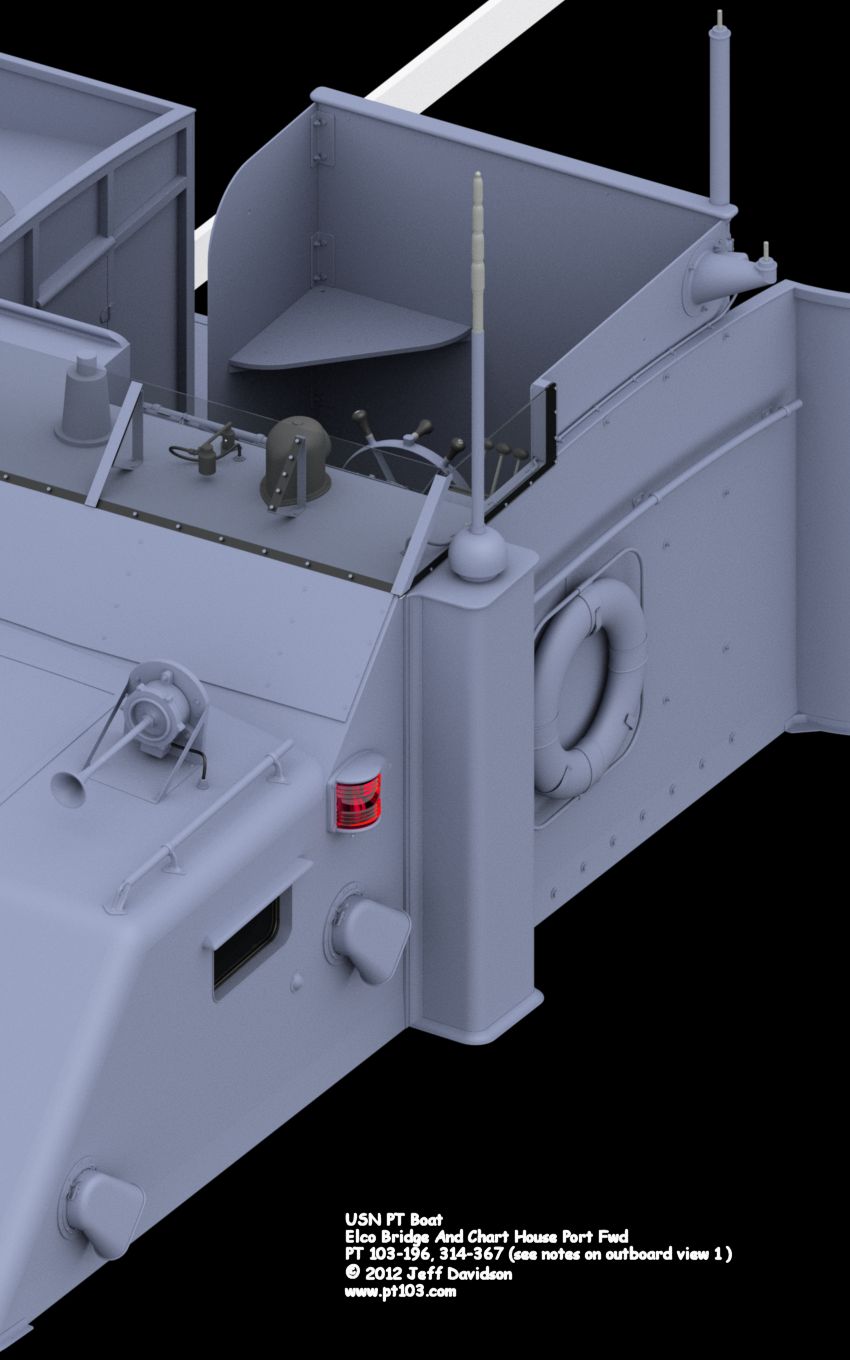
Here's a shot from Gene's site, note the underlying rubber:

|
Total Posts: 2200 | Joined:
Dec 21, 2006 - 1:30am | IP
Logged
|
|
David Waples
TOP BOSS
|
Posted on: Dec 5, 2012 - 6:05am
|
The instructions do not call for cutting it apart. Definitely something I will be paying attention to on the build. Many of the boats, like the 109, painted the windshield but I think I would remove the bottom section of the photoetch and probably replace with some small rivet detail on the exterior of the windscreen. Great observation Jeff.
Dave
David Waples |
Total Posts: 1679 | Joined:
Jan 2, 2007 - 9:55pm | IP
Logged
|
|
|